AI Autotagging Operation
Background
AI Autotagging is designed to automatically classify (tag) unstructured content, helping to organize and analyze text data at scale. This tagging leverages datasets that include a column of text you want to classify automatically. This is commonly used for social media posts, open-ended survey responses, customer feedback etc.
How it works
To demonstrate how the AI Autotagging operation works, we’ll walk through an example from the perspective of a marketing analyst looking to identify trends in social media posts related to their product category.
The AI Autotagger can process both raw text content (e.g., user reviews) and links to embedded text from other applications (e.g., content pulled via the Google Search app).
You’re not required to provide any example data, keyword lists, or boolean logic for the model to begin tagging. However, if you do have example tags you’d like the AI to learn from, you can optionally upload them to guide the tagging behavior. Either way, the tagger will apply any custom tags you’ve specified and can also surface organic themes it identifies in the content.
Each row in your dataset should contain one 'entry'. Each entry can be assigned multiple tags if applicable.
Configuring the AI Autotagger
- Select the AI Autotagging operation and click Edit to enter the configuration page.
- Name your configuration by clicking the pencil icon next to “Edit Configuration.”
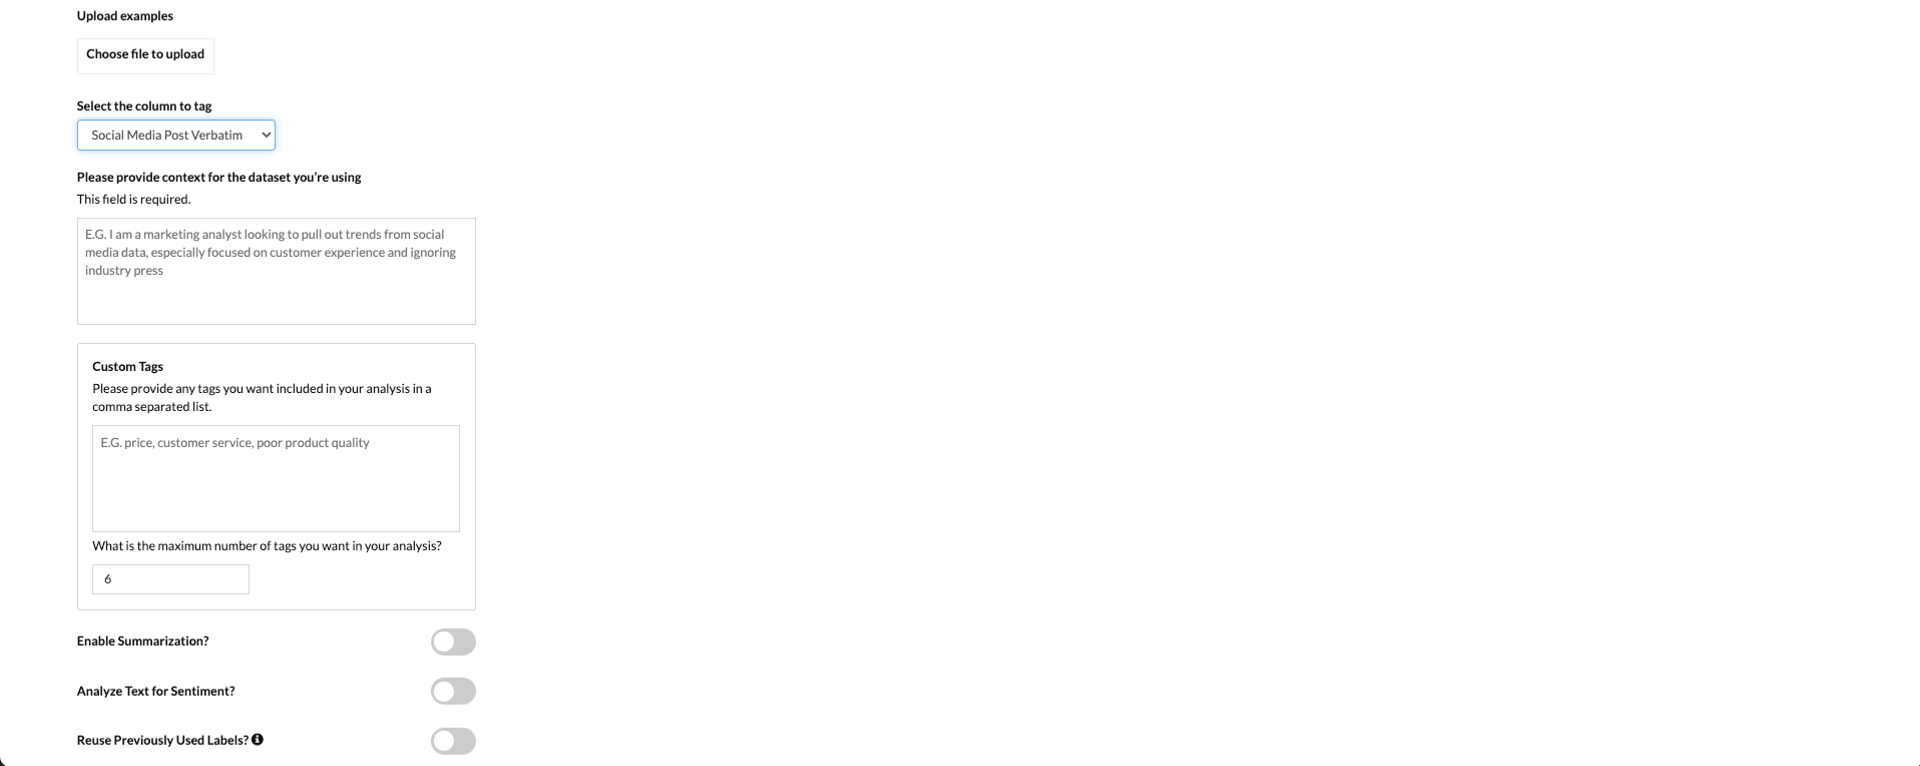
- Upload Example File (Optional)– If you have example data that reflects how you’d typically tag content, you can upload it under the Upload Examples section by clicking Choose file to upload.
- The file must be a CSV with the following schema (column structure): Content | Tag | Sentiment
- If there are multiple tags for one content item, include them as comma-separated values in the same row.
- The Sentiment column must exist but can be left empty if you are not tagging for sentiment.
- Select the Column to tag - (Required) Choose the column containing the text you want classified. This could be raw unstructured content or links (references) to files with the content you wish to tag.
- Provide Context - (Required) Add a natural-language description of your data, what you’re hoping to achieve with tagging, and any relevant instructions or areas of focus including what to include or exclude. This context helps guide the AI in how to interpret and apply tags.
For example: “I am a marketing analyst looking to pull out trends from social media data, especially focused on customer experience and ignoring industry press.” - Add Custom Tags - (Optional) If you already know the themes or concepts you want to tag, you can list them here. For example: price, customer service, poor product quality. You can leave this blank for a fully exploratory (greenfield) analysis.
Tip:If you provide custom tags but also want the AI to find additional themes organically, make sure the maximum number of tags (next step) is set higher than the number of custom tags.
- Set the Maximum Number of tags - (Required). Specify the maximum number of classification tags you want the operation to return.
Additional Functionality
You can optionally enable the following features:
- Summarization – The AI will generate a one-sentence summary for each text entry. This is especially helpful for long-form content and can be used in downstream analytics.
- Sentiment Analysis – The AI will assign a sentiment label (positive, negative, or neutral) to each piece of content.
- Reuse Previously Used Labels – The AI will retain the set of tags it used in a previous run, ensuring consistency across updated datasets.
- If enabled, previously generated tags are cached and reused—even if the input content changes.
- Unchecking this option resets the cache, allowing the AI to generate a new set of tags from scratch.
- Note: Changing the maximum number of tags will automatically reset the cached labels.
Once your setup is complete, click Save, then run the macro to generate your results.