Macros - An Overview
Background
A substantial portion of time is often dedicated to manual data processing tasks prior to generating an analytical output. These tasks typically include data cleaning, transformation, deduplication, the creation of calculated columns or fields, and the preparation of data for data science models.
The most efficient way to do this in Redbird is via natural language using our AI Data Tool - see here for more info.
However, an alternative can be to leverage a set range of prebuilt point and click processes called operations that sit within Macros. The Macro feature within the Redbird platform is designed to streamline and automate these repetitive data processing tasks through an intuitive, no-code, point-and-click interface.
A macro contains building blocks called operations that get executed in sequence to transform your dataset. For example, let’s say your monthly workflow consists of the following steps:
- Combine two datasets
- Deduplicate the data based on the value in a specific column
- Aggregate two metrics to create a new derived metric
In Redbird, you can create a macro that is attached to an unprocessed dataset with operations to accomplish the above steps. After you run the macro, you will obtain a processed, automated analytical output. In the future, when the unprocessed dataset gets updated with the most recent month’s data, the macro you configured automatically processes the data in the same way, thus saving time.
In addition, Redbird lets you reuse macros associated with one dataset by mapping it to a completely different one that requires the same processing steps.
Key Terms and Definitions
- Macro: A macro is a feature in Redbird that enables the automation of tedious data processing steps. It contains a group of operations that are executed in sequence to transform the data. Macros are always attached to a dataset.
- Operation: An operation is a building block, configured by the user, to perform a specific action on an unprocessed dataset. Operations can be joined together in a macro to perform everything from basic ETL functionality to more advanced analytics like statistical analysis and data science modeling.
- Base Dataset: The base dataset refers to any dataset that will serve as an input for a macro (this could be a raw, unprocessed dataset or an output of another macro).
- Processed Dataset: The processed dataset is the first and primary output produced by a macro. It contains the transformed data and will include new rows or columns added by the macro. You can either use this dataset in your analytical outputs directly or create another macro on top of it.
- Secondary Dataset Outputs: Certain Macros generate additional datasets beyond the primary output. These secondary outputs will either appear directly on the workflow canvas or may initially be hidden. Hidden outputs can be revealed through the Connections section in the right-side panel, accessible from the Macro node itself.
- Summary Output: Certain operations (e.g. data science and text analytics) generate interactive summary outputs (which are not datasets). In the case of a data science operation, summary statistics give you more information about supervised and unsupervised model statistics. In the case of a text analytics operation, summary statistics give you more information on trends and topics that were identified. These summary outputs will either appear directly on the workflow canvas or may initially be hidden. Hidden outputs can be revealed through the Connections section in the right-side panel, accessible from the Macro node itself.
- Macro Builder: This is the canvas where operations are added to the macro. You can add or edit operations, change the order of the operations, and add annotations to the operations on the macro builder.
- Operation Library: The operation library contains all the pre-built operations supported within Redbird. You can either use the search bar or click through the categories to find the operation you want from the library.
How It Works
A macro executes its operations in sequence to transform an unprocessed base dataset and produce one or more processed outputs. The macro always works with a copy of the base dataset, which remains untouched. There are three main output types:
- The processed dataset contains the primary output of the macro.
- New datasets that are output from certain operations.
- Other outputs that are not datasets. These can either be summaries generated by data science and text analysis operations, or trained data science models themselves which can be used for predictive analytics.
You can utilize output datasets to create analytical outputs such as dashboards, download them as files, push them directly to a data warehouse or cloud storage, or use them as inputs for additional Macros and further data processing.
Building a Macro
A macro is always attached to one base dataset.
How to Create a Macro
- Navigate to the workflow canvas where your dataset is. Click on the plus icon to open the left-side panel, then click on the process section to expand it.

- Drag the Macro Node onto the canvas, placing it to the right of the dataset node. Then connect them by clicking and dragging a line from the circle on the right side of the dataset node to the circle on the left side of the Macro node. A connecting line (or “arm”) will appear to indicate that the two nodes are now connected.
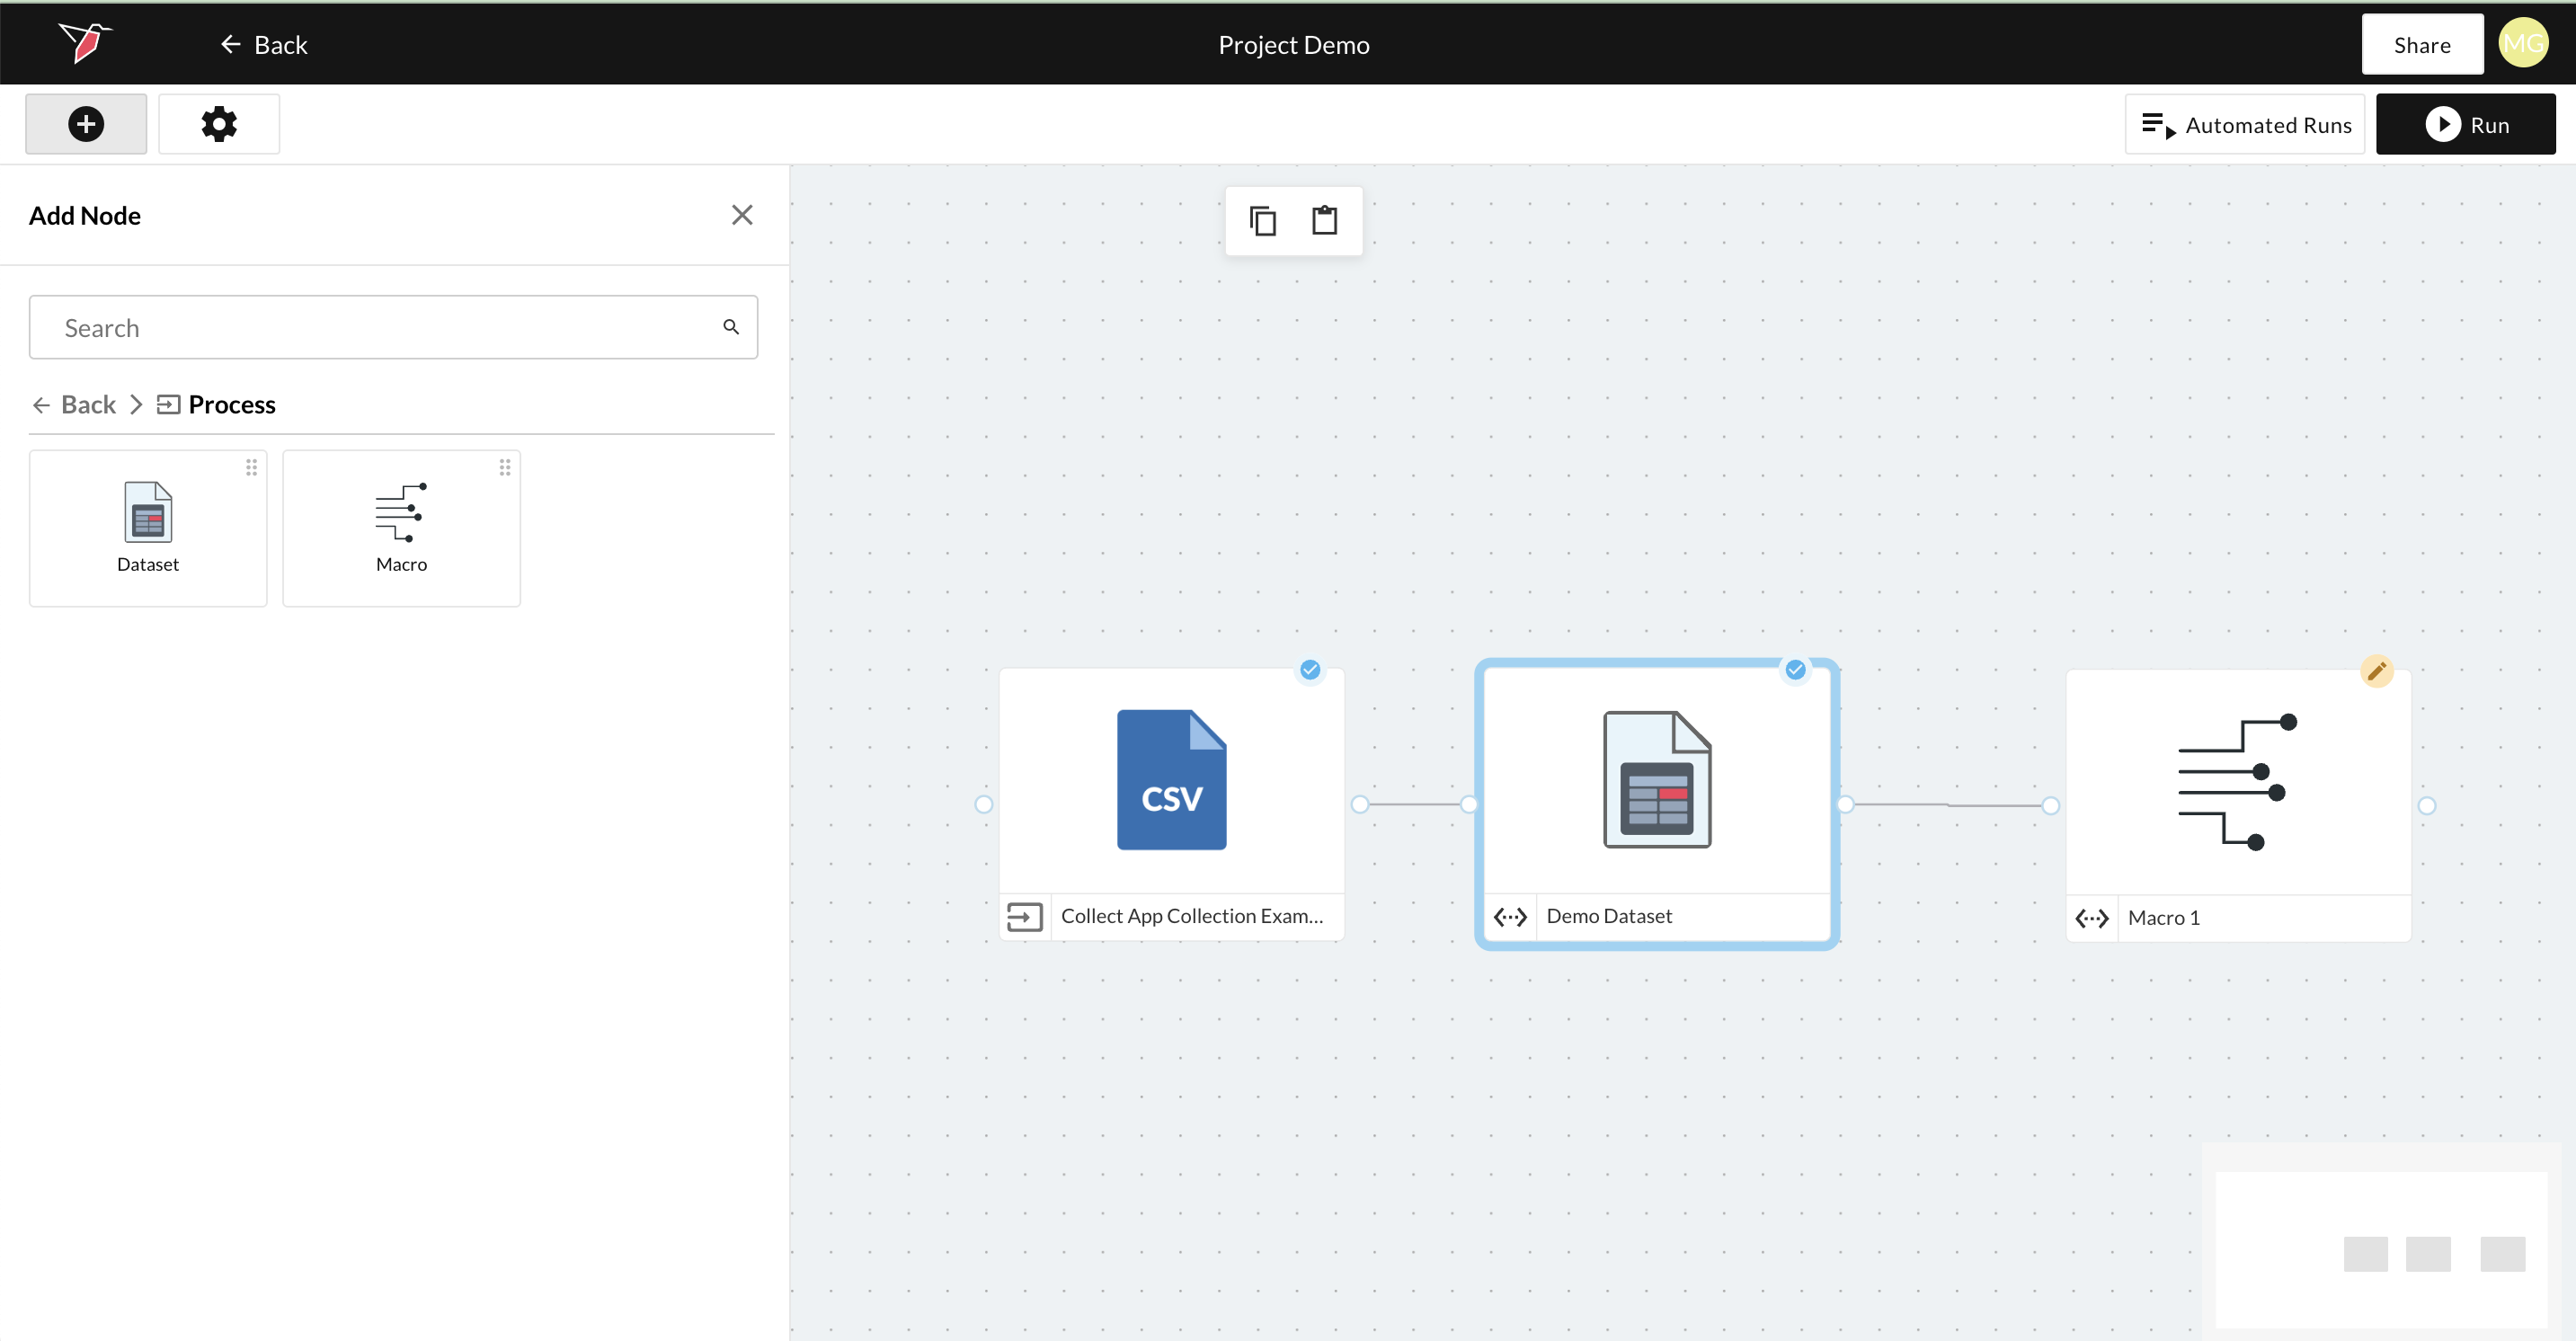
- Double-click the Macro node to open the Edit Macro page, where you can begin adding operations to process and transform your data.
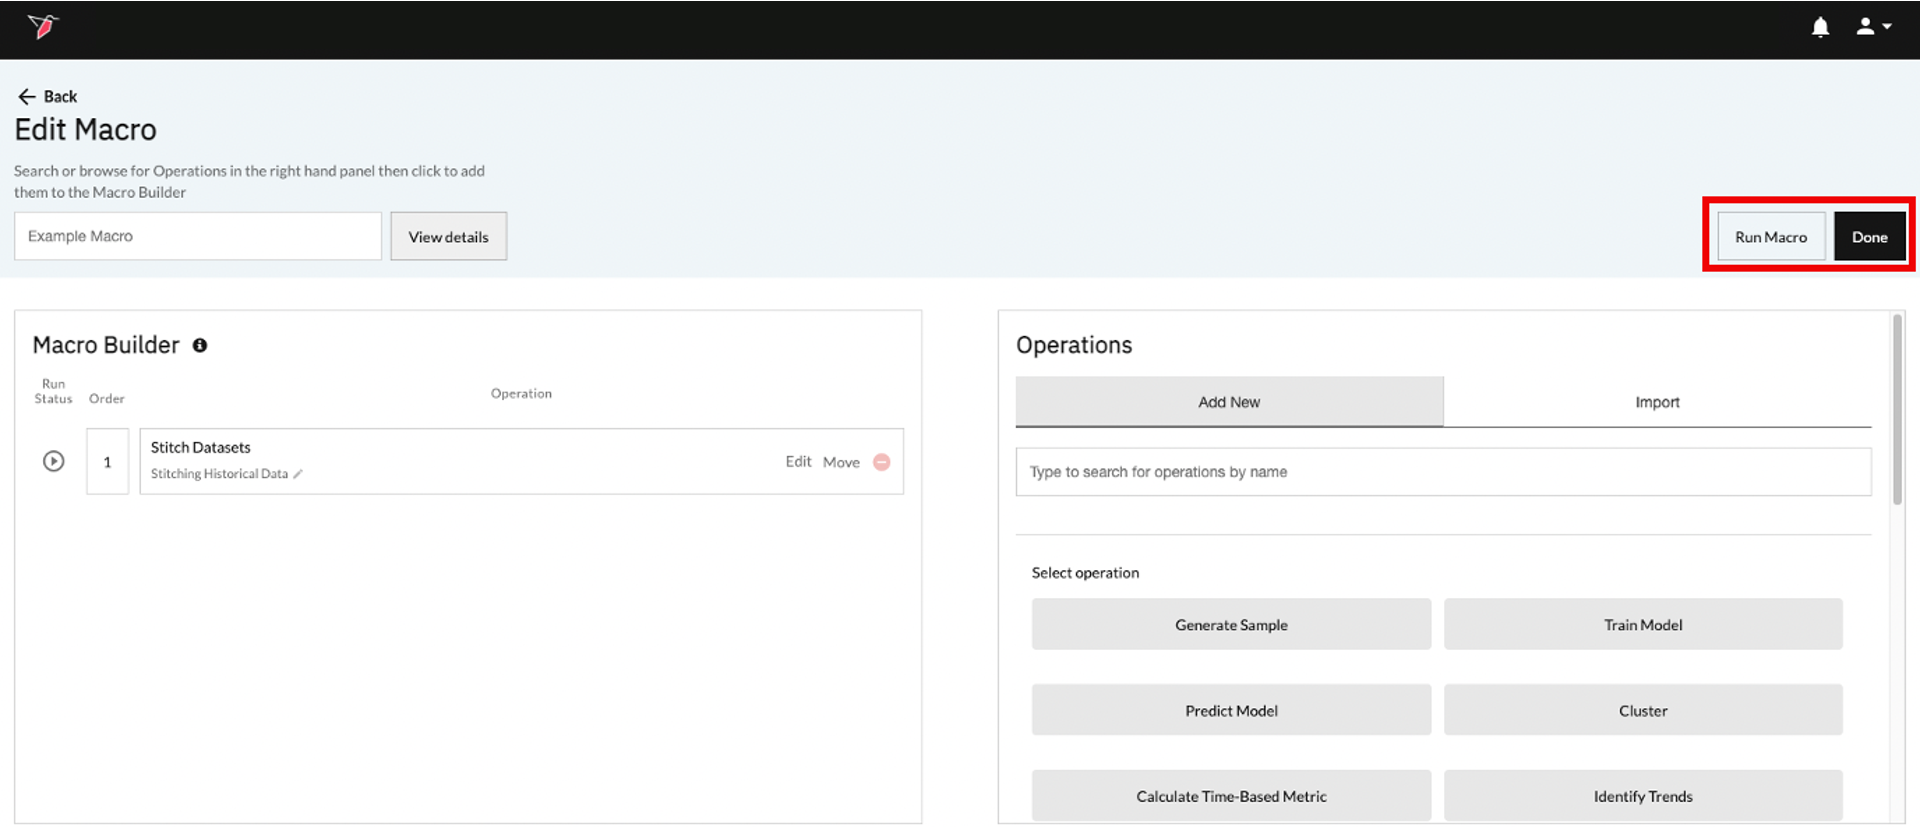
The Edit Macro Page
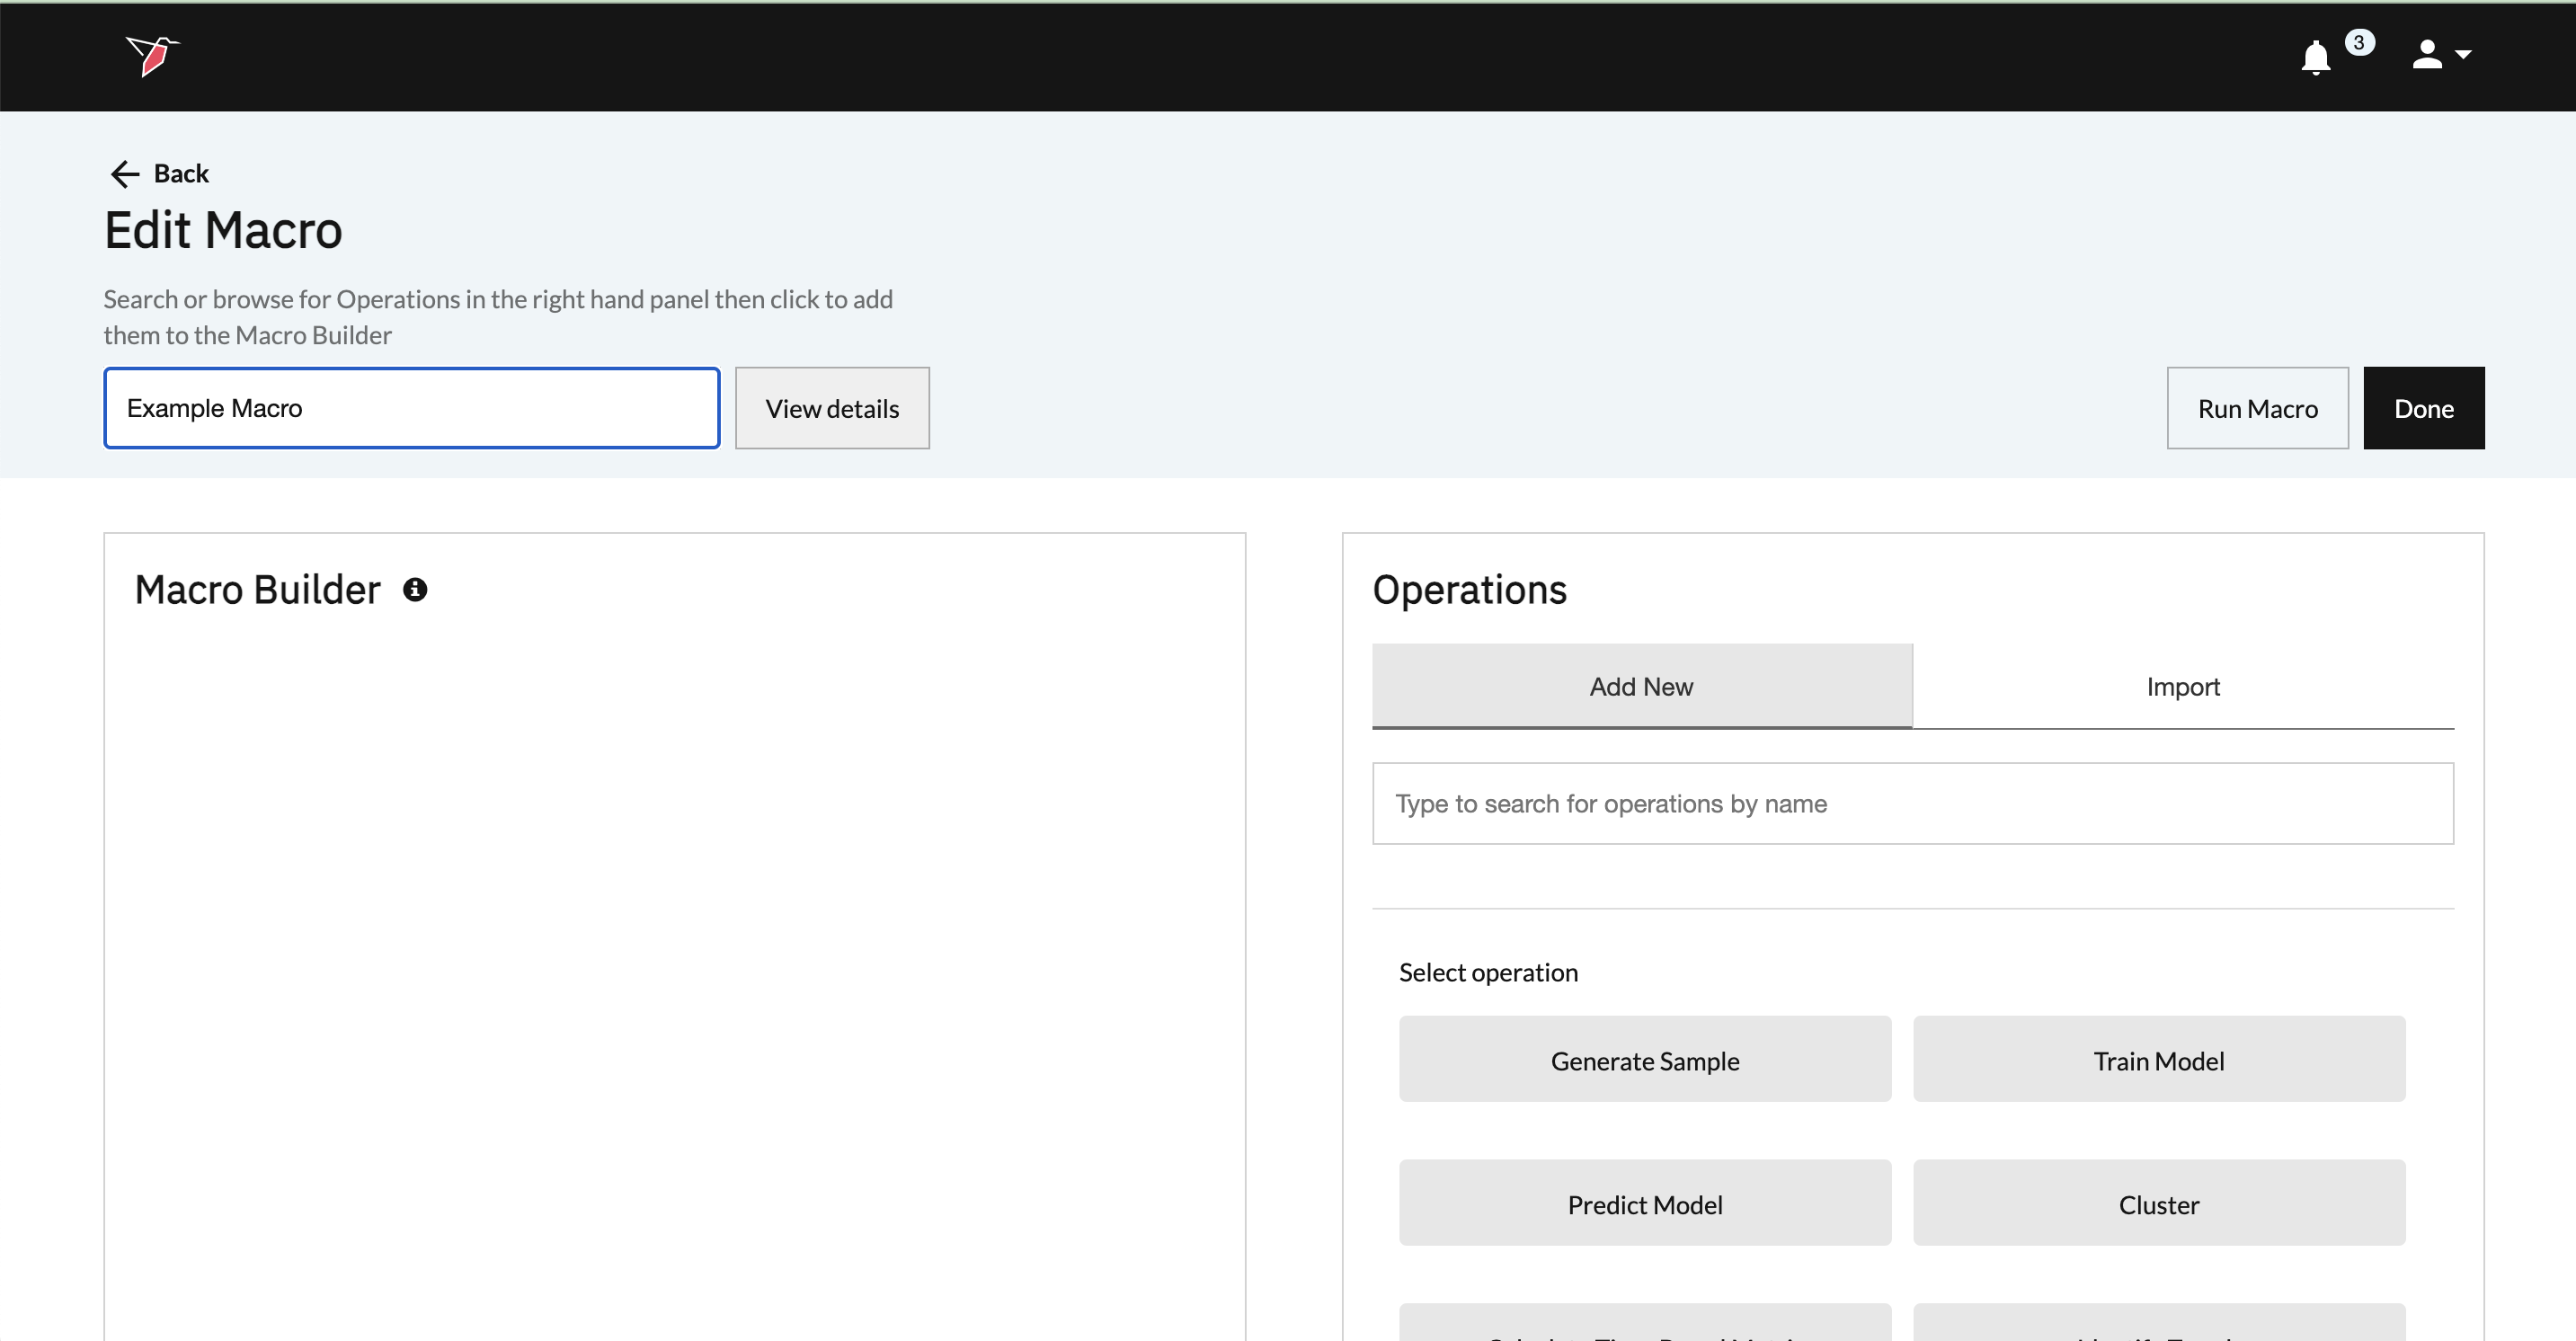
This Edit Macro page allows you to add and configure all the desired operations and specify the sequence in which they are performed. Please look at the screenshot below:
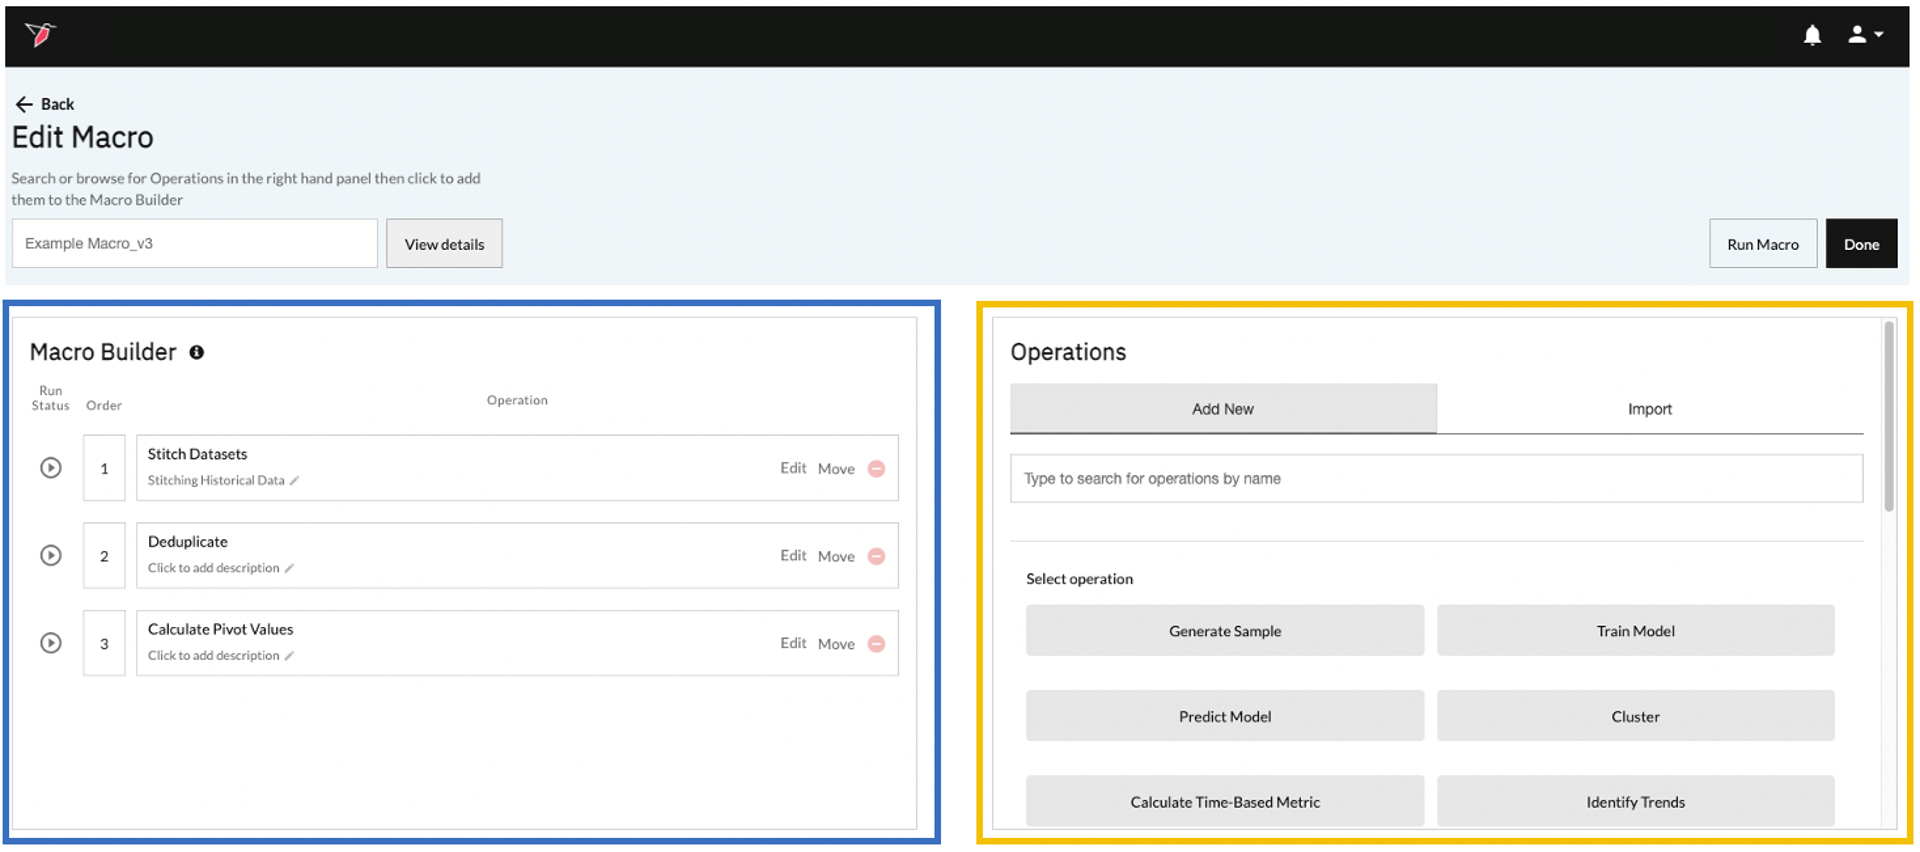
The left-hand side of the screen (highlighted in blue) is the Macro Builder canvas. This is where operations will be placed.
The right-hand side of the page (highlighted in yellow) is the Operations Library, which allows you to choose which operations you want to add to a macro. You can do one of the following:
- Add a new operation:
- Search for the desired operation by typing in the search bar.
- Pick an operation by navigating the list of operations below the search bar.
- Copy an operation from the current or any other existing macro.
How to Add Operations to a Macro
To start building a macro and its associated operations, please follow the below steps.
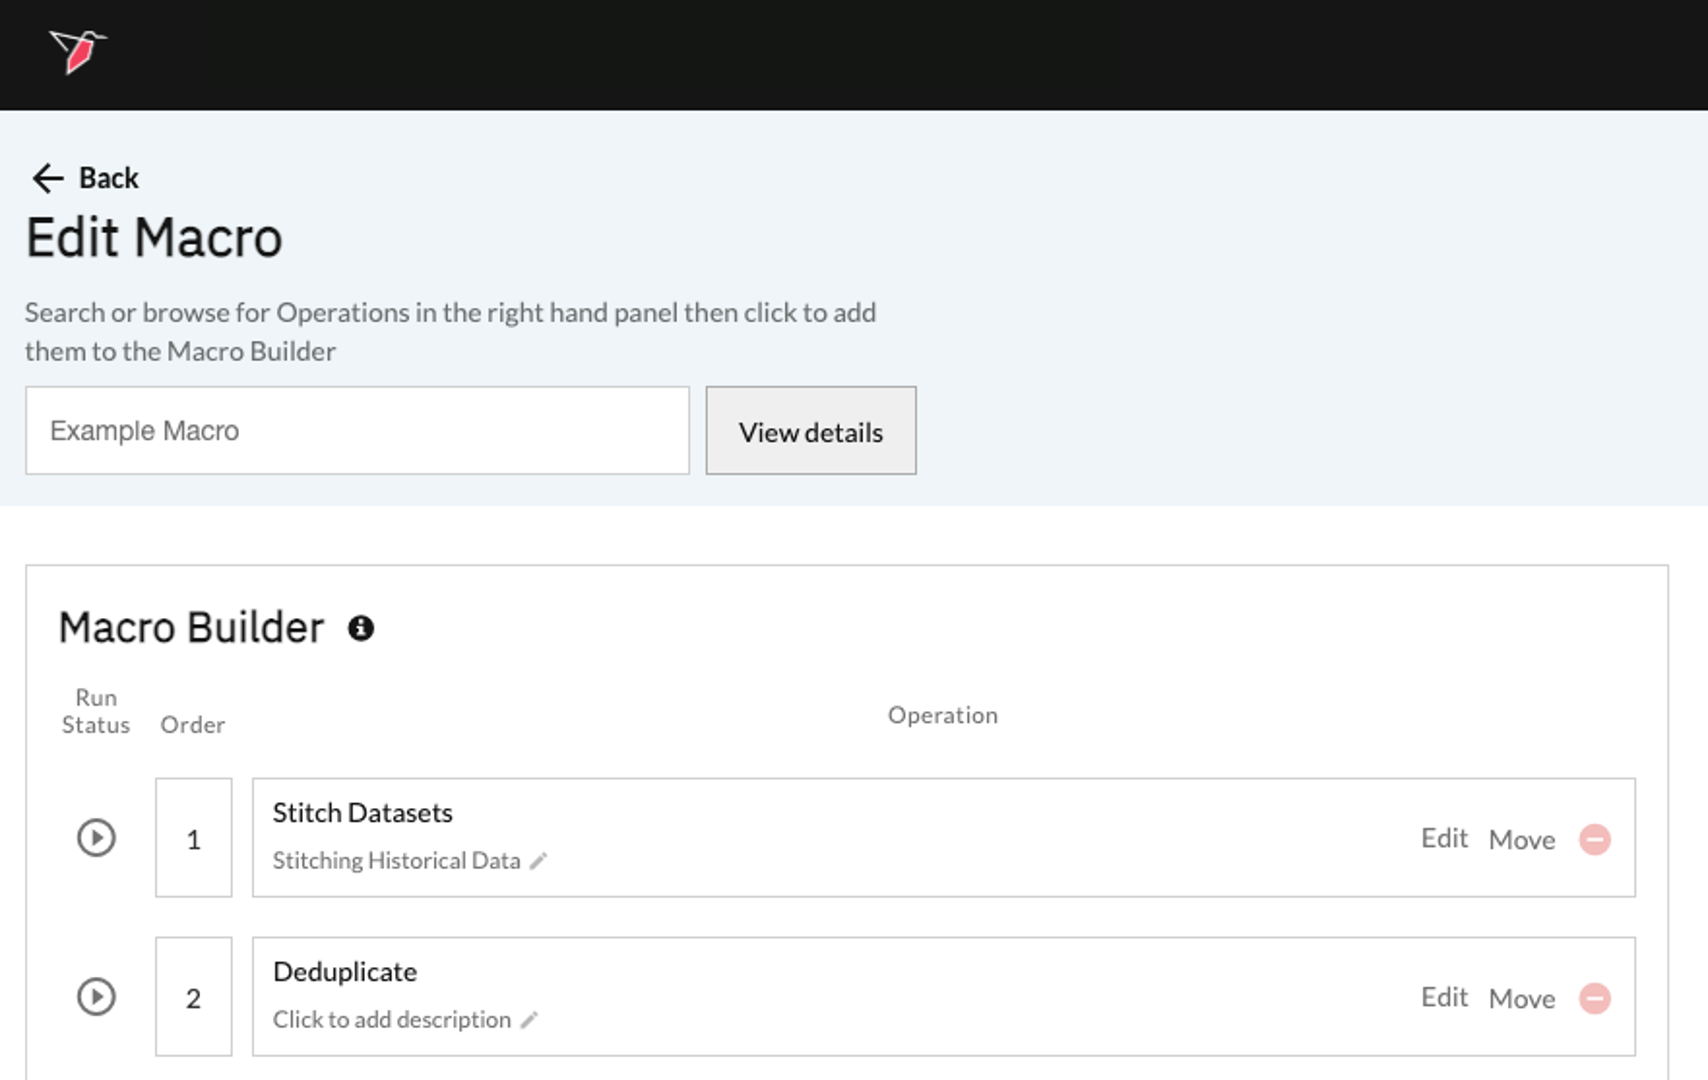
- Give this macro a name by clicking on the textbox on the upper-left-hand side of the screen above the macro builder.
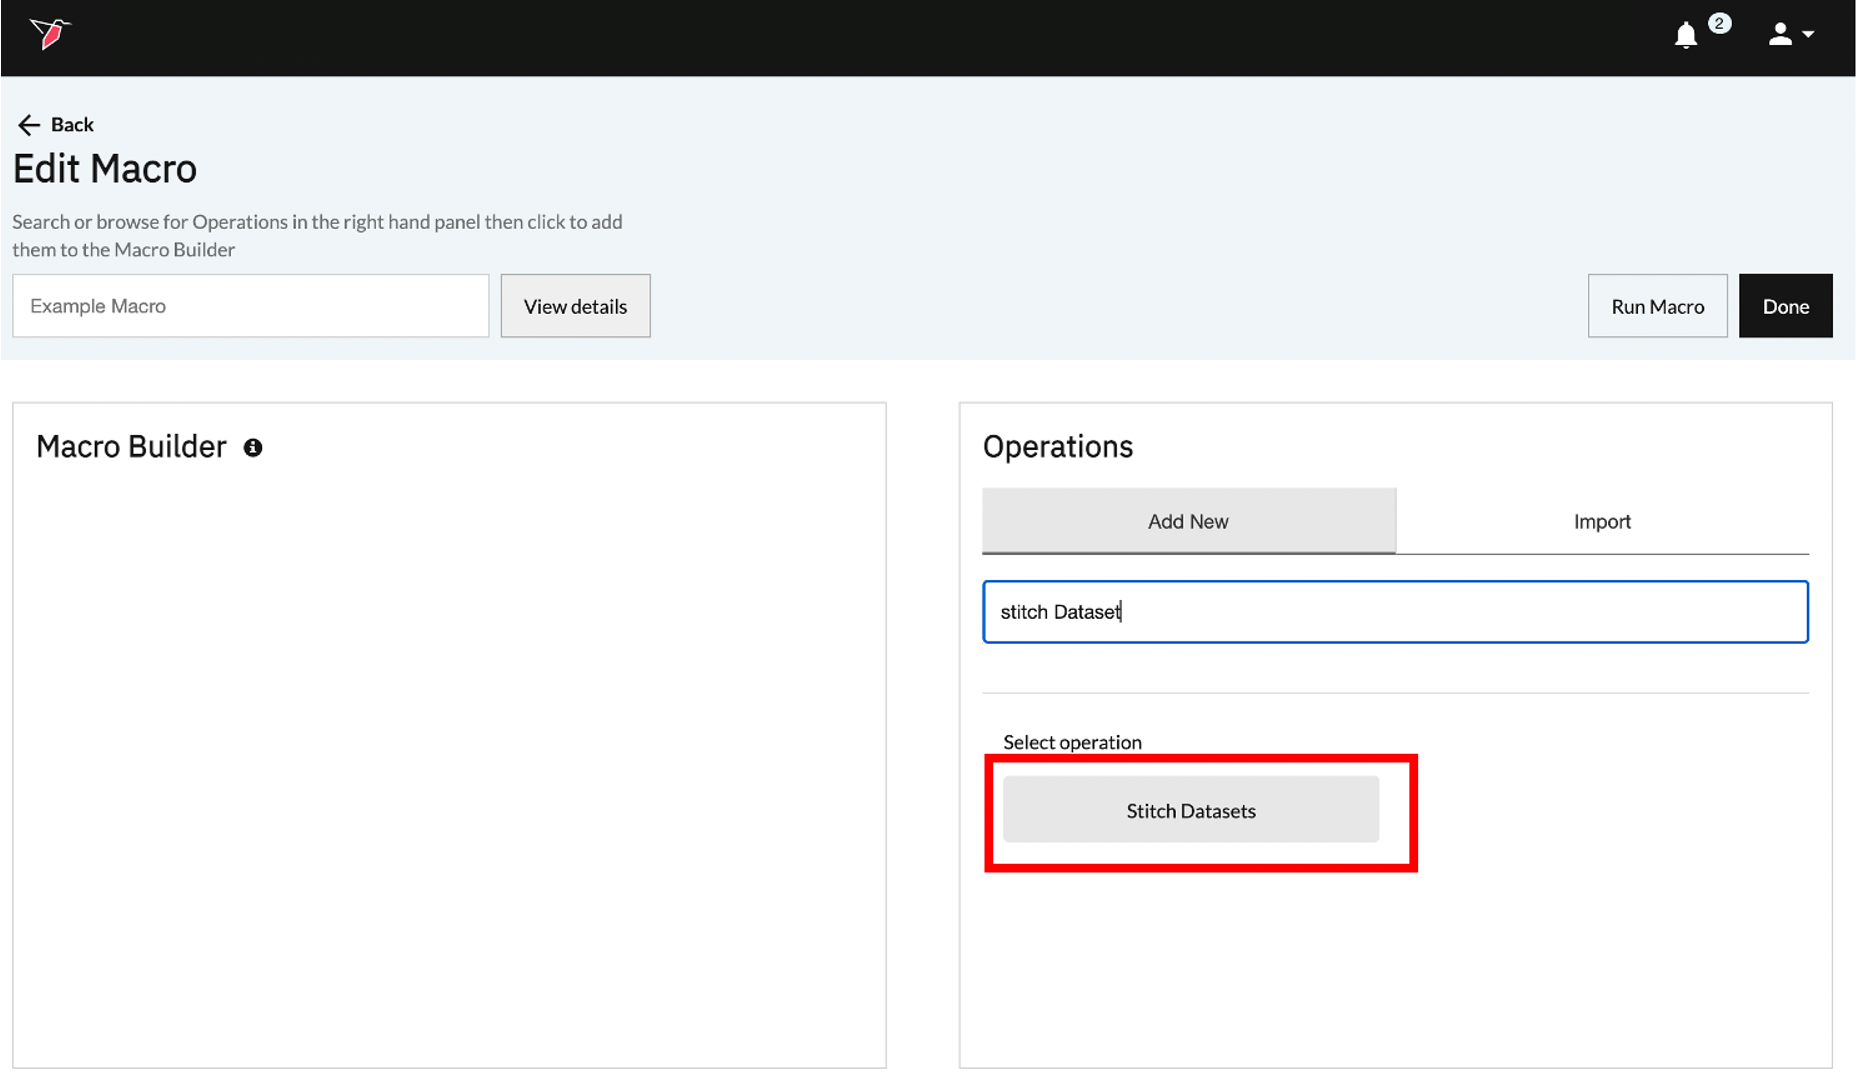
- Click Add New on the Operations Library on the right-hand side of the page. From here you can either search for the operation you want using the search box or explore the library of pre-built operations on Redbird by clicking through the categories displayed.
- Next, click on the operation you want to add as shown below.
- The operation will be added to the Macro Builder on the left-hand side of the screen. Click Edit on the operation you added to configure the operation.
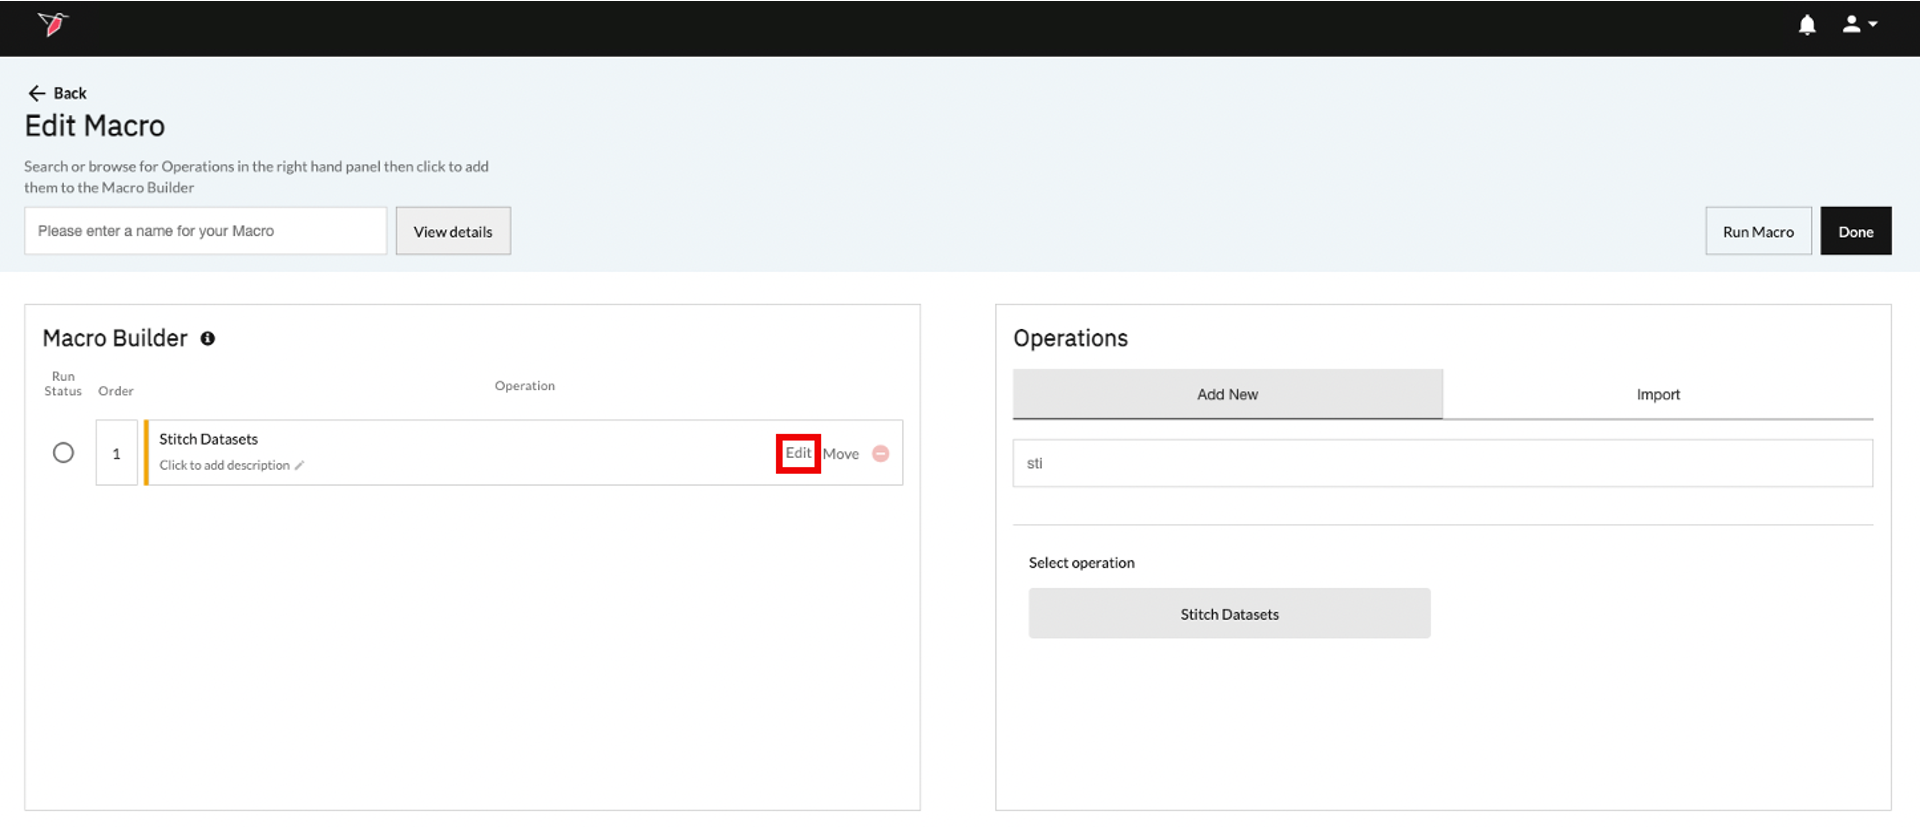
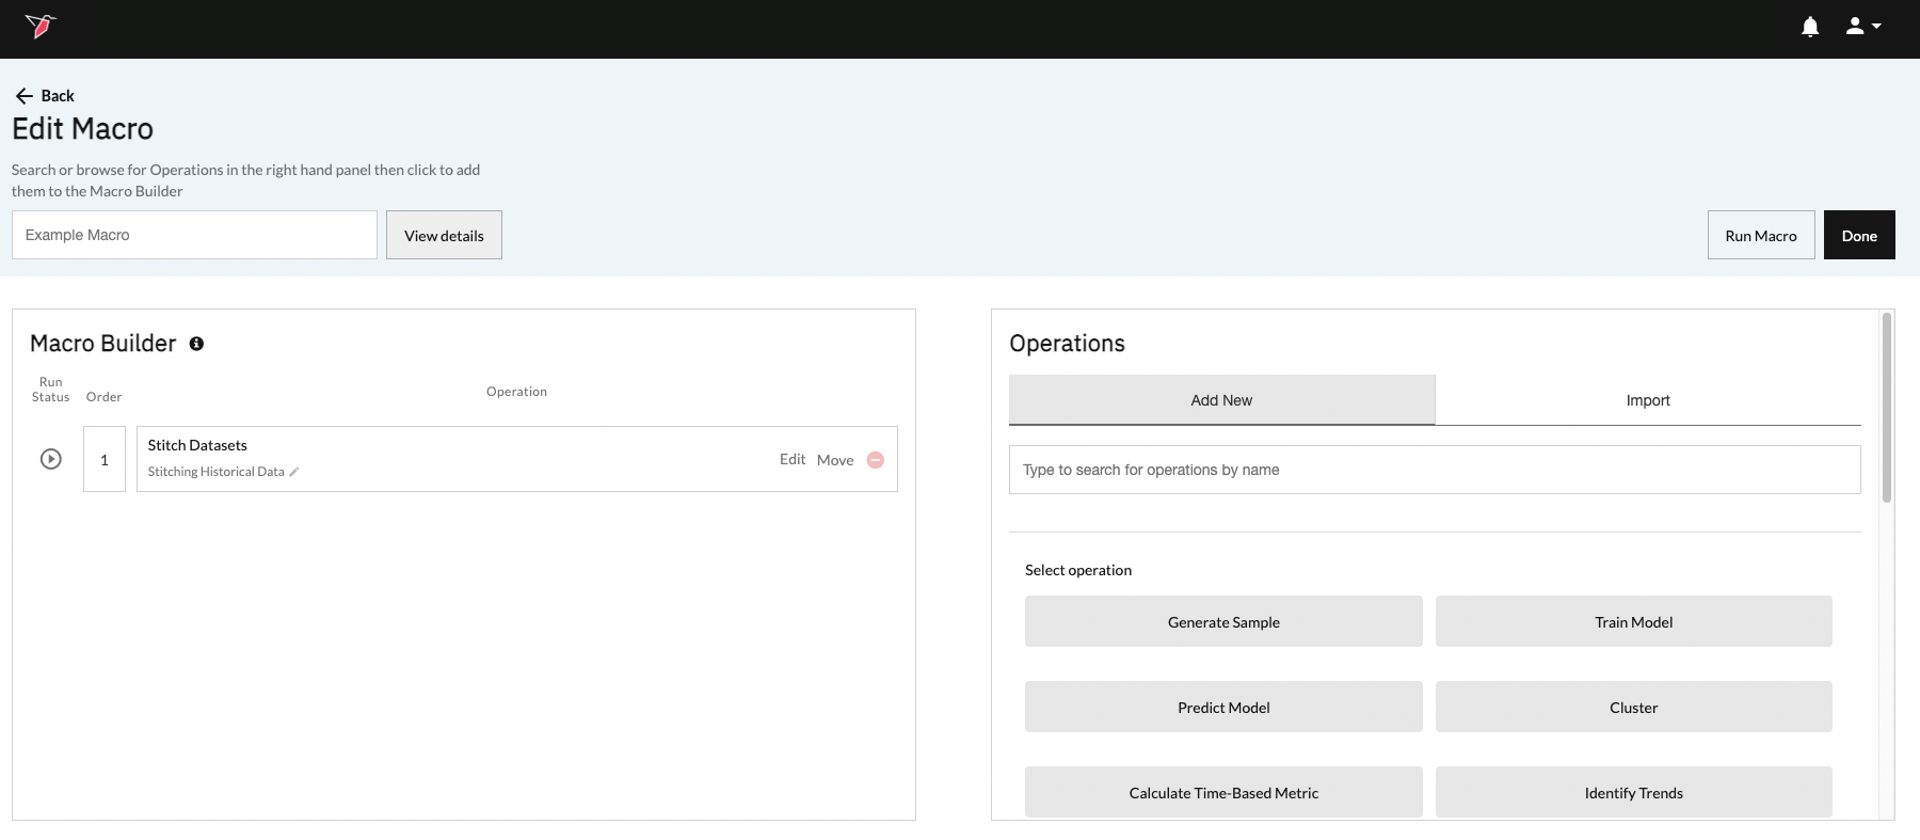
- After you configure and save the operation, the operation will include a play button indicating that it is valid.
Important:
Important• If new columns were added in an operation, they will be available for use in operations after it.
• If columns were deleted in an operation, they they will not be available for use in subsequent operations.
• If the order of operations is changed, it will affect all subsequent operations below the current one.
Note:The operations you add are color coded to reflect their status.
• Green means that the operation is configured correctly and is valid.
• Yellow operation is currently invalid and needs user input.
• Red operation is locked as a function of a preceding operation being invalid.
- This step is optional. You can add annotations to operations to improve the macro’s readability and to add additional context. To add an annotation click on the name of the operation and then add your desired note. For instance, if you are stitching two datasets, you can say “Stitching Historical Data”.

- If you want to add more operations, just repeat steps 2 through 6.
- If you want to delete an operation just click (Red X) on the right-hand side of the operation. Note that deleting an operation might cause other operations below it to break, especially if they were referencing the columns added by the operation you deleted.

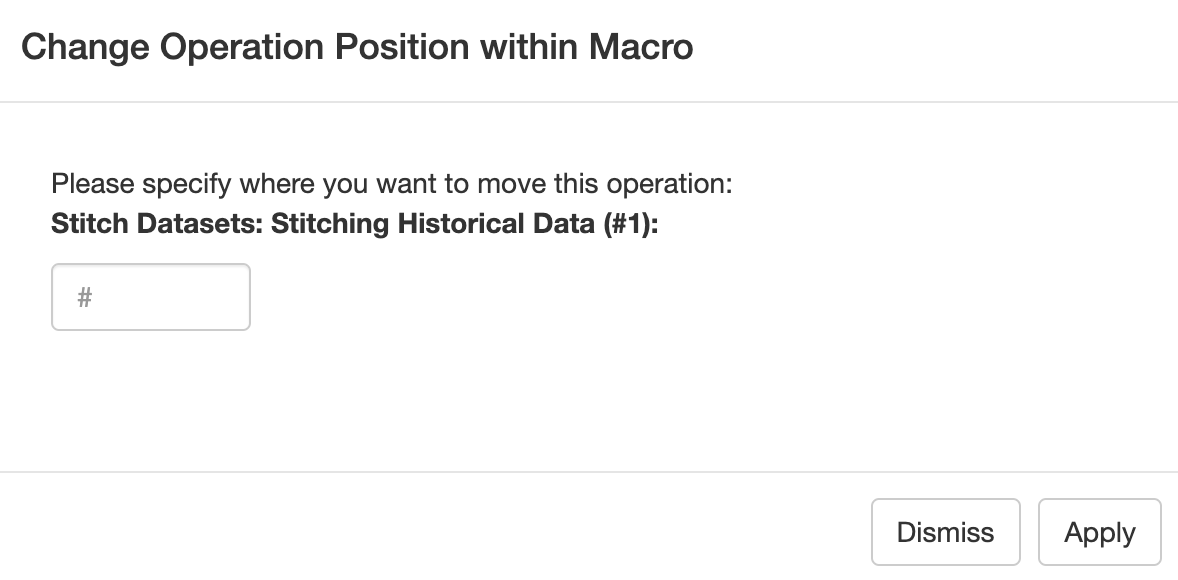
- If you have multiple operations, you can change the order of the operations by:
- Clicking and dragging the operation to the right spot.
- Clicking Move on the right-hand side of the operation, and then specify the location in the popup that appears:

- Once you have finished building the macro, on the upper-right corner click Run Macro to execute it immediately or click Done to exit the Edit Macro page.
Important:The order of the operation is important.
- If an operation added a column, and it was moved to a different location, it can cause other operations that reference the newly added column to break.
- Redbird automatically keeps track of operations when they are moved around and will prompt you if any action is needed.
- Clicking Done will return you to the Workflow Canvas page with the Macro configured but not yet run—it will be ready to run when required (see next section). If you click Run Macro, the system will start to run the Macro. You will see it running on the canvas, and once completed, the output objects—such as datasets or summary outputs—will appear connected to the Macro, ready for exploration or downstream use.
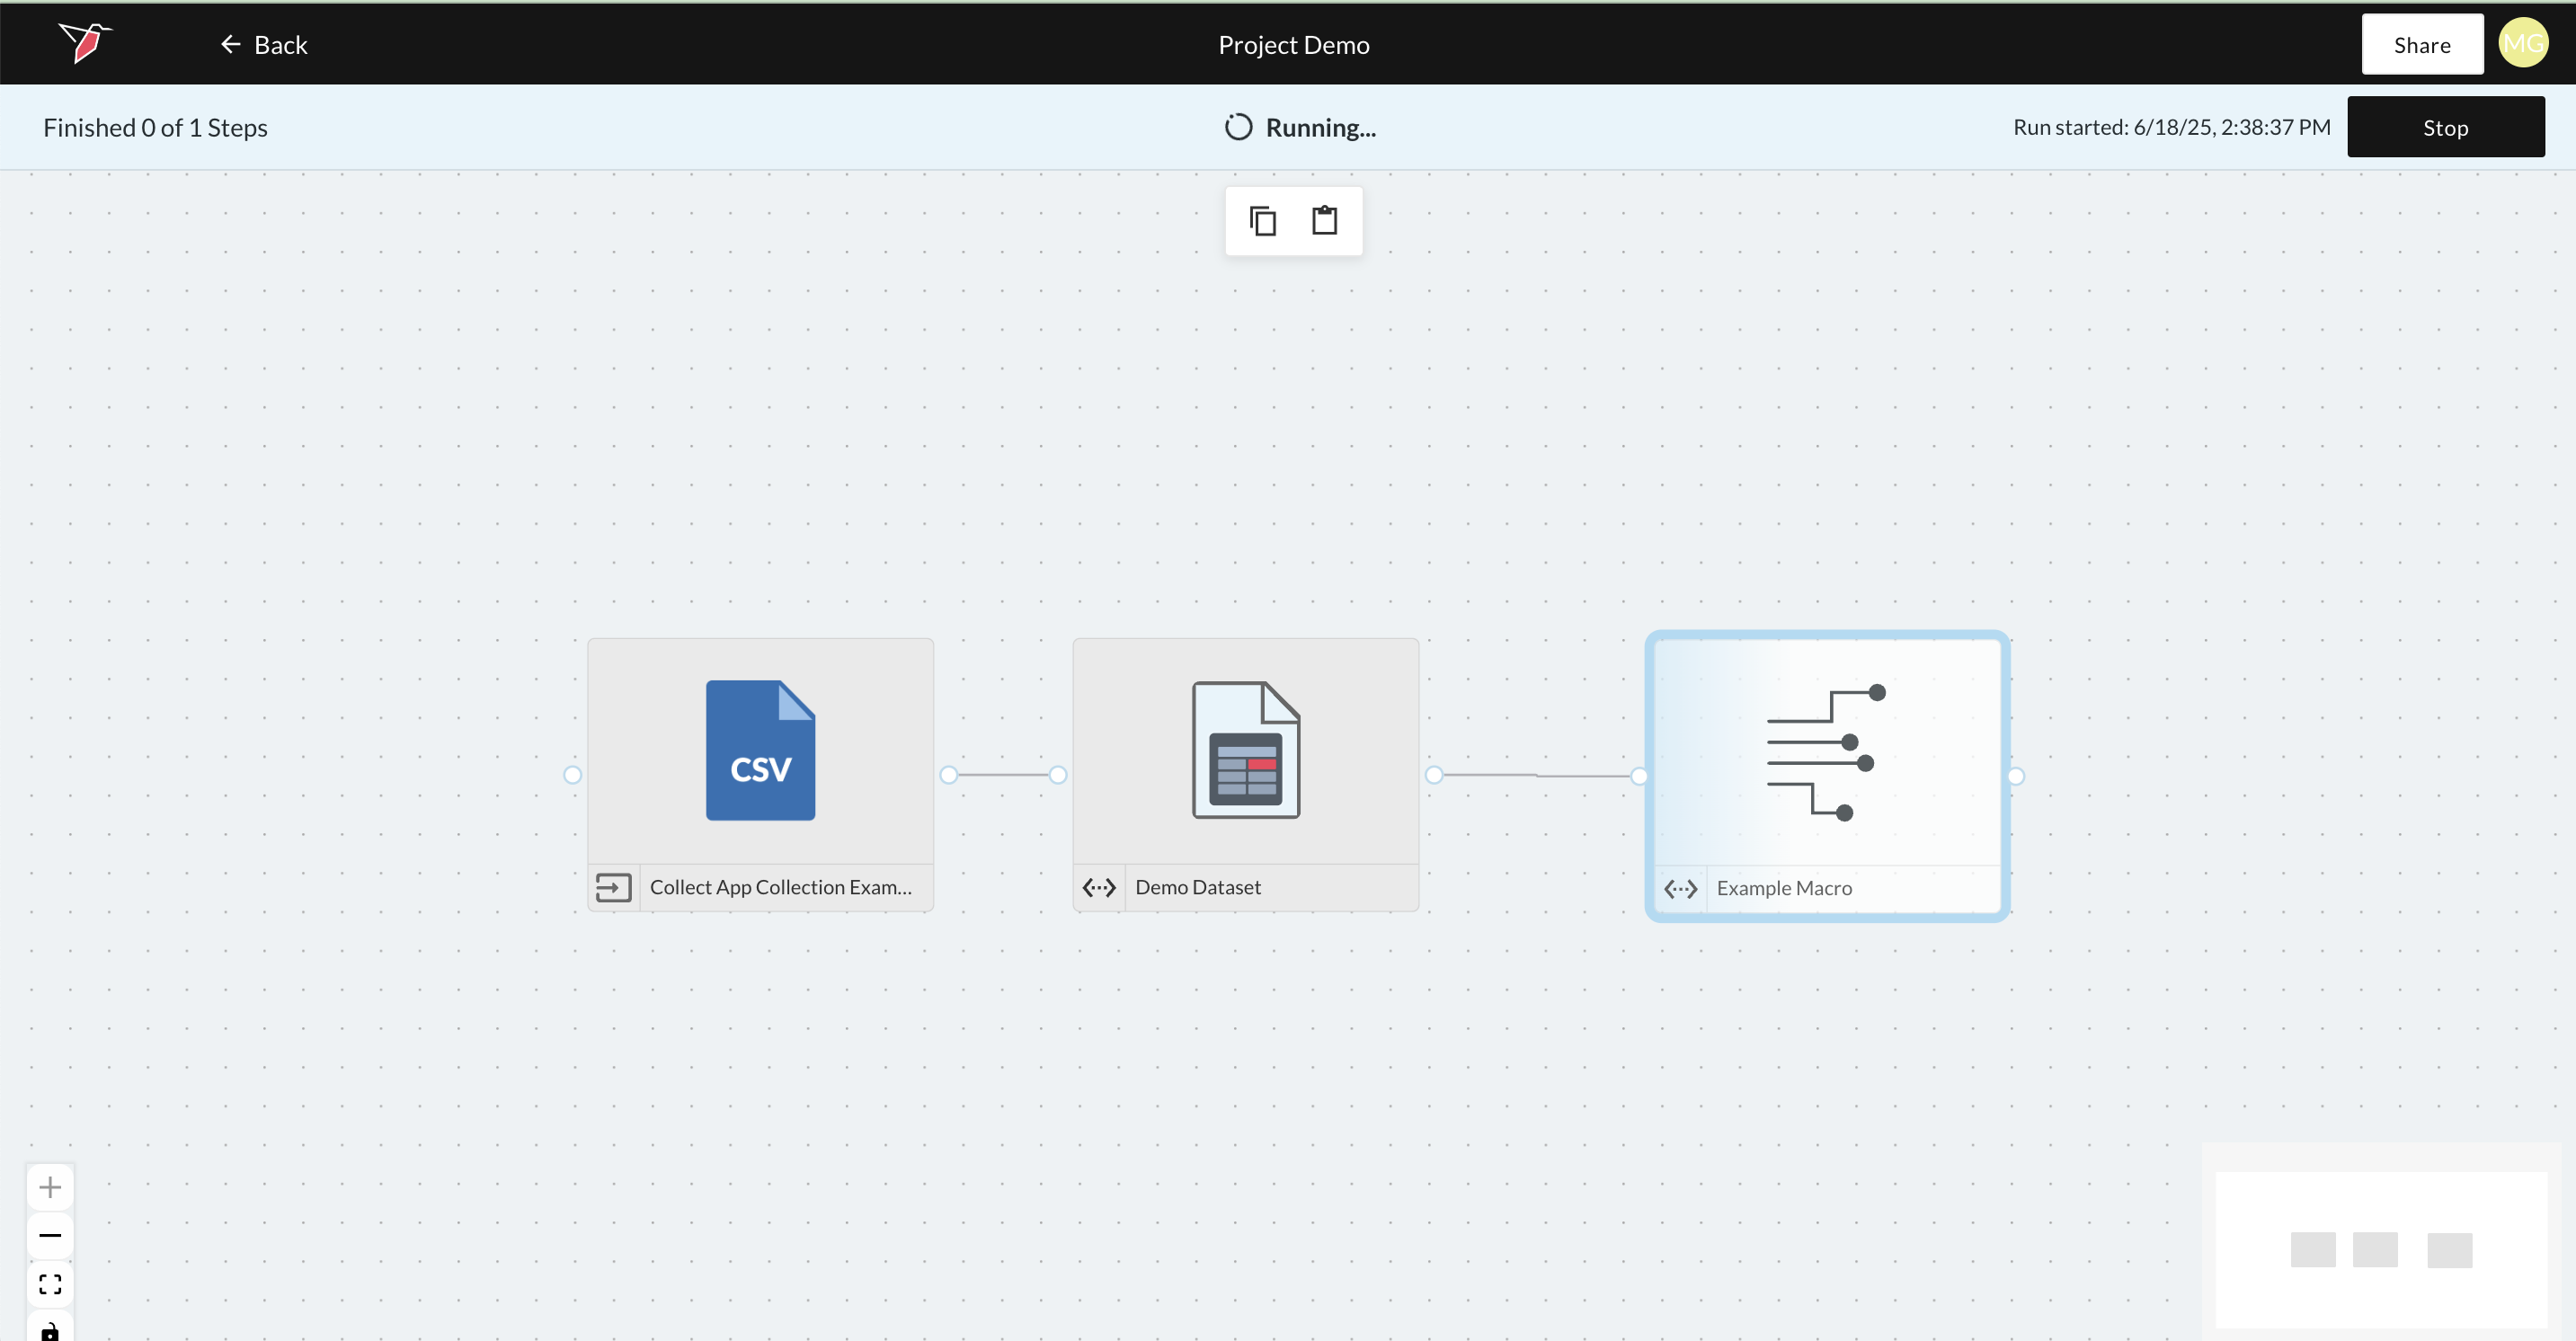
Macro in Running State
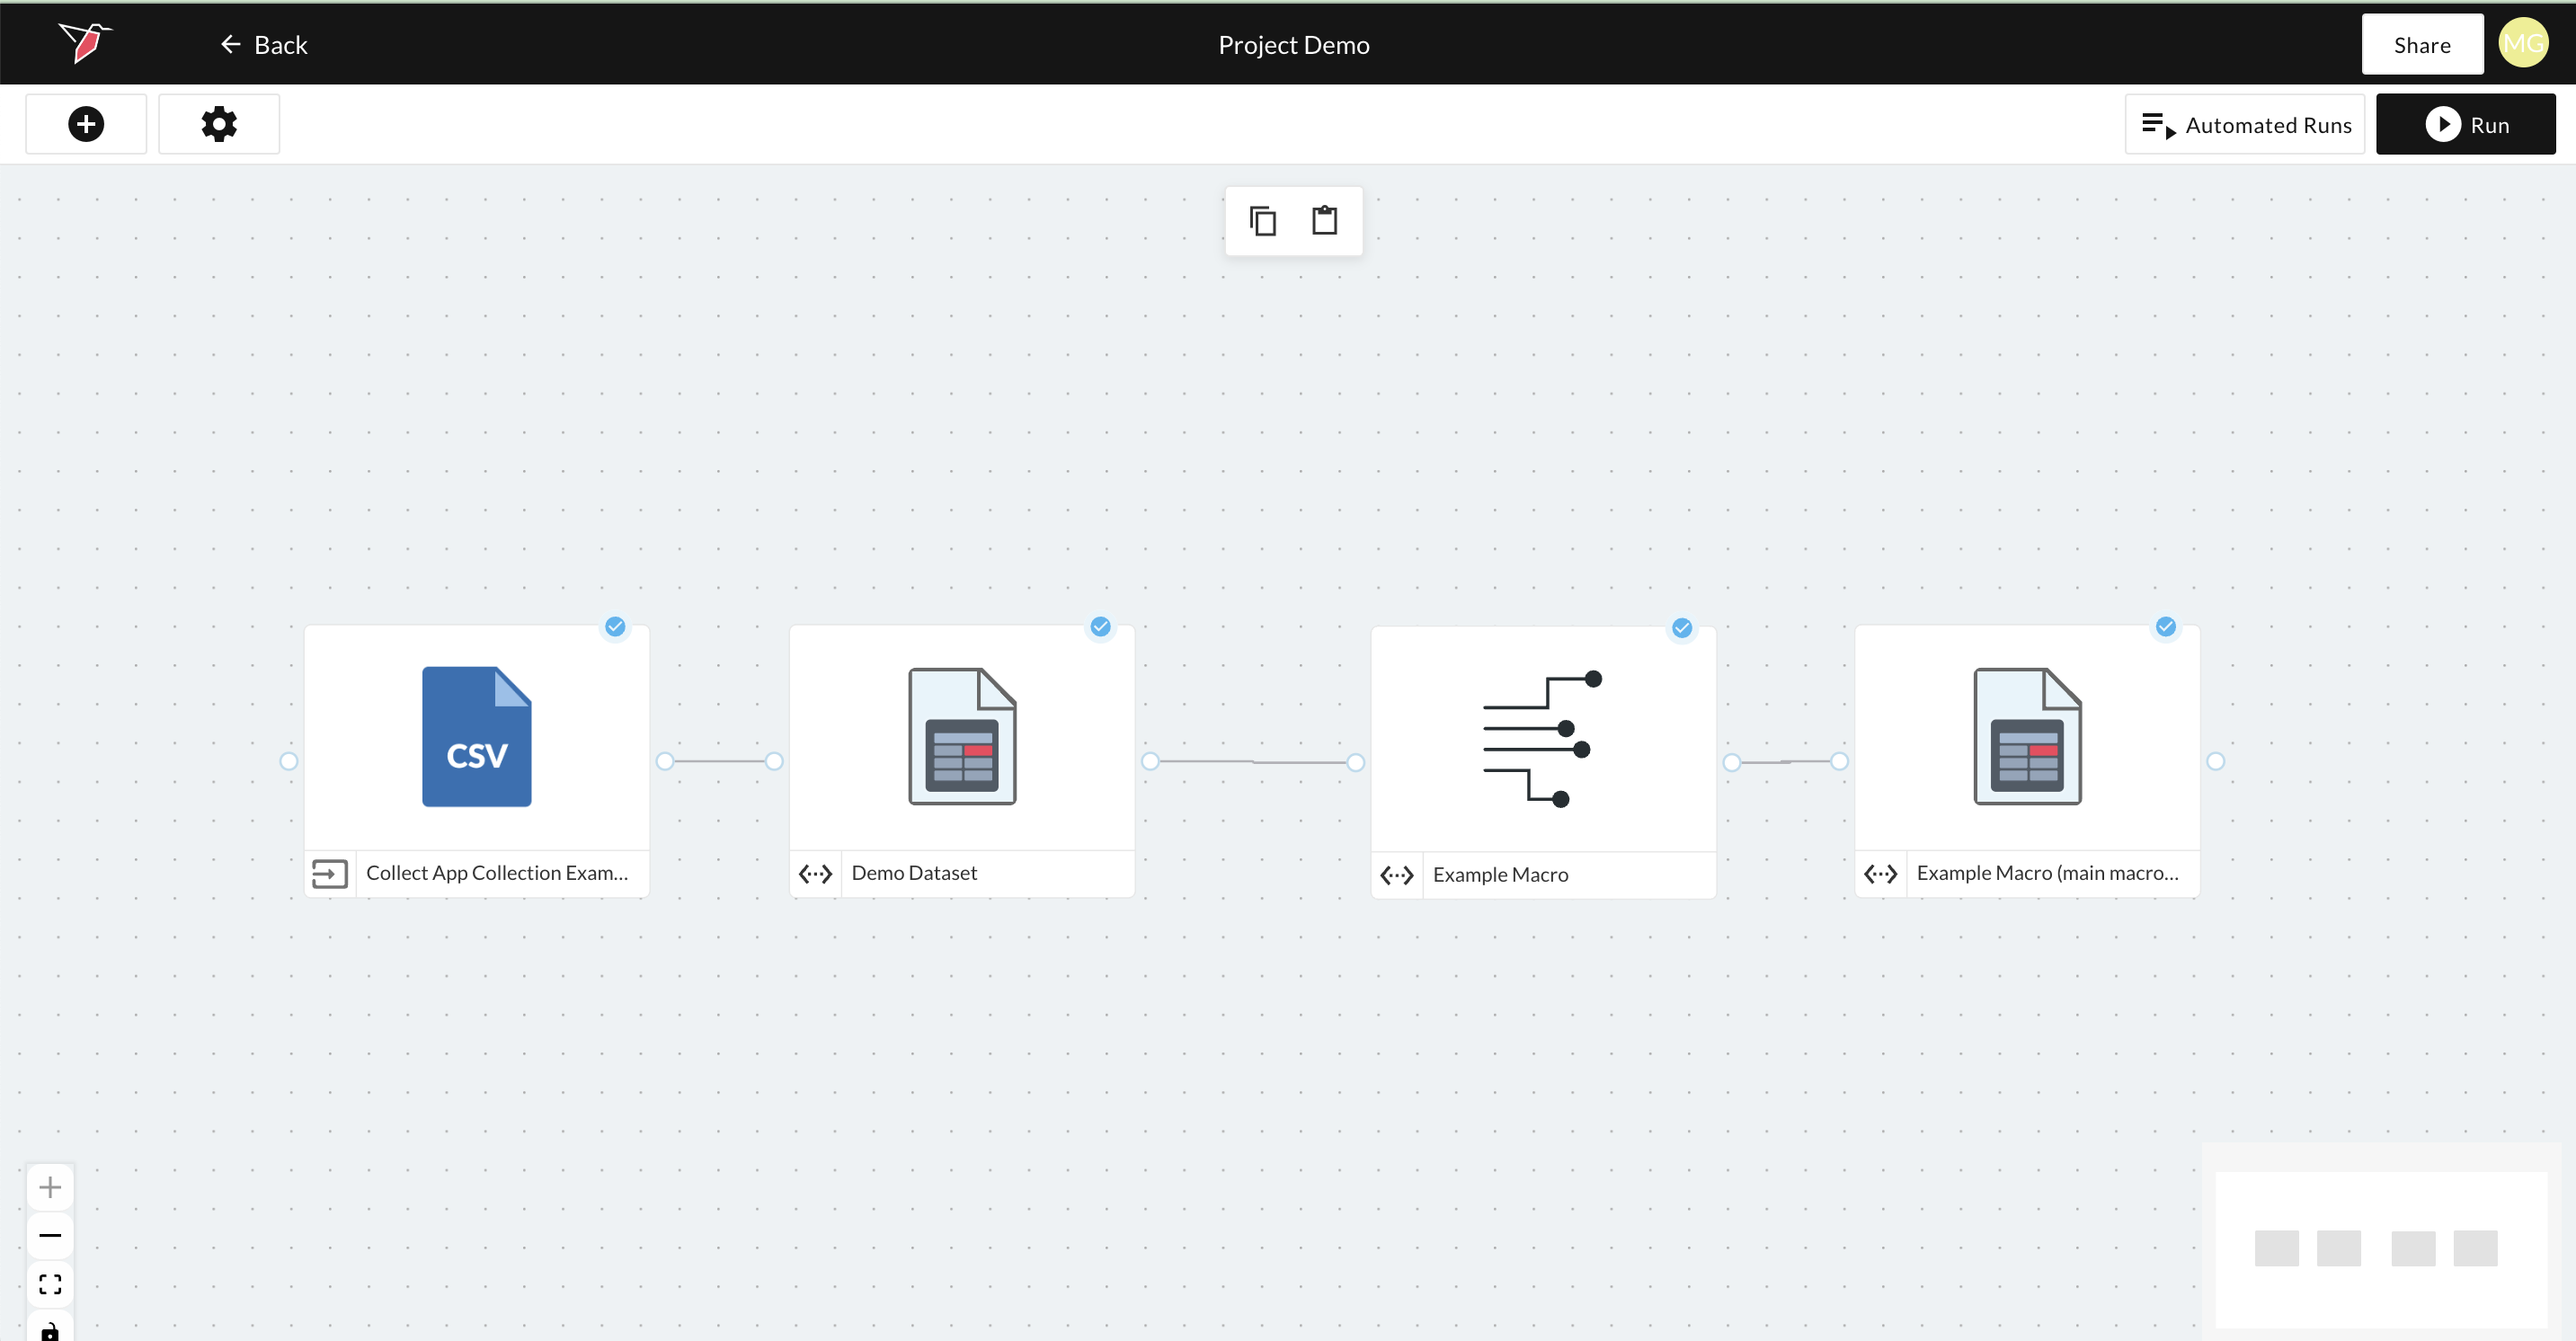
Macro after run has finished with output datset
Running Macros
In the previous section, we covered how to run a Macro directly from the Edit Macro page. Alternatively, Macros can be run incrementally or from the Workflow Canvas. See below for instructions on how to perform these actions.
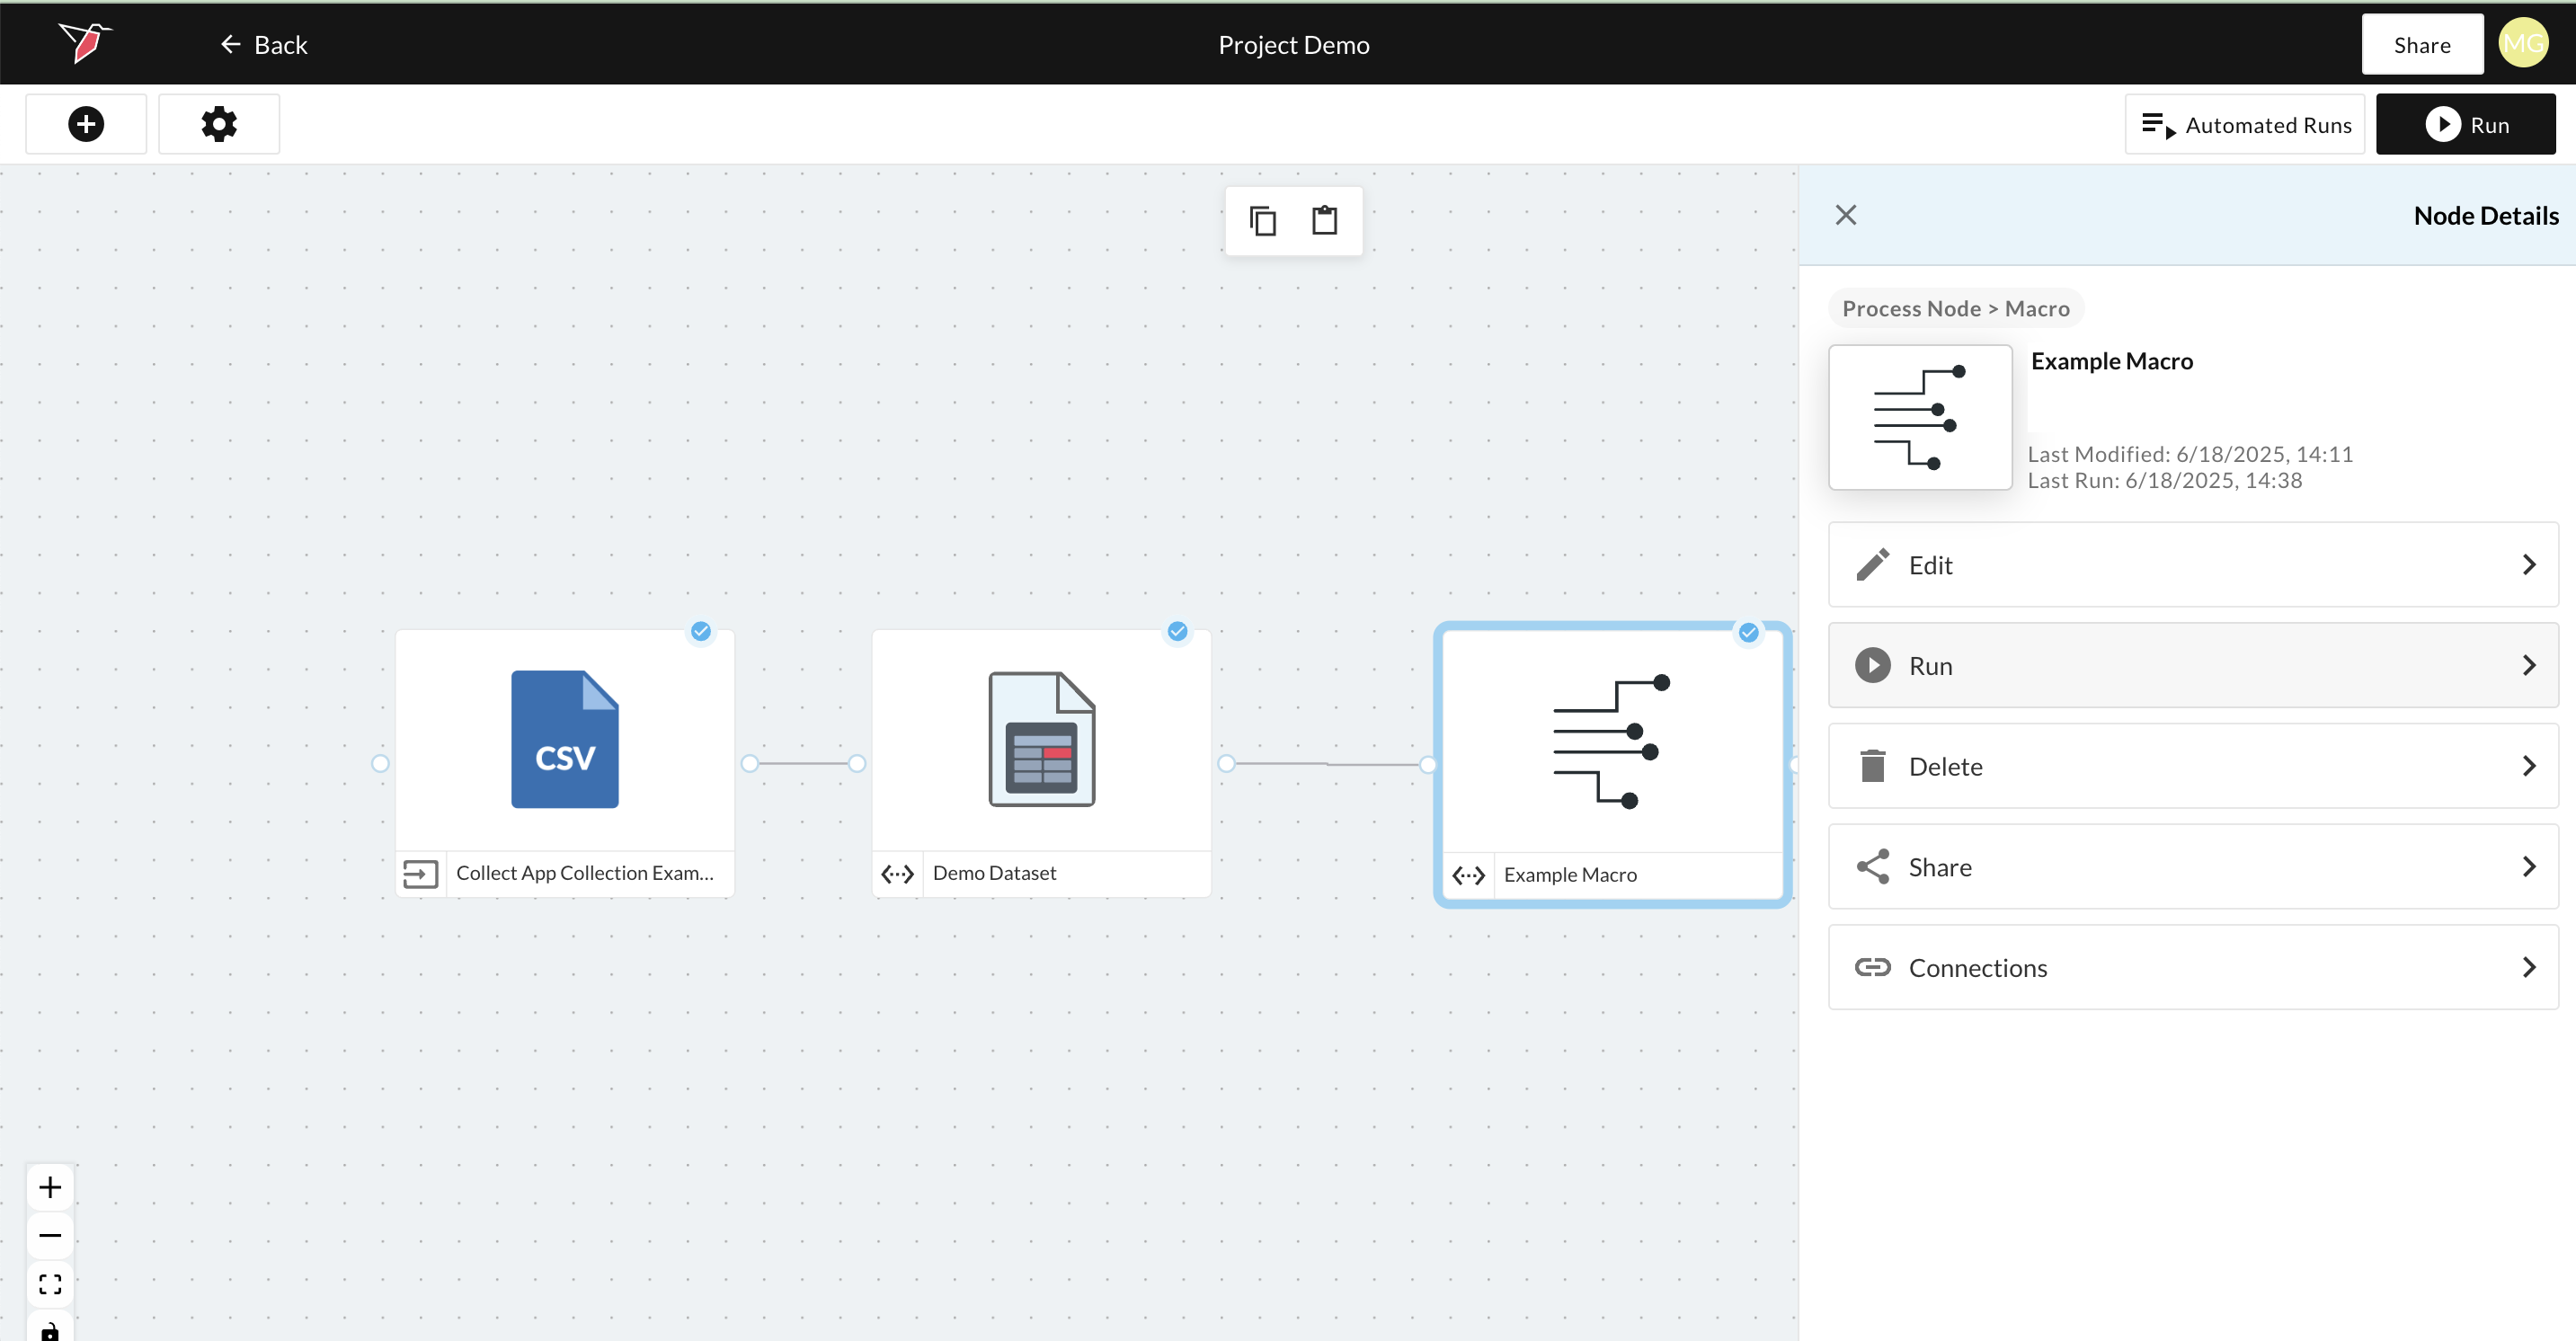
How to Run a Macro From the Workflow Canvas
- Click on the Macro node to open the right-side panel.
- Click Run.
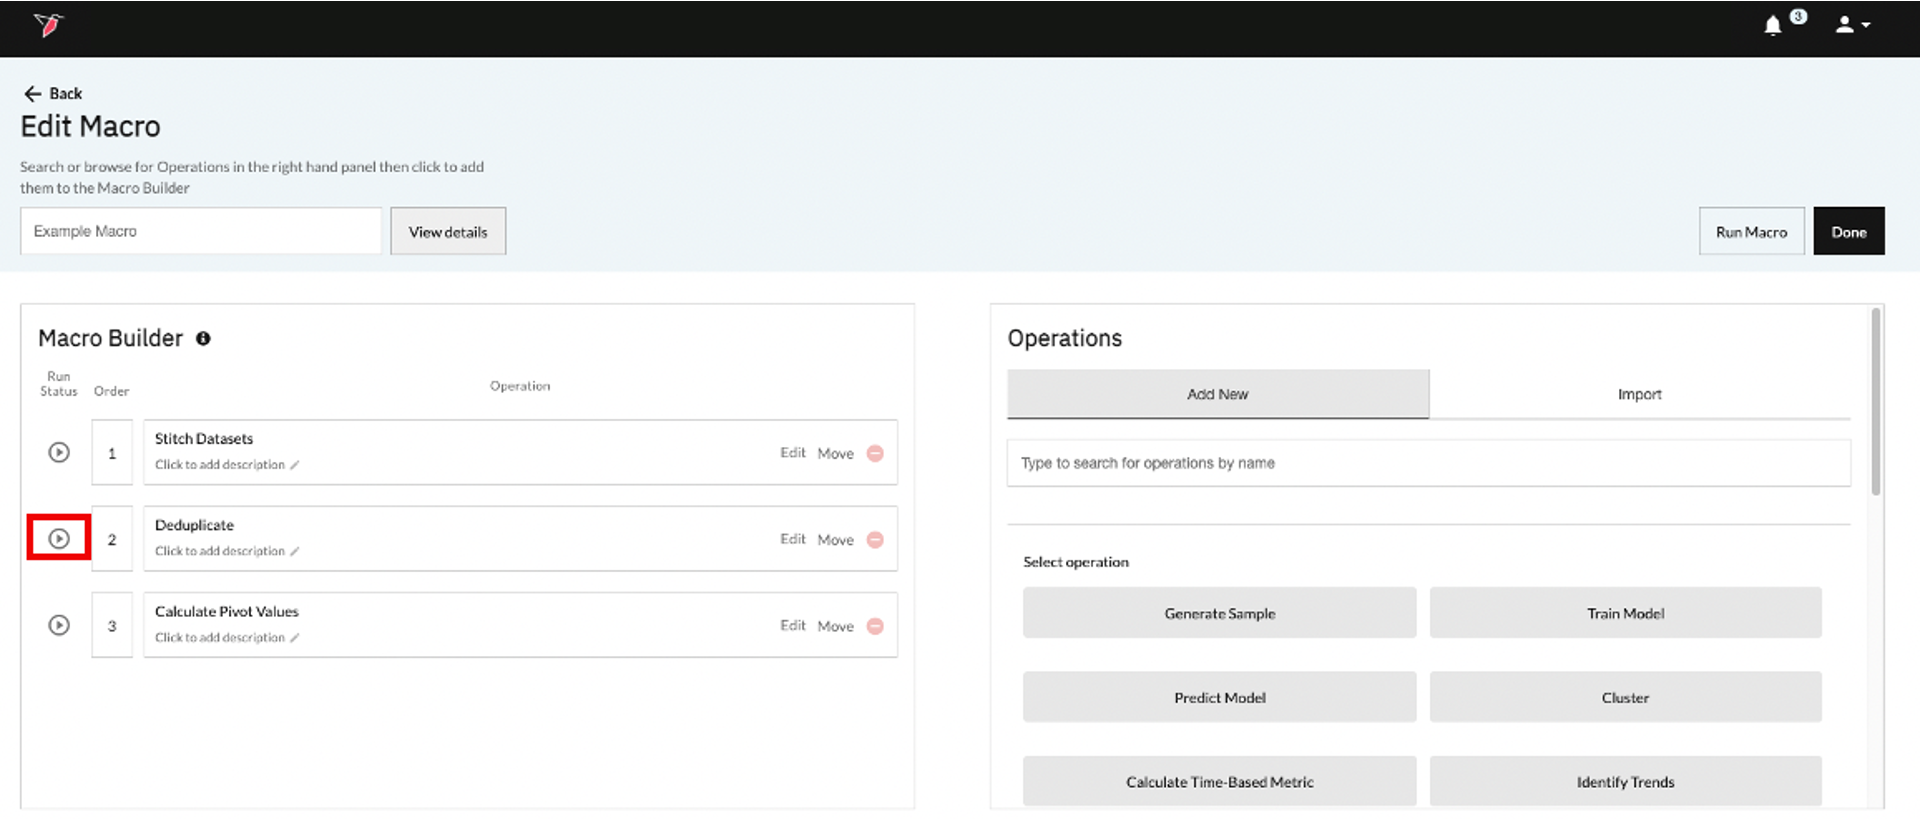
How to Run a Macro Incrementally
If you are interested in just running part of your macro, you can run it incrementally. This is a great way to test your results, prior to running your full macro.
- From the Workflow Canvas, click on the Macro Node then click Edit on the right-side panel. This brings you to the Edit Macros page.
- Click the play icon located to the left of the operation you are interested in running. Redbird will run the operation you selected and all of the operations that come before it in sequential order.
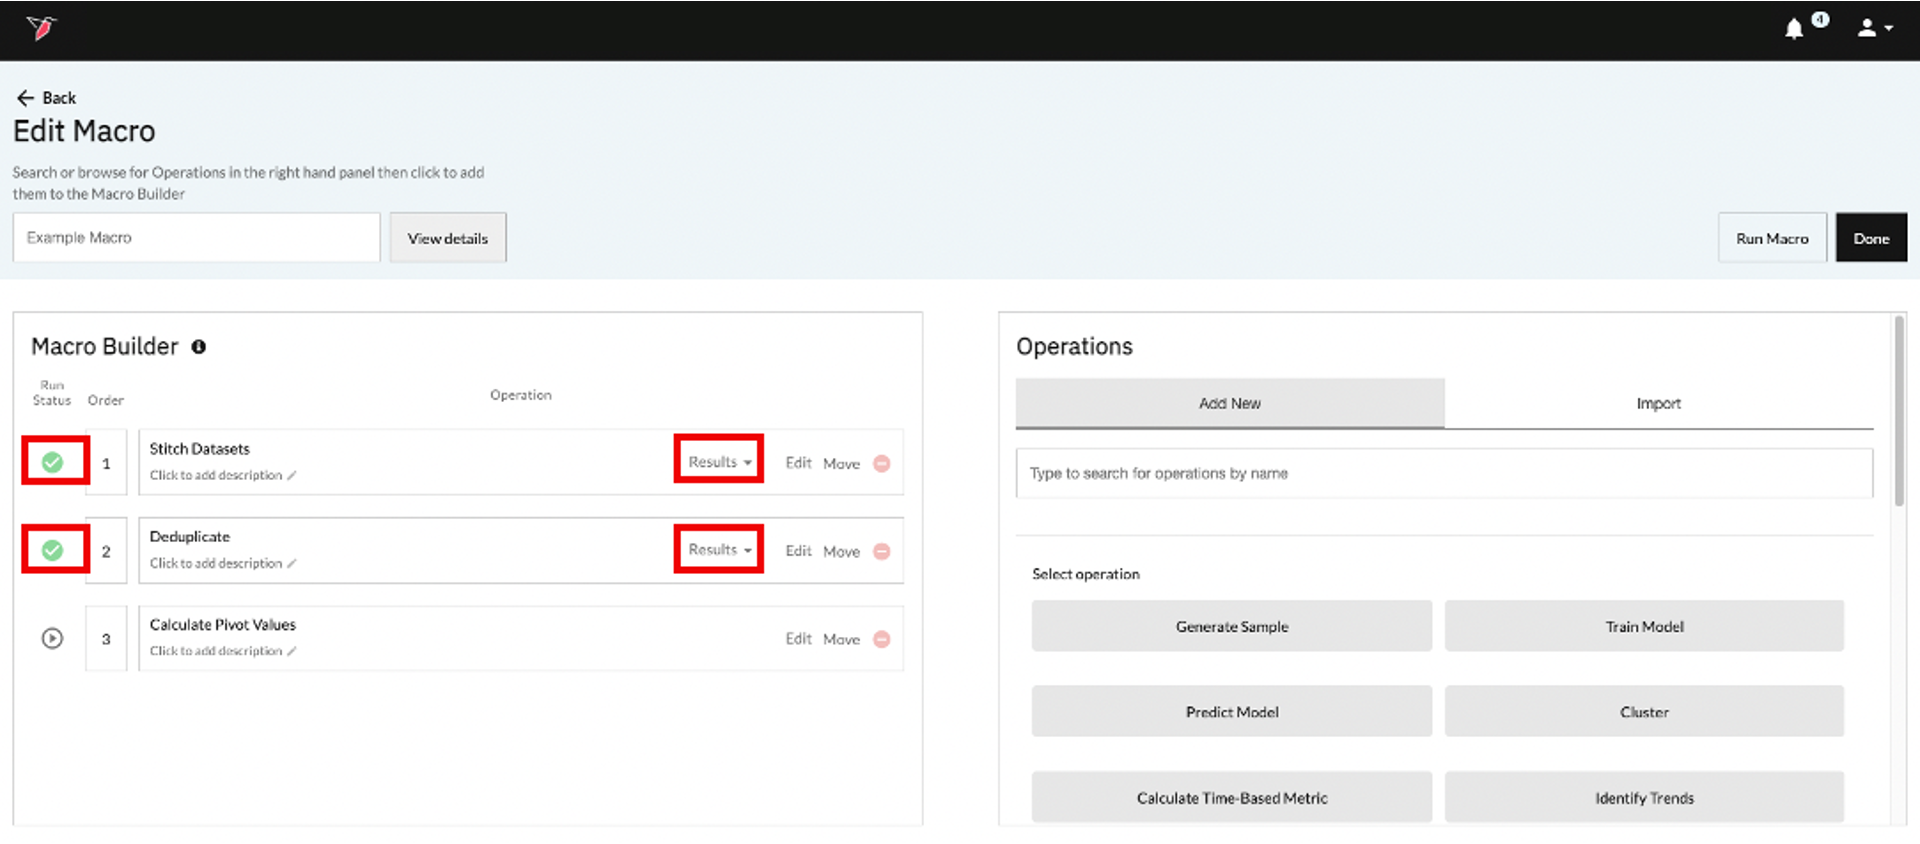
- After the macro has run you will see green check marks next to the operations that have run successfully. You will also be able to view the transformed data by clicking the Results link associated with each operation.
Macro Details and History
- Clicking View Details on the Edit Macro Page opens a pop-up summarizing all the operations configured within the macro. This provides a high-level overview of the macro’s structure and logic, serving as a helpful reference when creating new macros or modifying existing ones. This summary is accessible within the "Current "tab.
- Switching from Current to Historical provides a record of all previous macro runs along with the specific operation configurations used in each run.
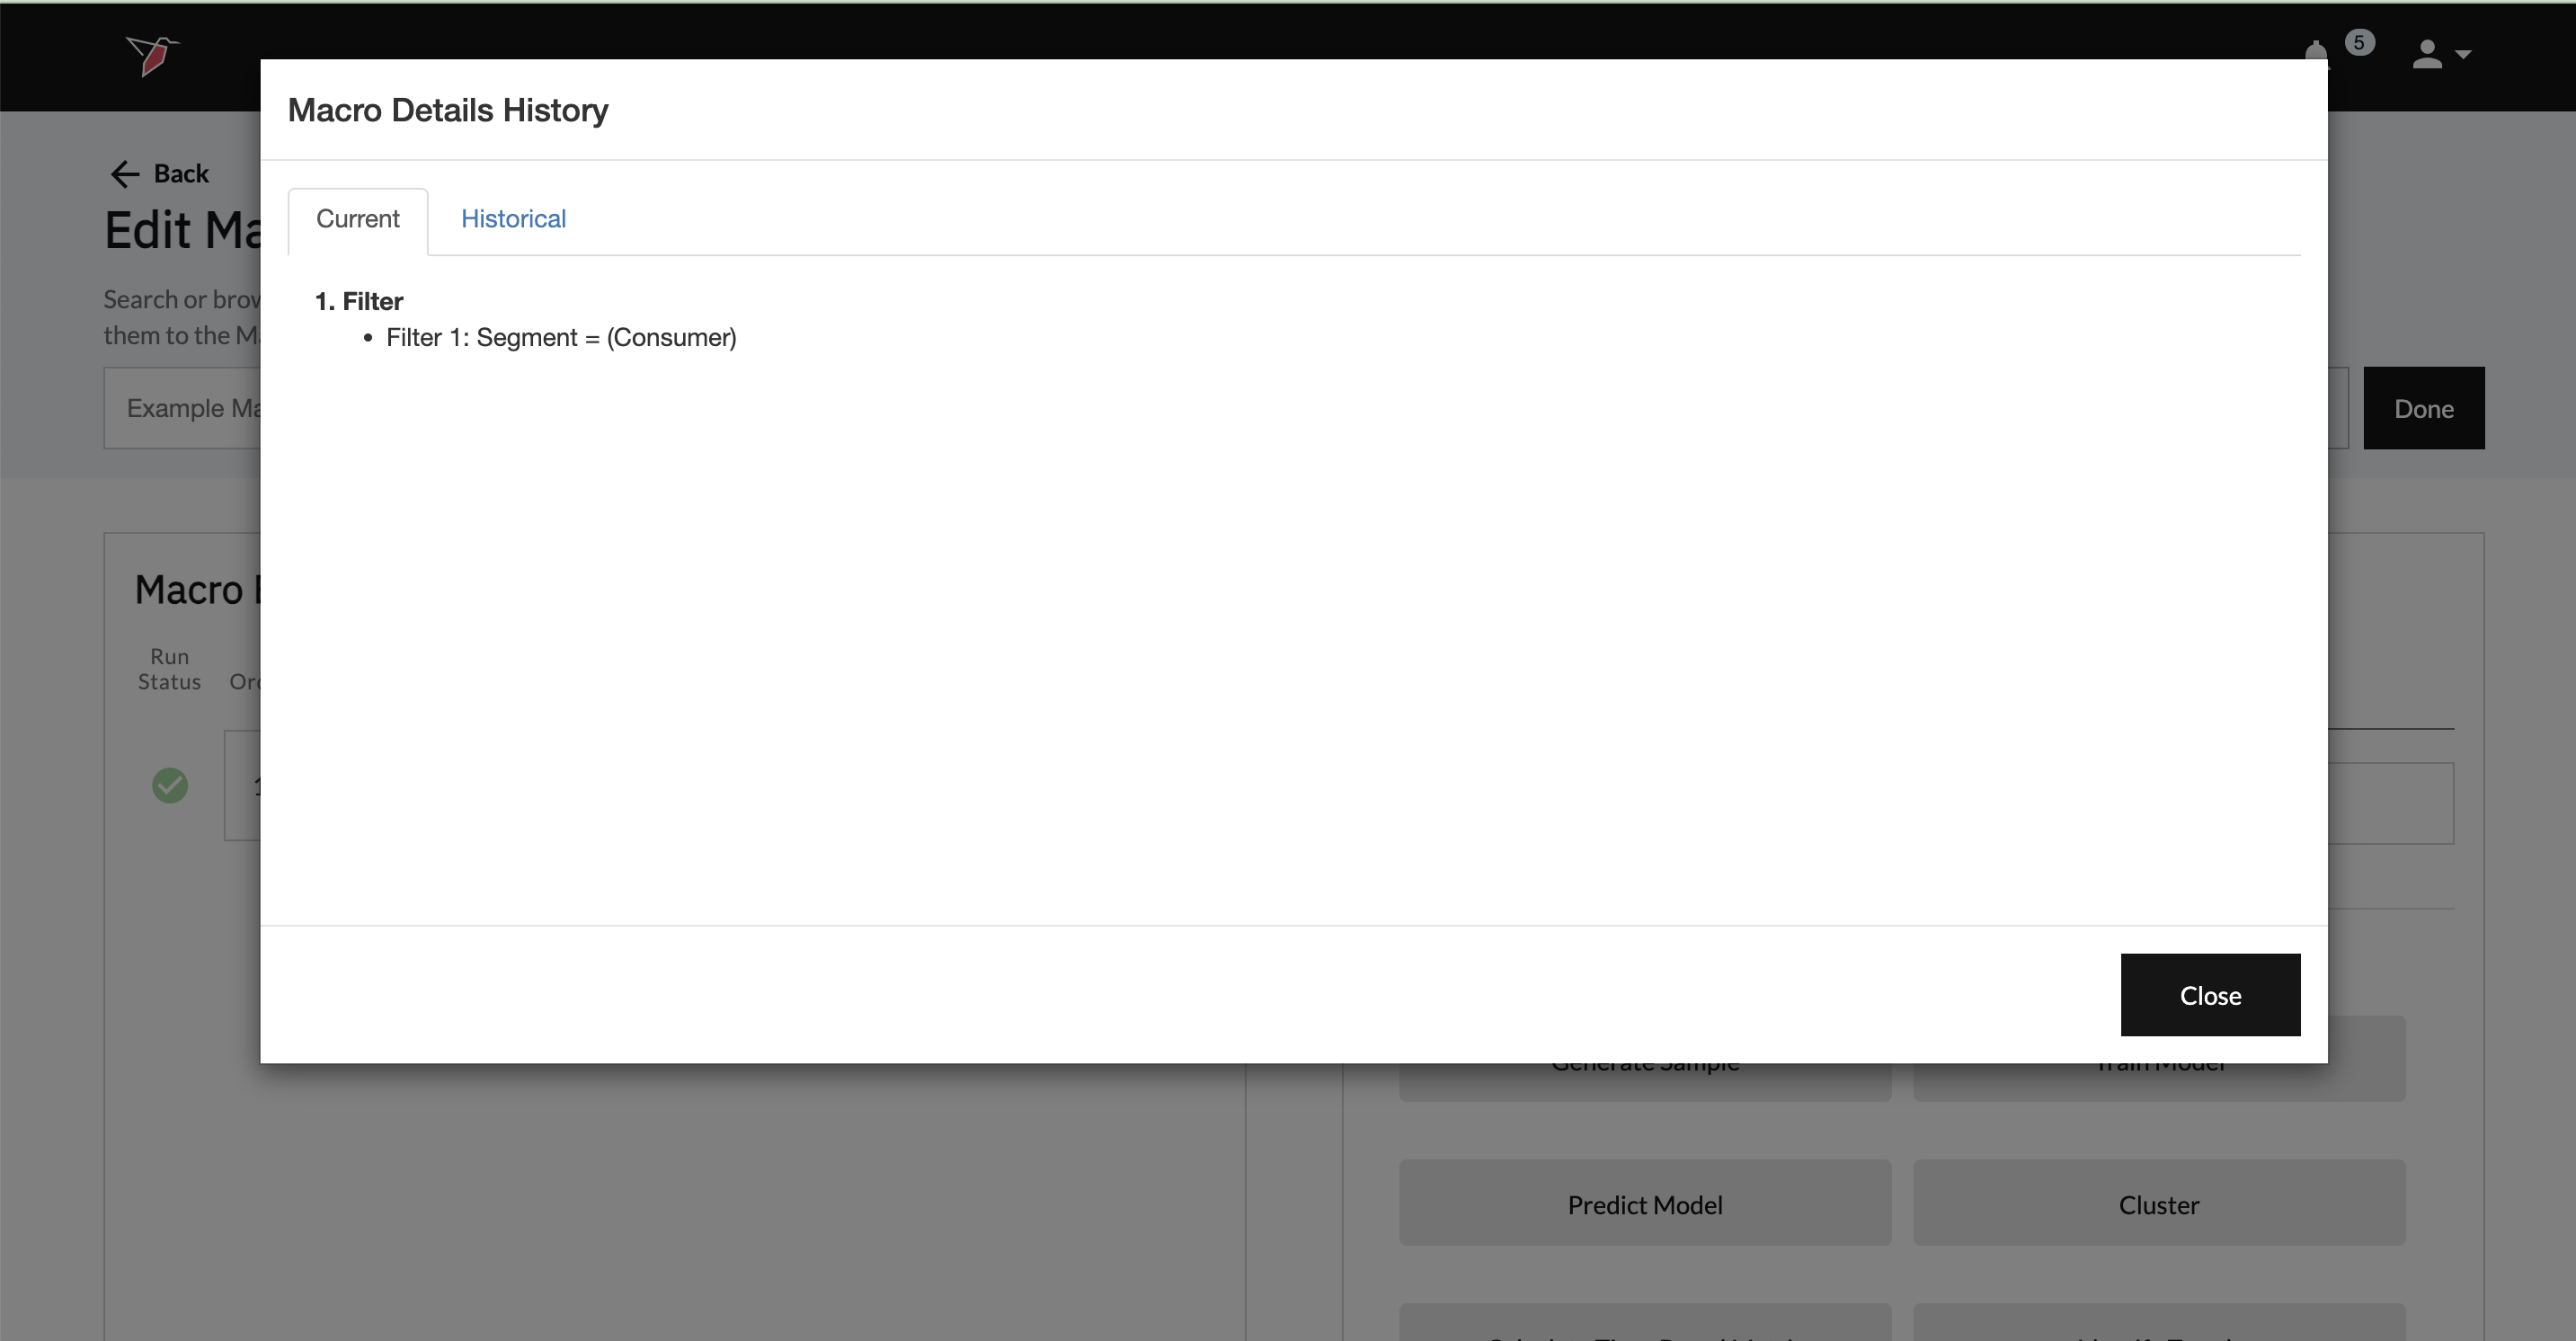
Current View
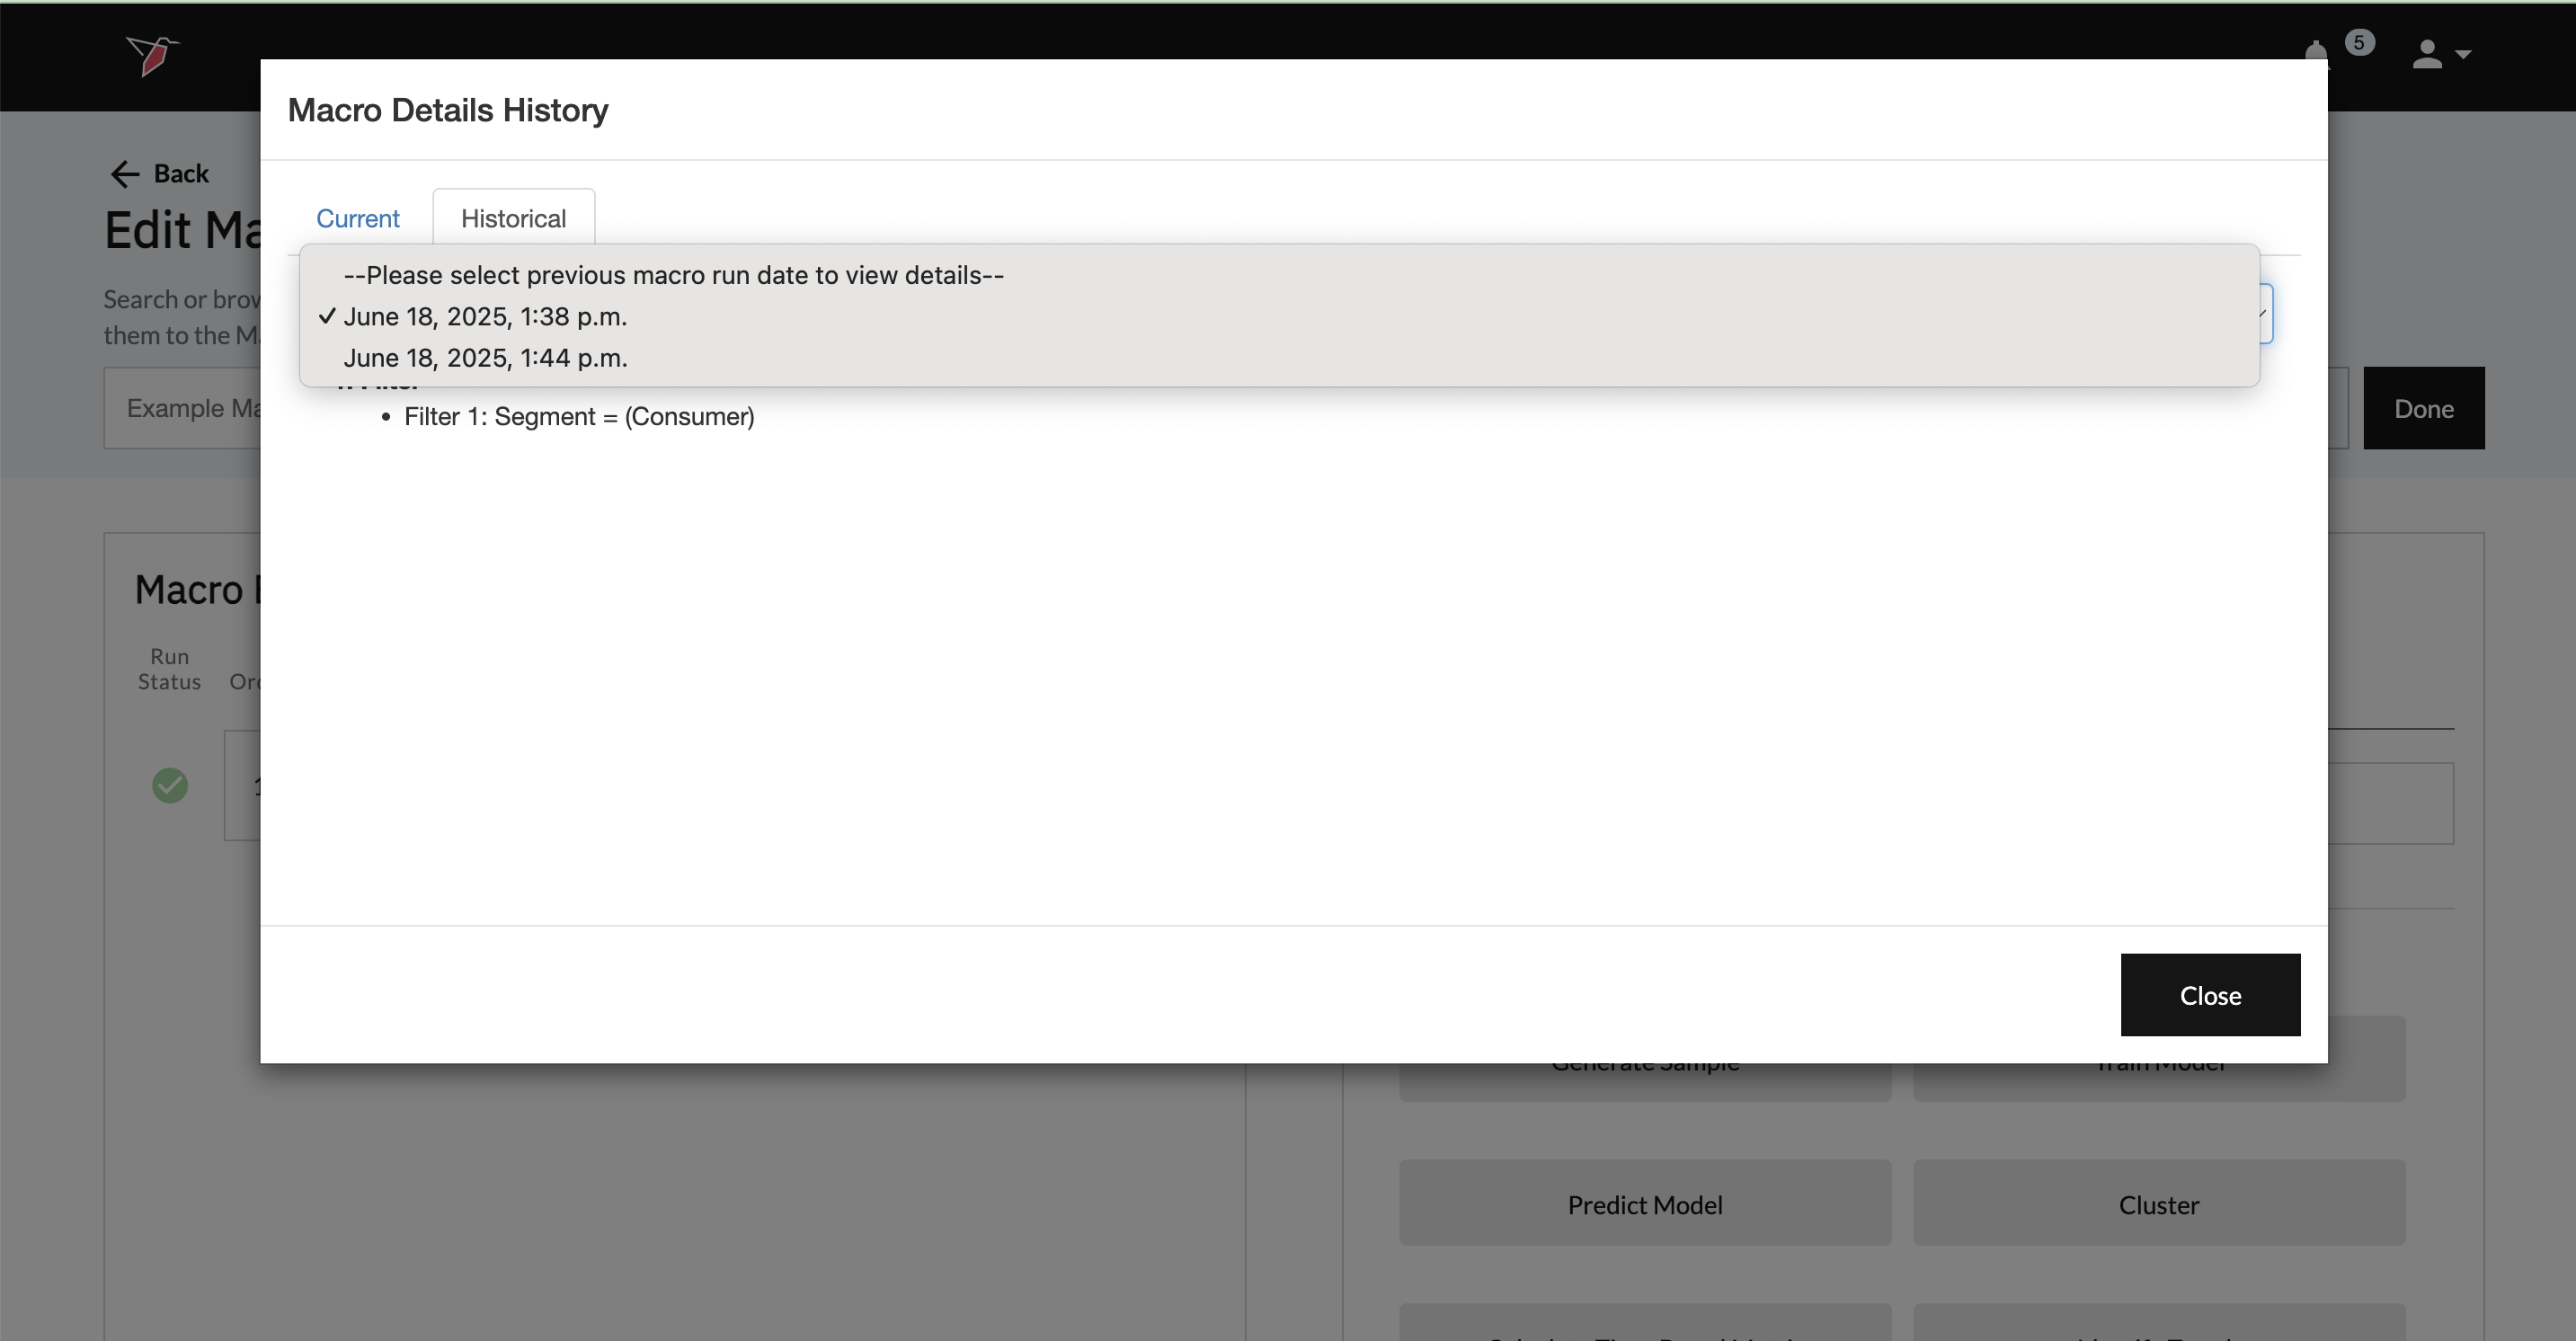
Historical View
Using the Processed Dataset Outputs
The processed datasets produced by a macro can be used in various ways, see this guide on how to use datasets.
Copying Macros
Macros not only automate complex data wrangling but are also very portable. This means that if you have a macro built to process a dataset in a certain way, you can reuse the same macro to process a totally different dataset in the same way without having to rebuild it. Redbird has an intuitive mapping interface that maps the columns used in the original macro to the columns in the new dataset so everything lines up perfectly. The image below shows how the copy process works.
Use case: Sue has a dataset containing data about different kinds of pets sold at a pet store. She builds a macro to process the data and predict next year’s pet sales. Now if Sue gets another dataset that contains data about different kinds of fruit from a fruit store, she can reuse the macro she built earlier to predict next year’s fruit sales using Redbird’s copy macro feature.
The copy process works as follows:
- The copy process is initiated and the new dataset is chosen by the user.
- The copy macro wizard determines the columns and the values from the original dataset that went into the macro and tries to map them to the new dataset. For instance, if the original dataset had a target column named “Pet” with Dog, Cat, and Bird as the values in it that were used in the macro, the mapping wizard tries to find an exact match in the new dataset.
- The wizard then prompts the user to provide a mapping for the columns it couldn’t map. For instance, if the target column is named Fruit and the corresponding values to be used are Apple, Orange, and Banana, the user can map them accordingly.
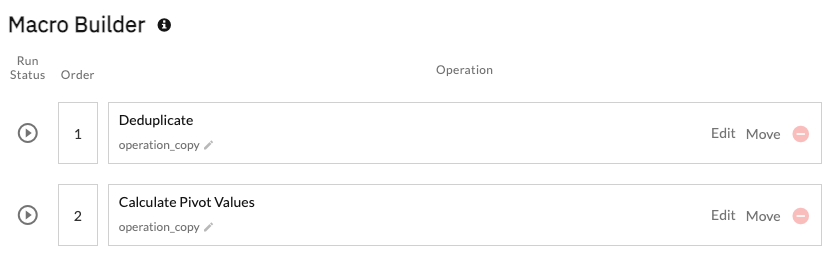
- A copy of the latest editable macro attached to the Pets dataset is created and is then attached to the Fruit dataset as a fully editable macro.
To copy a macro, do the following:
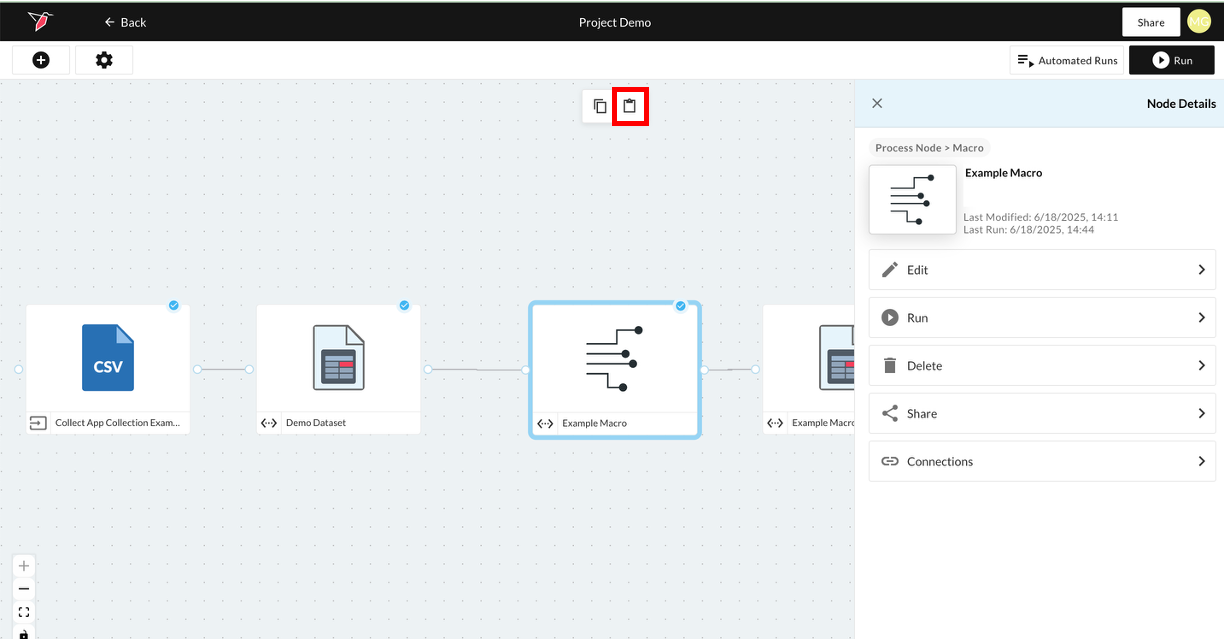
- On the Workflow Canvas page, find the macro you want to copy and click the Copy icon at the top of the canvas.

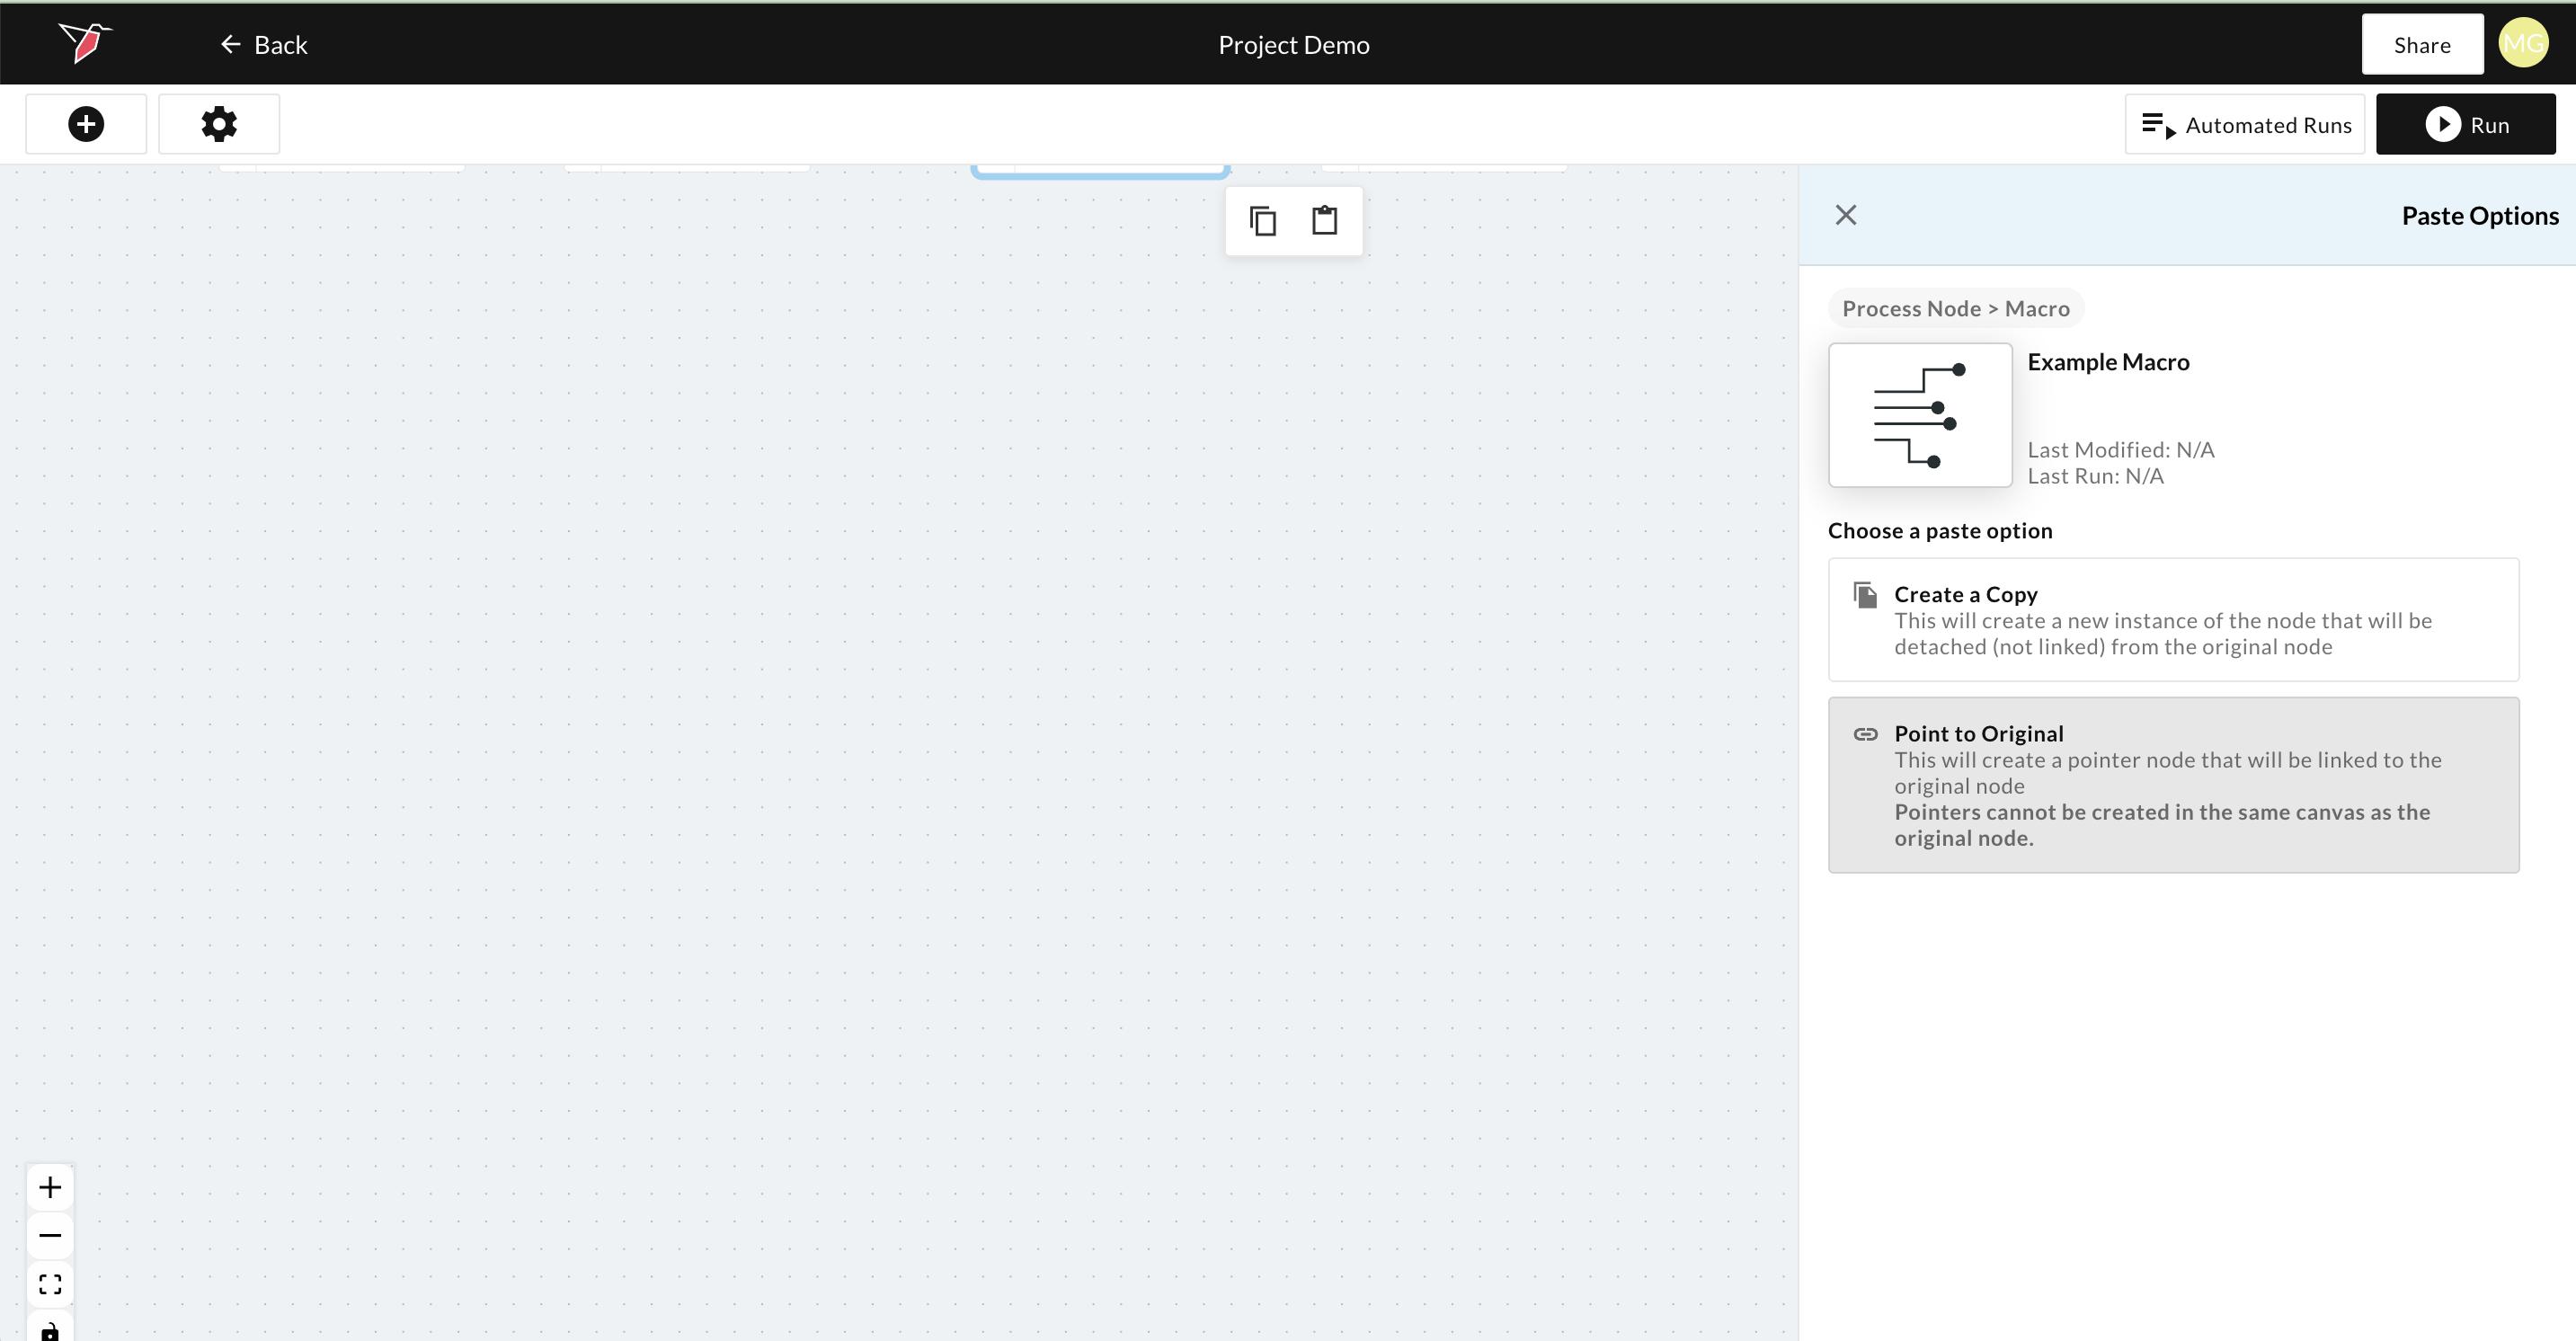
- Then navigate to the workflow canvas where you wish to paste the Macro (this can be the same canvas or a different one). The canvas must contain the dataset you intend to connect to the Macro. Once on the desired canvas, click the Paste icon.
- Click Create a Copy. This will bring you to the Mapping Wizard.
- Choose the dataset to which you want to copy the macro in the New Dataset dropdown (from all those available on the current canvas), and click Next located on the upper and lower right corners of the screen.
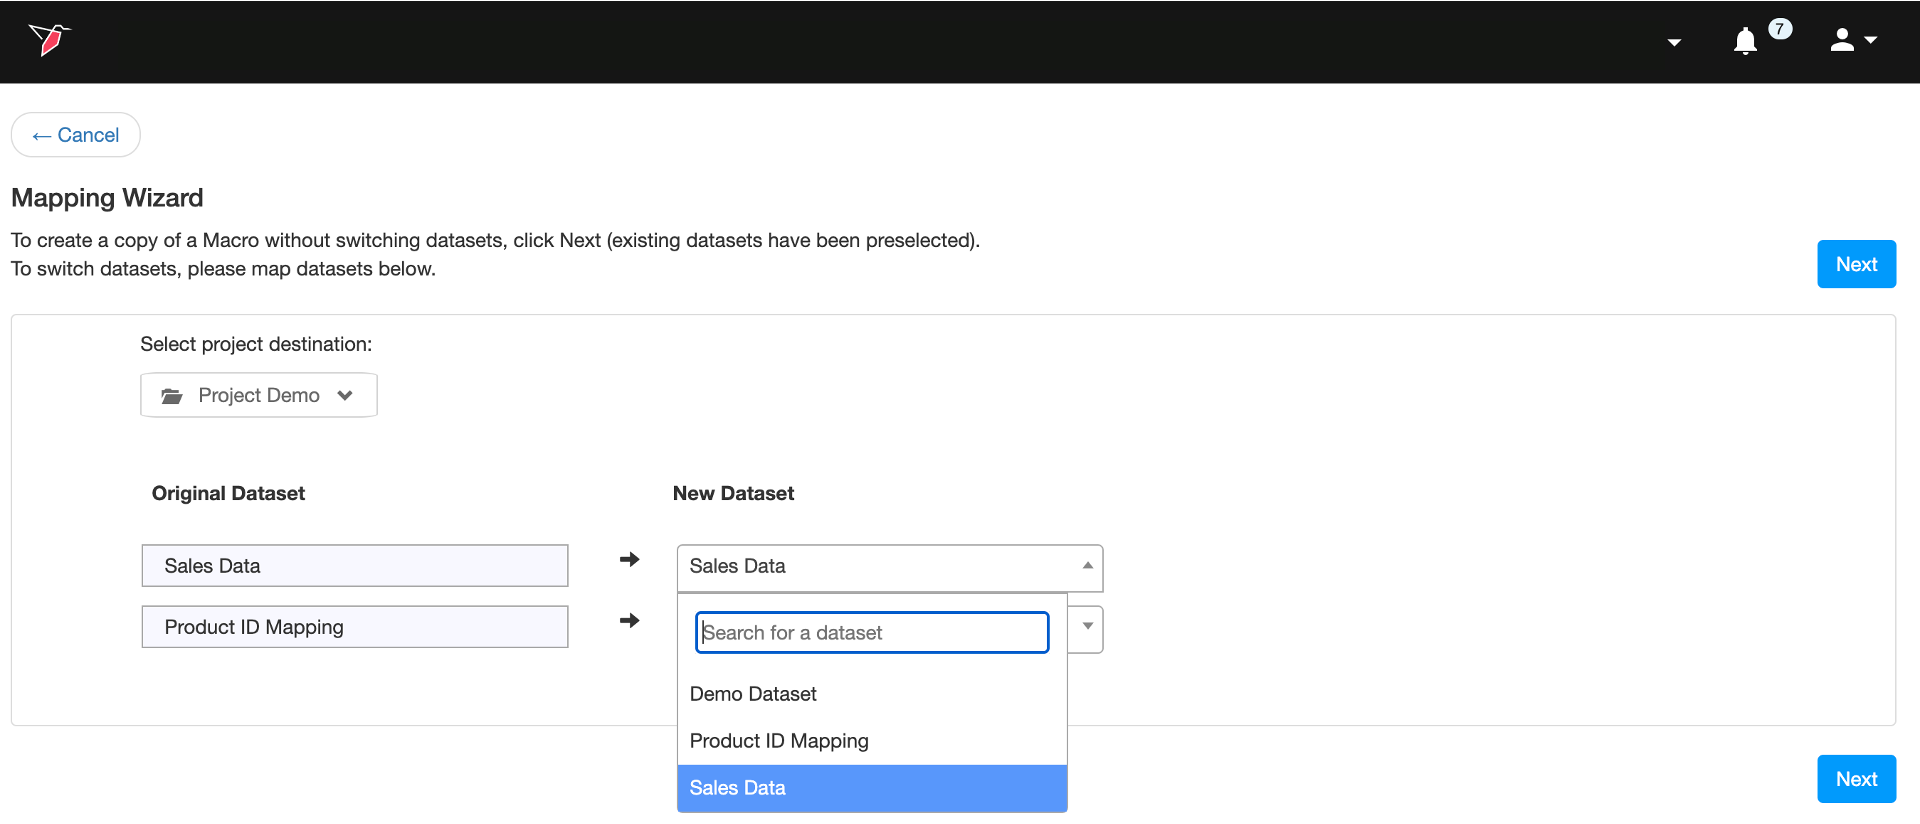
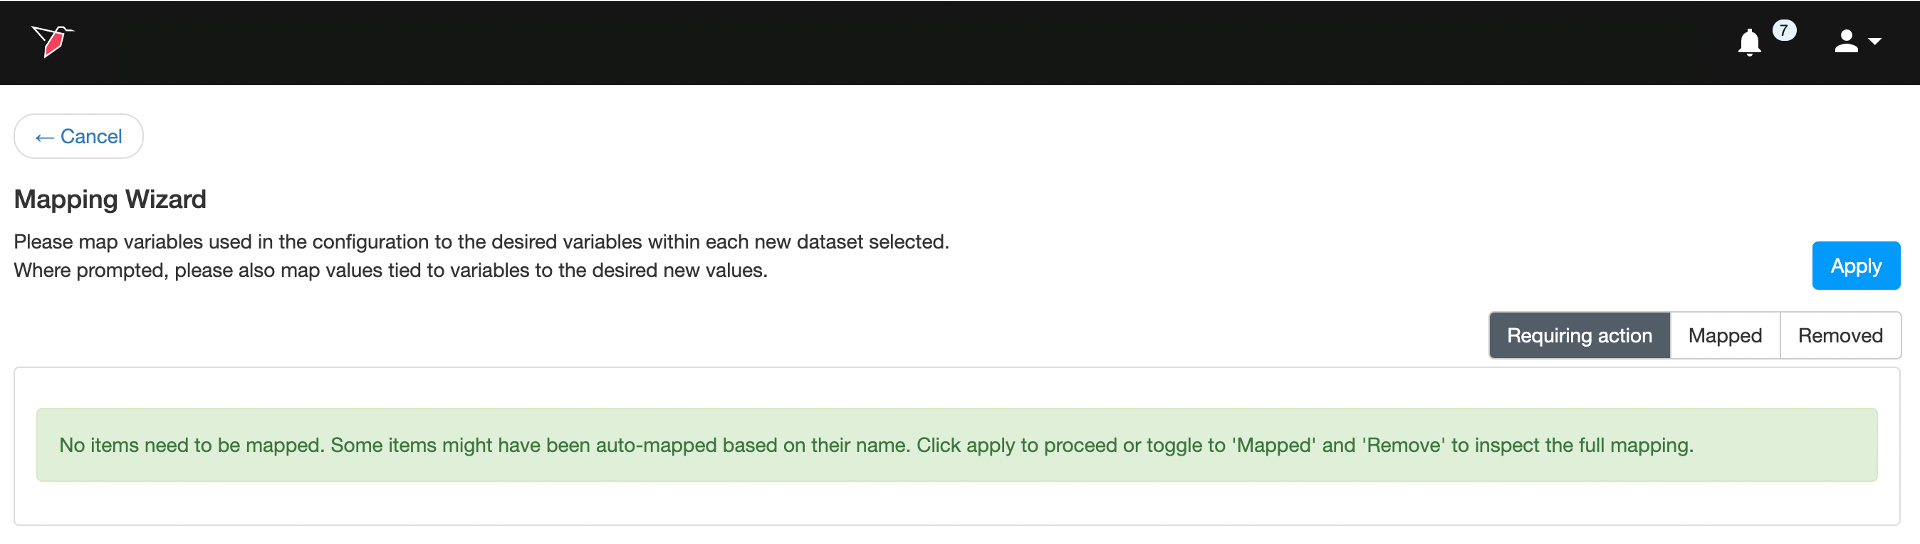
- The wizard will now try to map all the columns used in the macro to the new dataset. If Redbird was able to successfully auto-map everything, you will see the following:
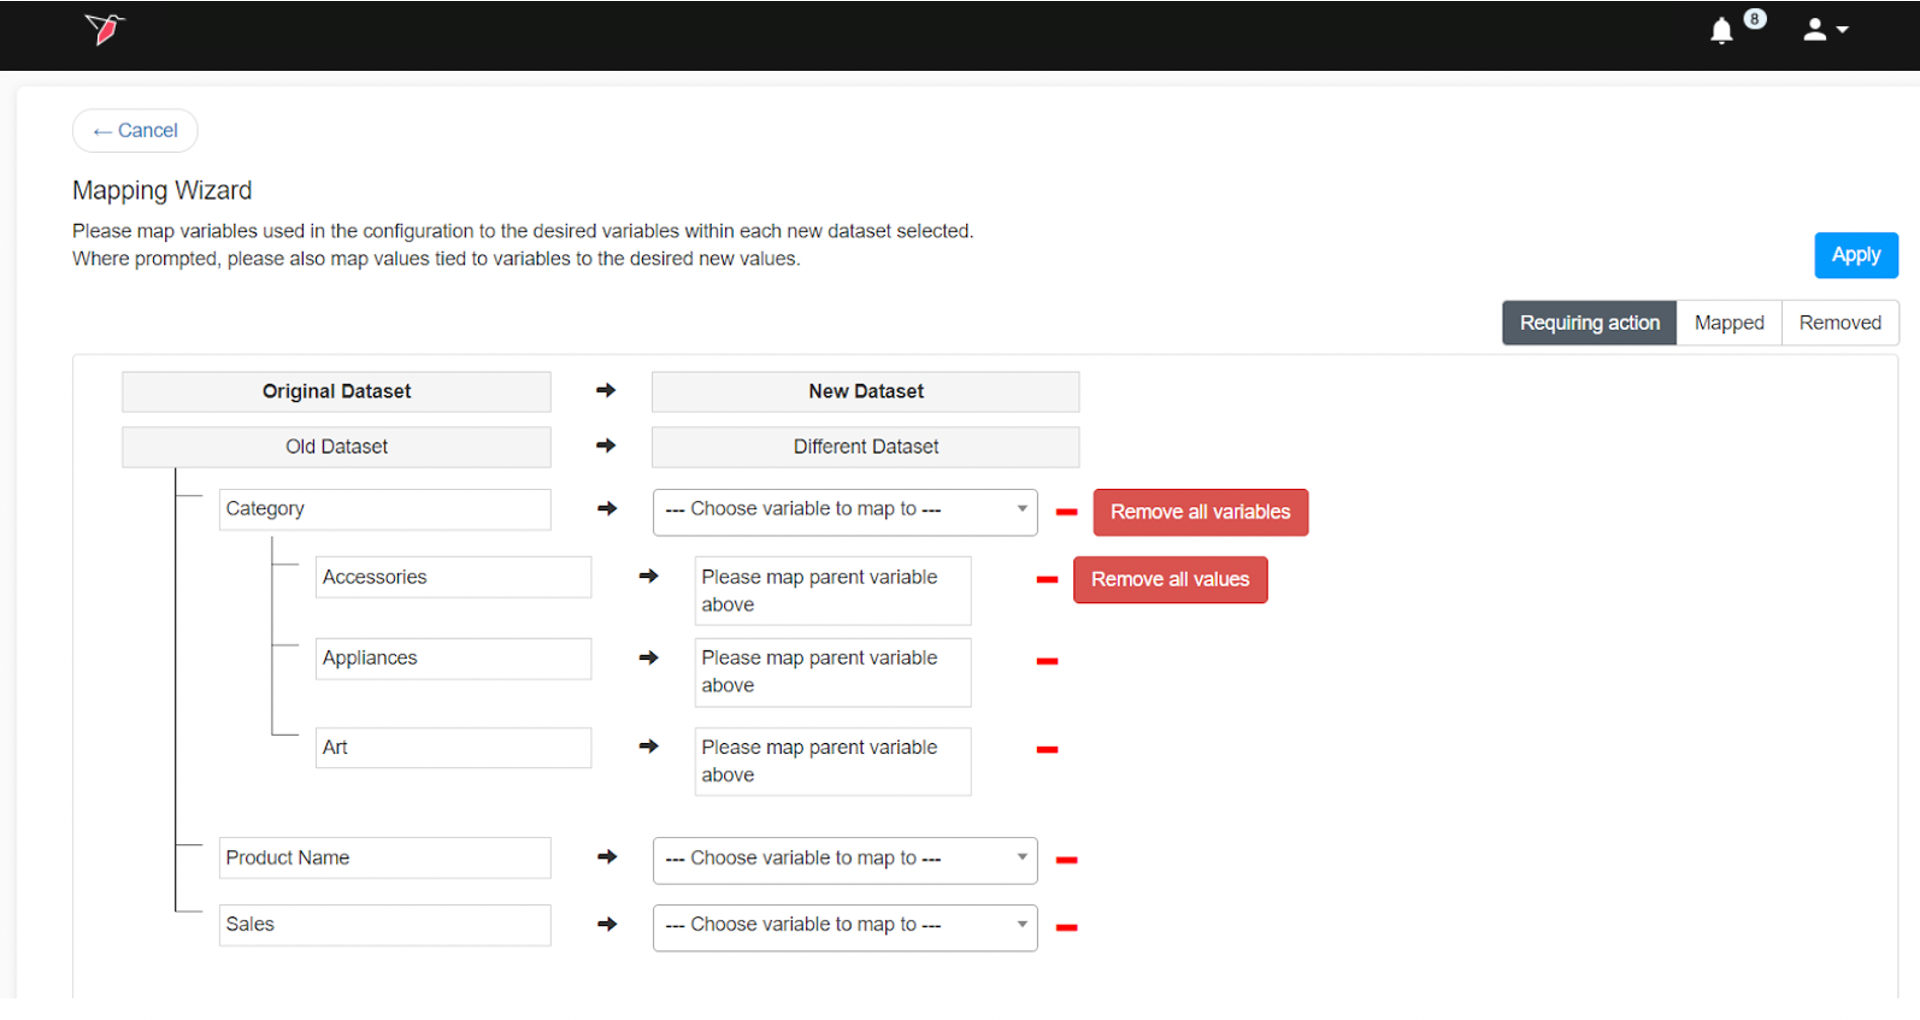
- The mapping wizard will ask you for inputs in the Requiring Action tab if there are any columns or values that need mapping. From here you can do the following things:
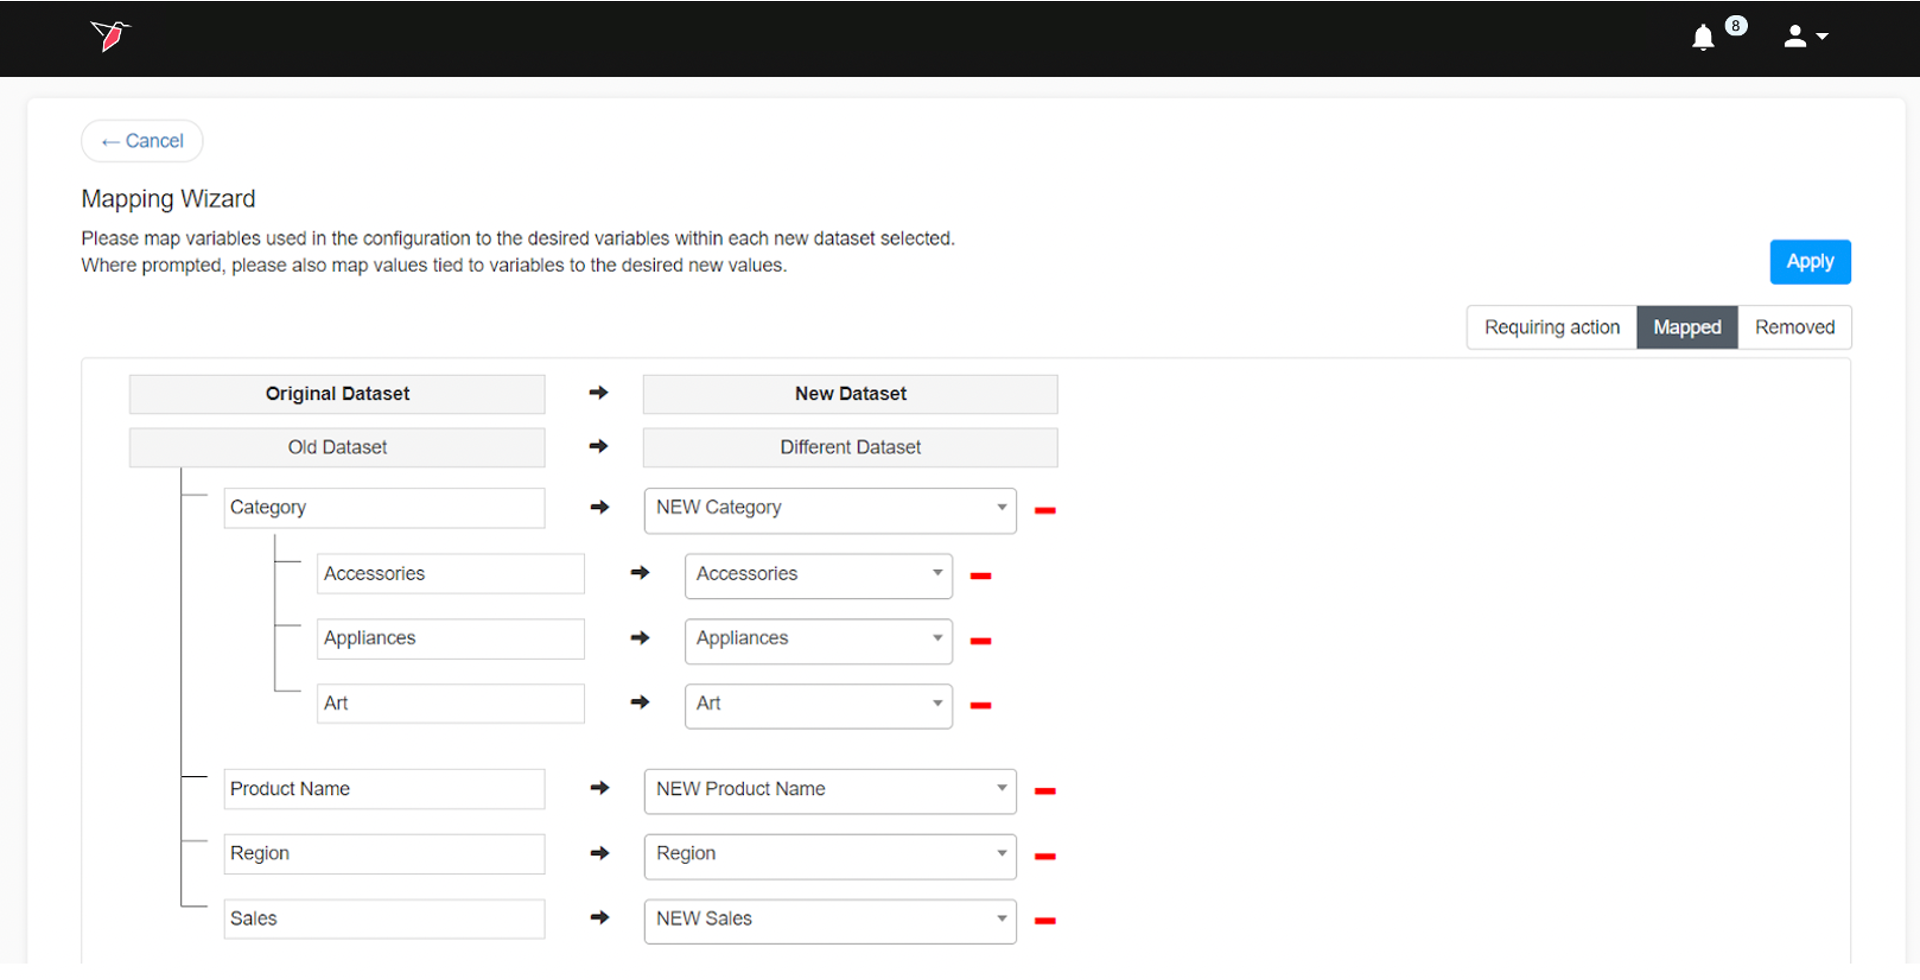
- Map the columns and the values (shown as a sub-level) from the original dataset to the new dataset. Any variables and values that were mapped will move to the Mapped tab on the upper-right corner of the wizard.
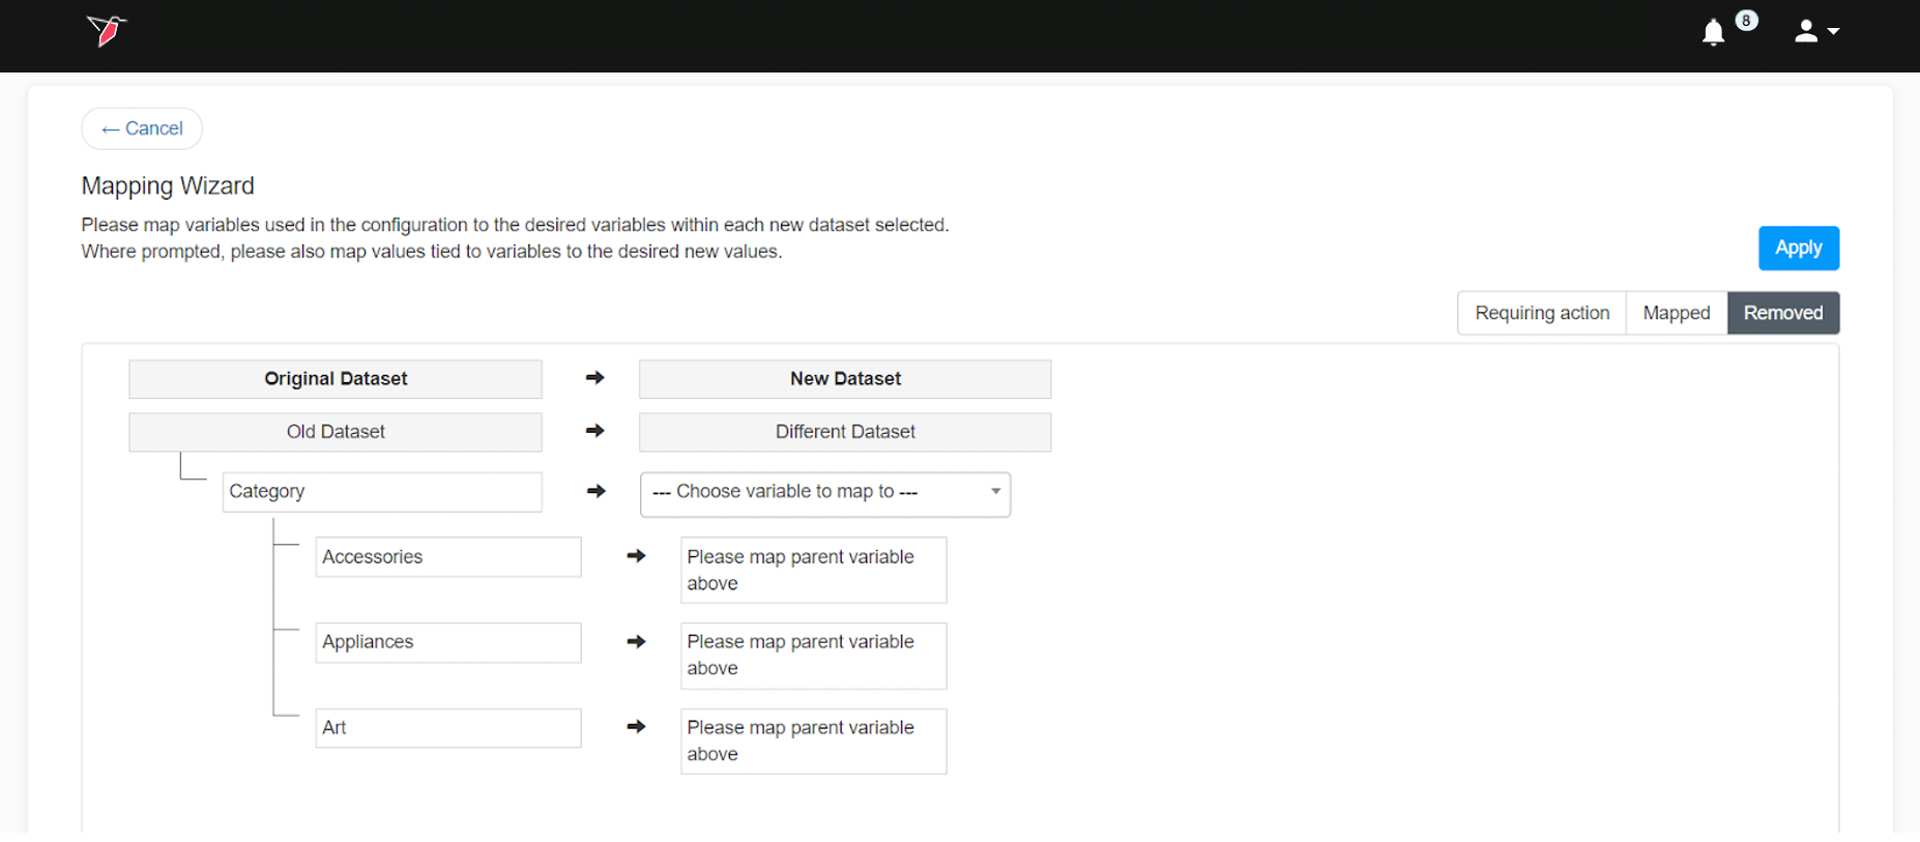
- Remove the column (variable) or value mappings one by one by clicking on the right-hand side of the mappings. Note that removing mappings may cause some operations to break. You will have to edit the operation to fix it in this case. Any variables and values that were removed will move to the Removed tab on the upper-right corner of the wizard.
- To bulk remove mappings use the Remove all variables and Remove all values buttons. Any variables and values that were removed will move to the Removed tab in the upper-right corner of the wizard.
- This step is optional. To edit any mappings that were previously made, click Mapped on the upper-right corner of the wizard. This will show you a list of items that were mapped before which you can change.
- This step is optional. If you want to edit the mappings for items that were removed, click Removed on the upper-right corner of the wizard.
- Once you are done with the column mappings, click Apply on the upper-right corner.
The macro will be copied to the new dataset you chose on step 4, and will appear on the Workflow Canvas. From this point, you can make further edits to the replica macro, or you can run it.
Copying Operations
In addition to copying and reusing entire macros on a different dataset, you can also selectively copy parts of one macro i.e. operations, to a different one. Redbird uses the same wizard to map the columns and values that go into the operation(s) being copied and the destination.
Use case: Sue has two datasets — one contains data about different kinds of pets sold at a pet store and another contains data about different kinds of fruit sold at a fruit store. She created a macro earlier on the Pets dataset, to clean the data and train a data science model to predict pet sales. Now, she wants to do the same with the Fruit dataset but with one added change — she wants to calculate year-over-year change in price and use that in the modeling as well. To do this, she will first need to create a new macro on the Fruit dataset and add the operations to calculate this new metric, she will use Redbird’s copy operation feature to bring in all the data cleaning and modeling operations from the Pets macro to the macro she is currently working on.
The copy operation process works as follows:
- Let’s say the user is working on “Macro 2” attached to “original dataset 2”. From this macro, the user picks a different macro to copy operations from. Let’s call this “Macro 1” which is attached to “original dataset 1”.
- The user then picks the operations they want to pull from “Macro 1” to “Macro 2”.
- Redbird’s mapping wizard then tries to map the values and columns from the original dataset 1 to 2.
- A copy of the operations is then created on “Macro 2”, mapped to “original dataset 2”
To copy operations, do the following:
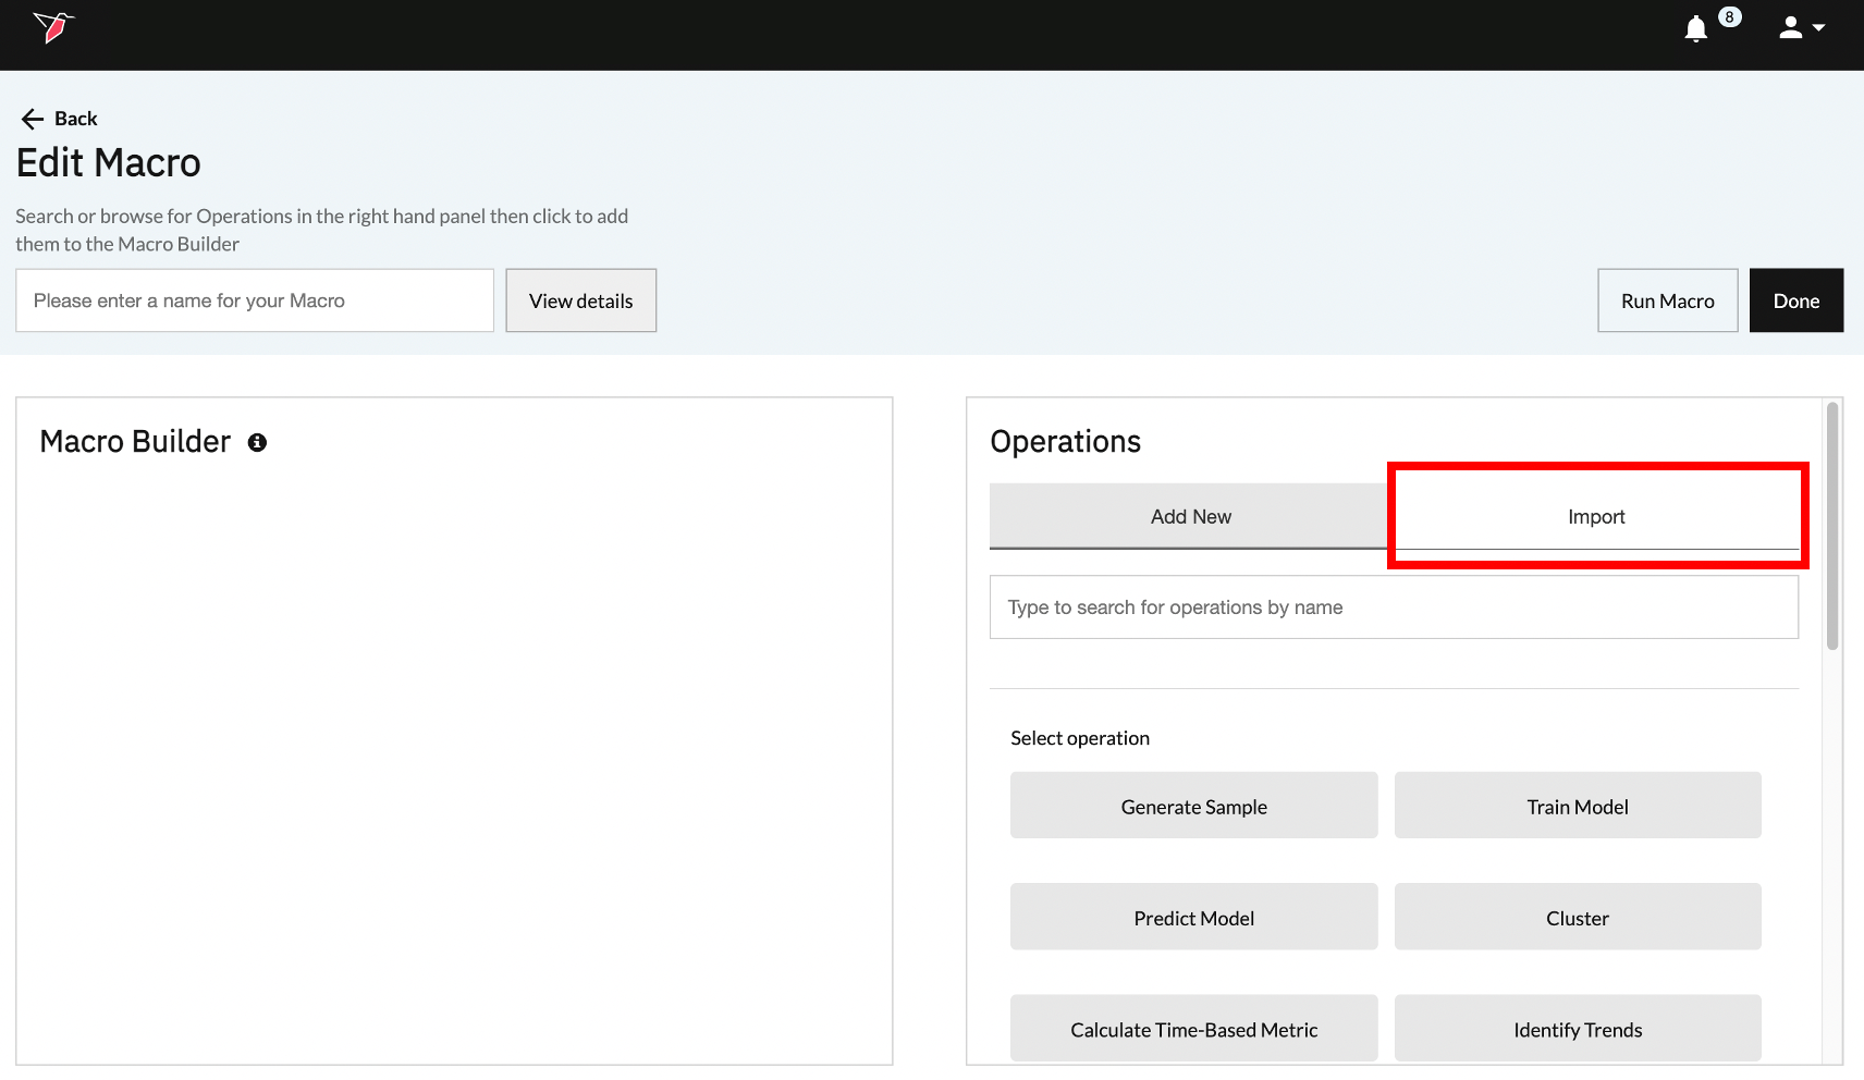
- On the macro you are working on, click Import on the right-hand side of the Edit Macro page.
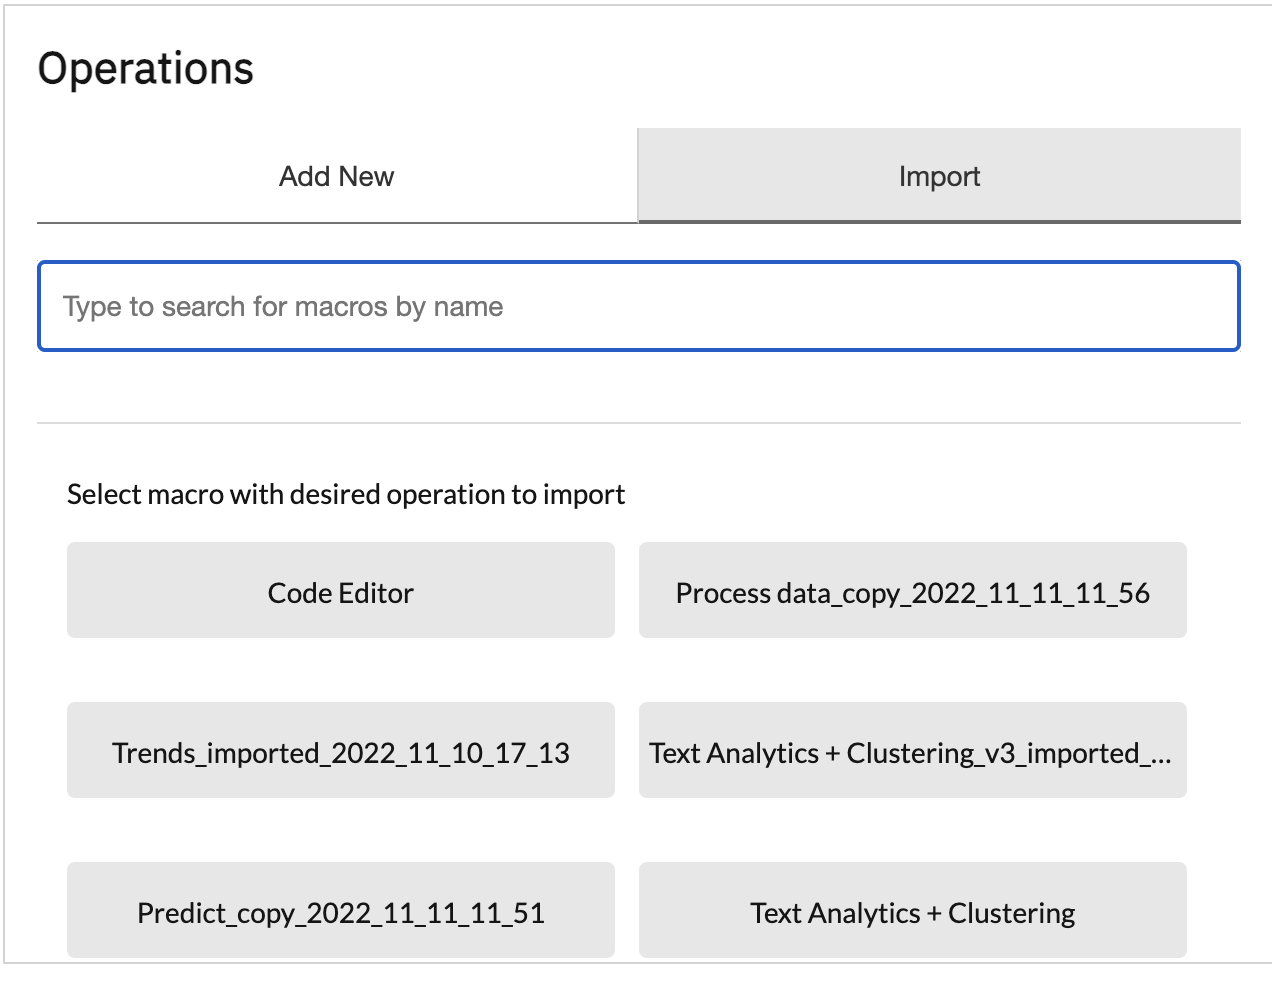
- Next, choose the macro from where you want to pull the operations. There are multiple ways of doing this:
- Use the search bar to search the macro by name.
- Pick from the macros using other datasets you have access to.
- Then, choose the operations you want to copy. There are multiple ways of doing this:
- If you want only one operation, click on the desired operation.
- You can choose multiple operations as well, just click on all the desired operations one after the other.
- Click Select All on the upper-right corner to choose all the operations in the macro.
- After the operations have been chosen, click Start Copy. This will bring up the mapping wizard
- Follow steps 4 through 9 from the Copying macros section above.
- The operations will be copied to the macro you are working on. From here you can edit the macros you just copied over or add more operations.