AI Data Tool
Overview
The AI Data Tool Node (AI DT) lets users transform data simply by describing their transformations in natural language. Redbird AI will translate those instructions into code that can be rerun as part of an automated workflow. The AI DT can transform different formats of input sources and create multiple outputs, all of which can be reviewed and easily refined at each step of the process. The AI DT can also perform more complex analysis such as running data science models.
Connecting Your Data Sources
- Add an AI DT node to the canvas by clicking the Add Objects (+) icon, navigating to the AI section, and dragging the AI Data Tool onto the canvas.
- Connect the objects you want to use as inputs to the AI DT node. These can include Redbird nodes from the canvas such as:
- Double-click the AI Data Tool node to edit your configuration. From within the AI DT node you can also connect to datasources in the following ways:
- You can also add documents directly to the AI DT node as a one off upload by clicking the + icon next to resources then clicking File Upload and following the steps.
- You can also use AI to connect to data sources—either preset or custom—via APIs or web automation flows, all through natural language prompts using our AI Connect functionality. You can access this by clicking the + icon next to resources then clicking Add Connection and following the steps. For more information on how it works, see here.
- You can rename your AI DT node by clicking on the pencil icon at the top of the page.
Using AI DT
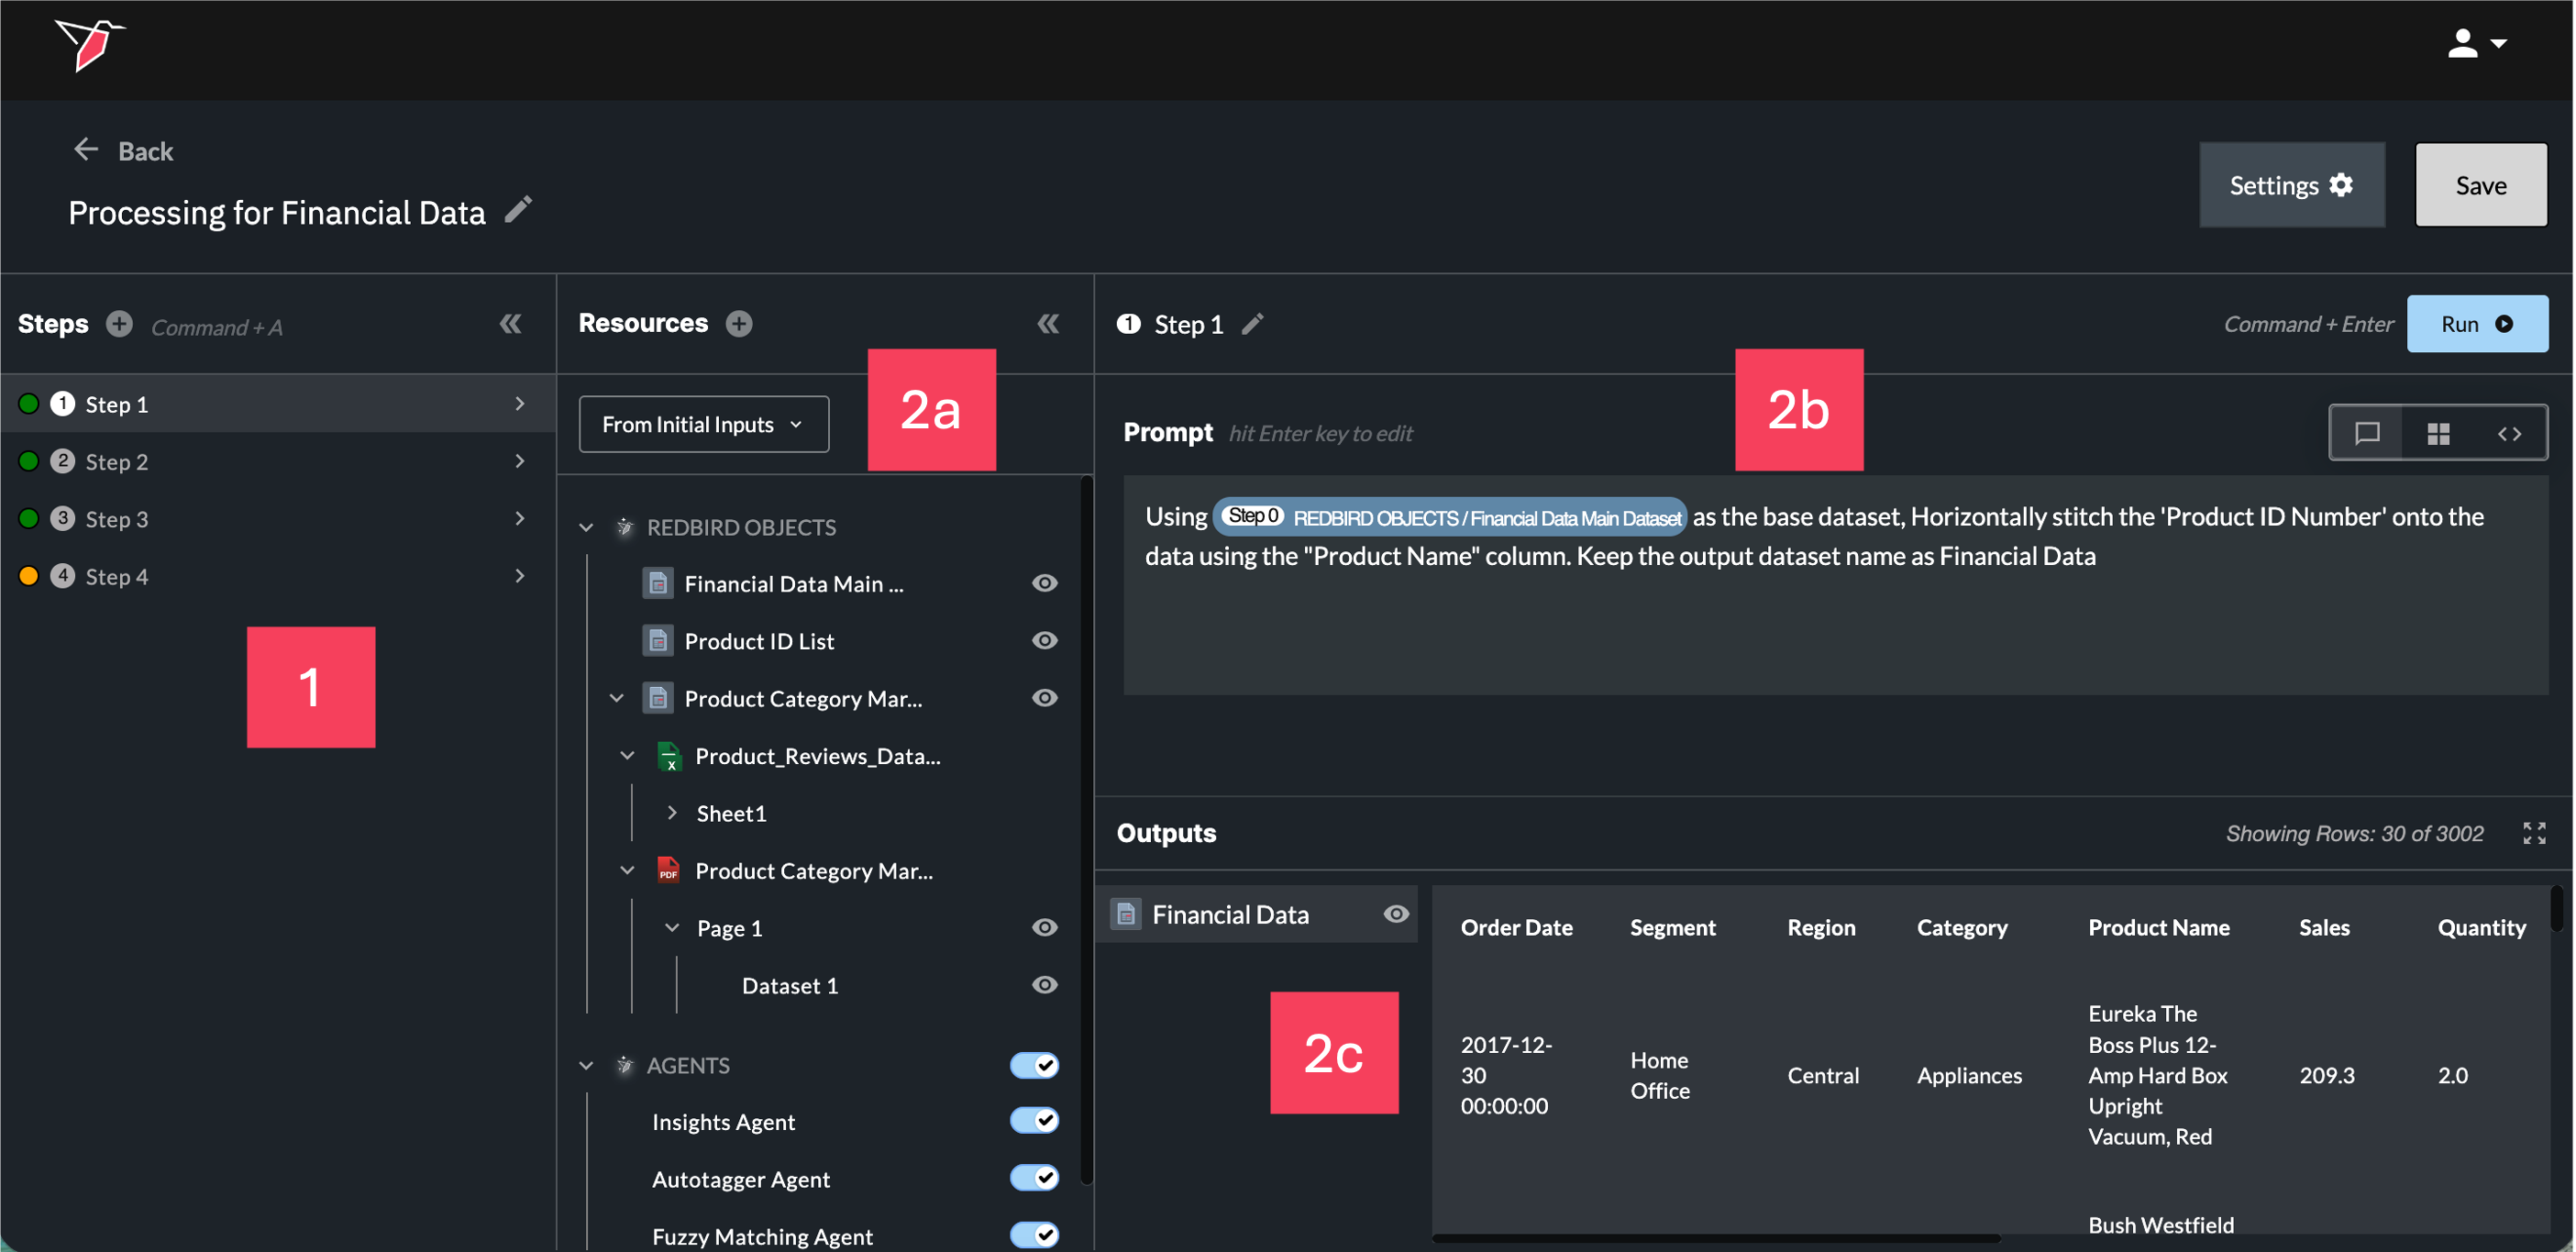
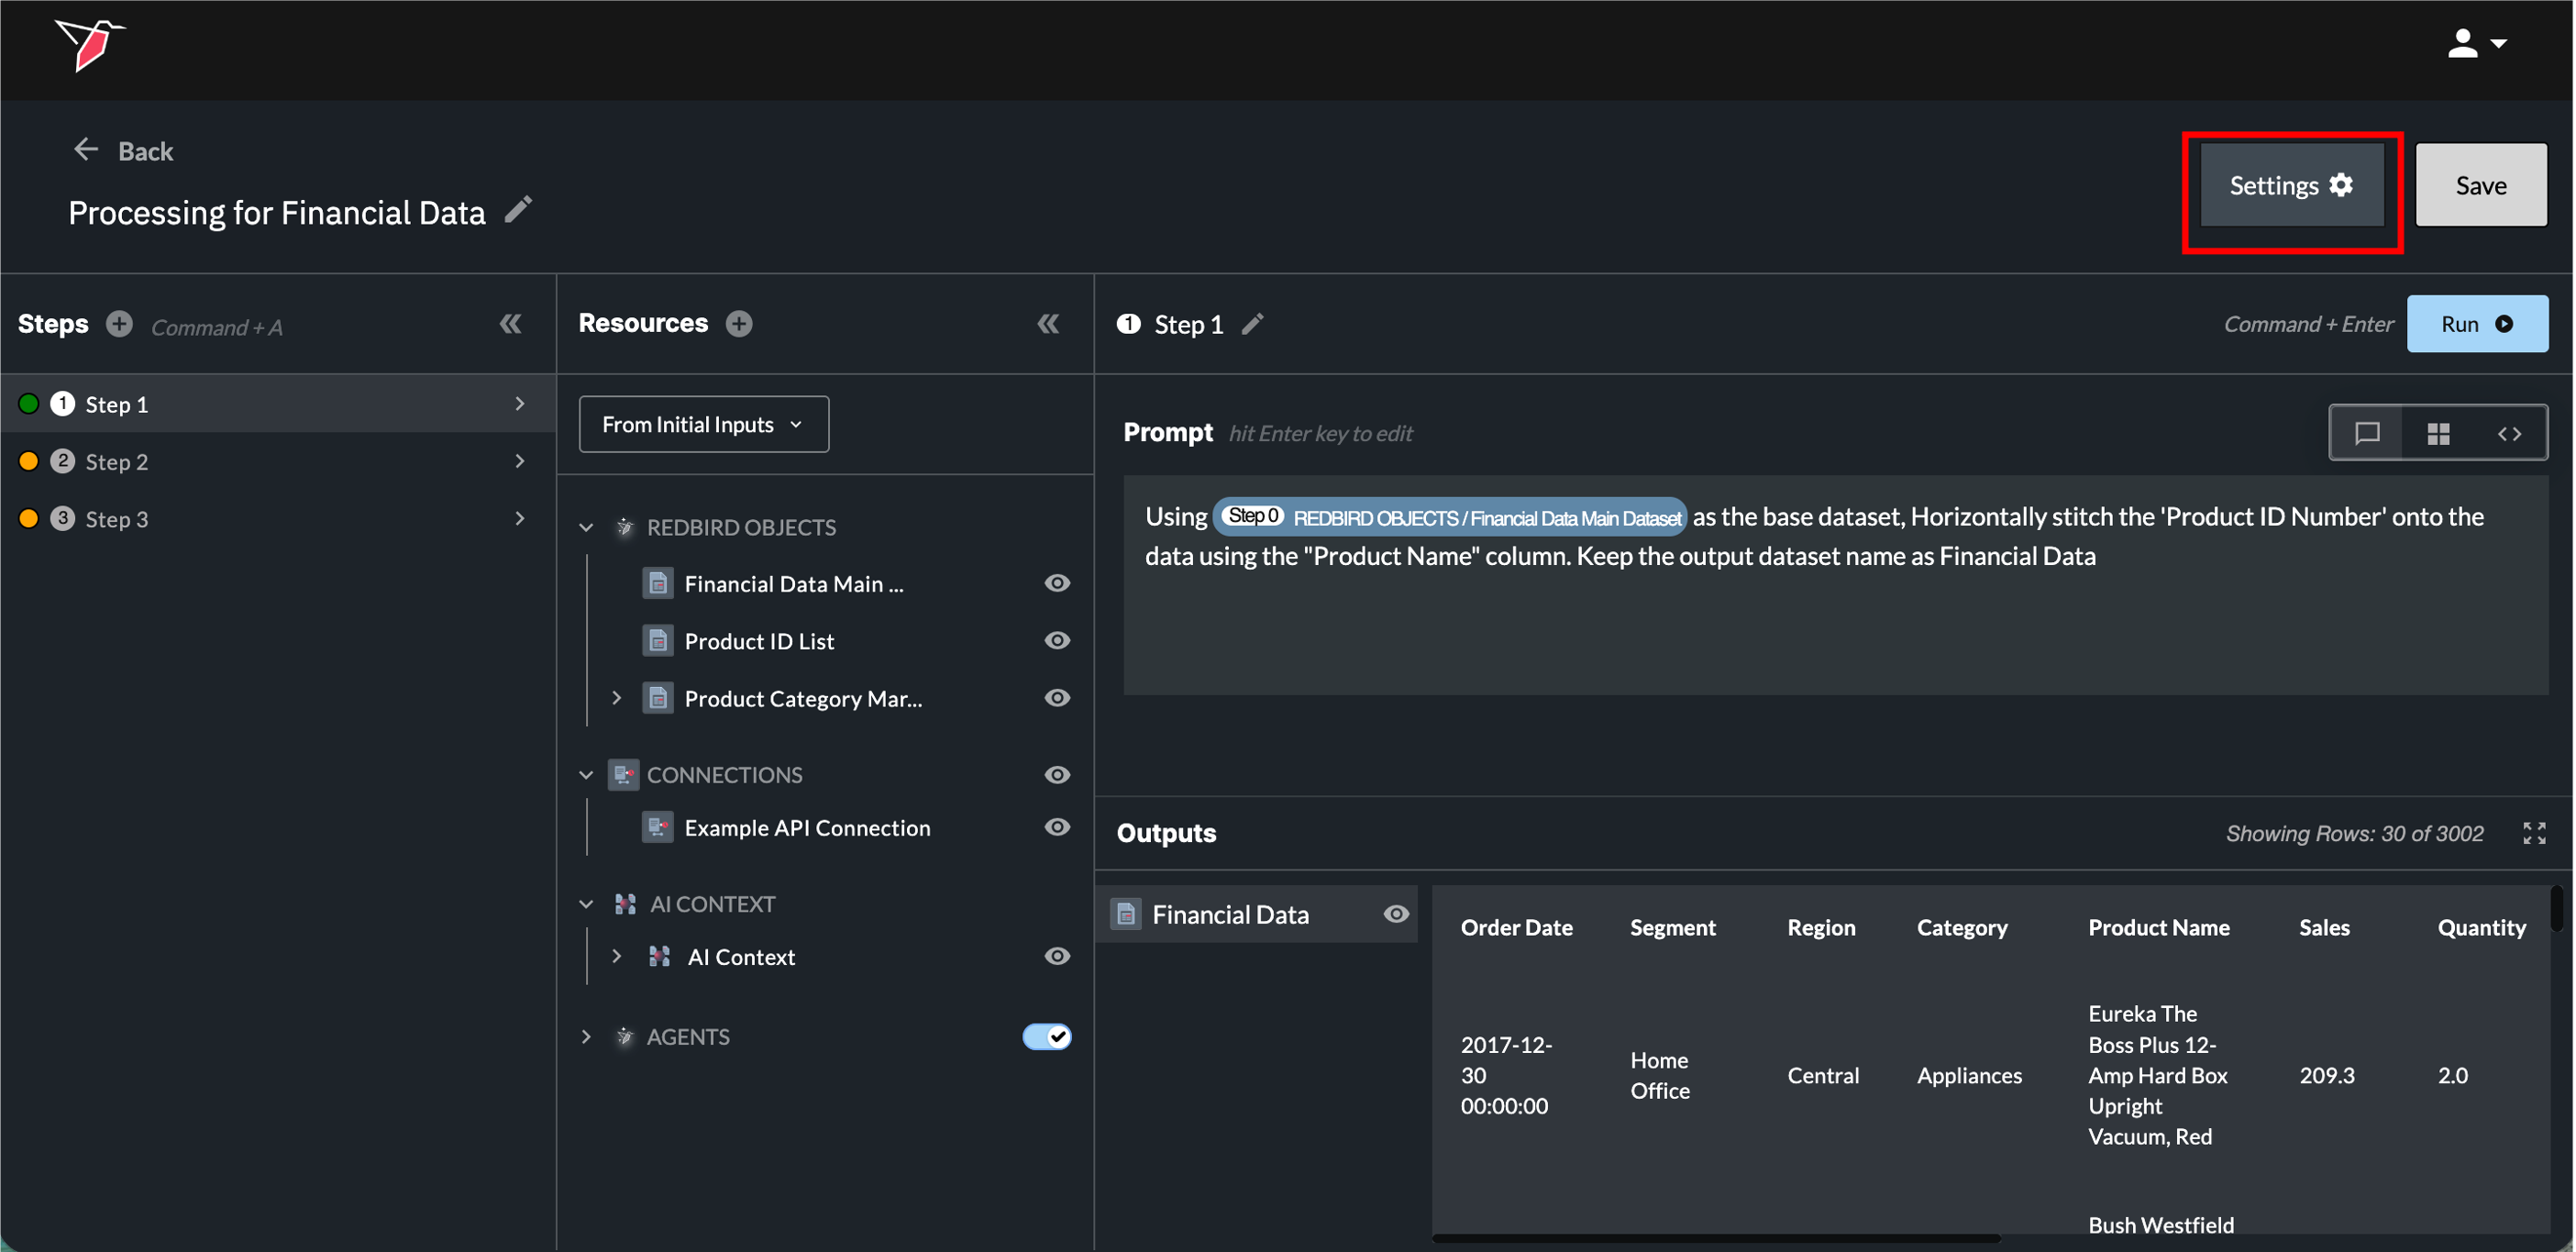
There are four main areas within the AI DT configuration.
- Steps: This section lists all steps created within the AI DT node. Each time the node runs, it executes these steps sequentially, with each step representing a distinct part of the data transformation process.
- Step Details: For every individual step, you will see:
- 2a Resources: The inputs and resources available to transform for that step.
- 2b Prompt: The natural language instructions you provide to describe the required transformation.
- 2c Outputs: The outputs generated from running that step, which either feed into the next steps or are created as objects on the canvas if they belong to the final step.
Each of these areas is explained in more detail in the sections below.
Section 1 - Steps
- It’s best to create a separate step for each distinct data transformation you want to apply to your dataset. You can rename steps using the pencil icon at the top of section 2b to keep your transformation workflow organized. This makes it easier to track and audit each part of the transformation flow and confirm the output after every step. Create a new step by using the + button or the 'Command+A' (Mac) / 'Control+A' (Windows) hotkey.
You can group multiple related transformation instructions into a single step if needed, but it's best to limit this to ~5 instructions to ensure clarity in the AI prompt.
-
Before saving your AI DT node, it is important to note the color of the circle next to each step in Section 1.
- Green - This indicates that the step has code generated and is ready.
- Yellow - indicates that the step does not have generated code, or that the prompt or code has changed since the last run. This means the step needs to be re-run by clicking Run or using the 'Command+Enter' (Mac) / 'Control+Enter' (Windows) hotkey to validate it.
- Red - This indicates that the last time that the step was run, there was an error. This step requires action before being able to run the whole AI DT node or even subsequent steps.
-
You can collapse/expand this section by clicking the double arrow icon in the top right hand corner of the Steps panel.
Section 2a - Resources
In the Resources section, you can view all inputs available to the AI DT node for the current step. There are five types of inputs that AI DT can work with:
Redbird Objects
These can either be Structured or Unstructured Files:
Structured Files:
These are Redbird datasets that are already in a structured, tabular format. They may have been uploaded via a collect app, extracted from a data warehouse, or generated by another node. They also include any structured outputs from the previous step in your current AI DT node. These datasets appear as a single entity in the Resources panel under the Redbird Objects section.
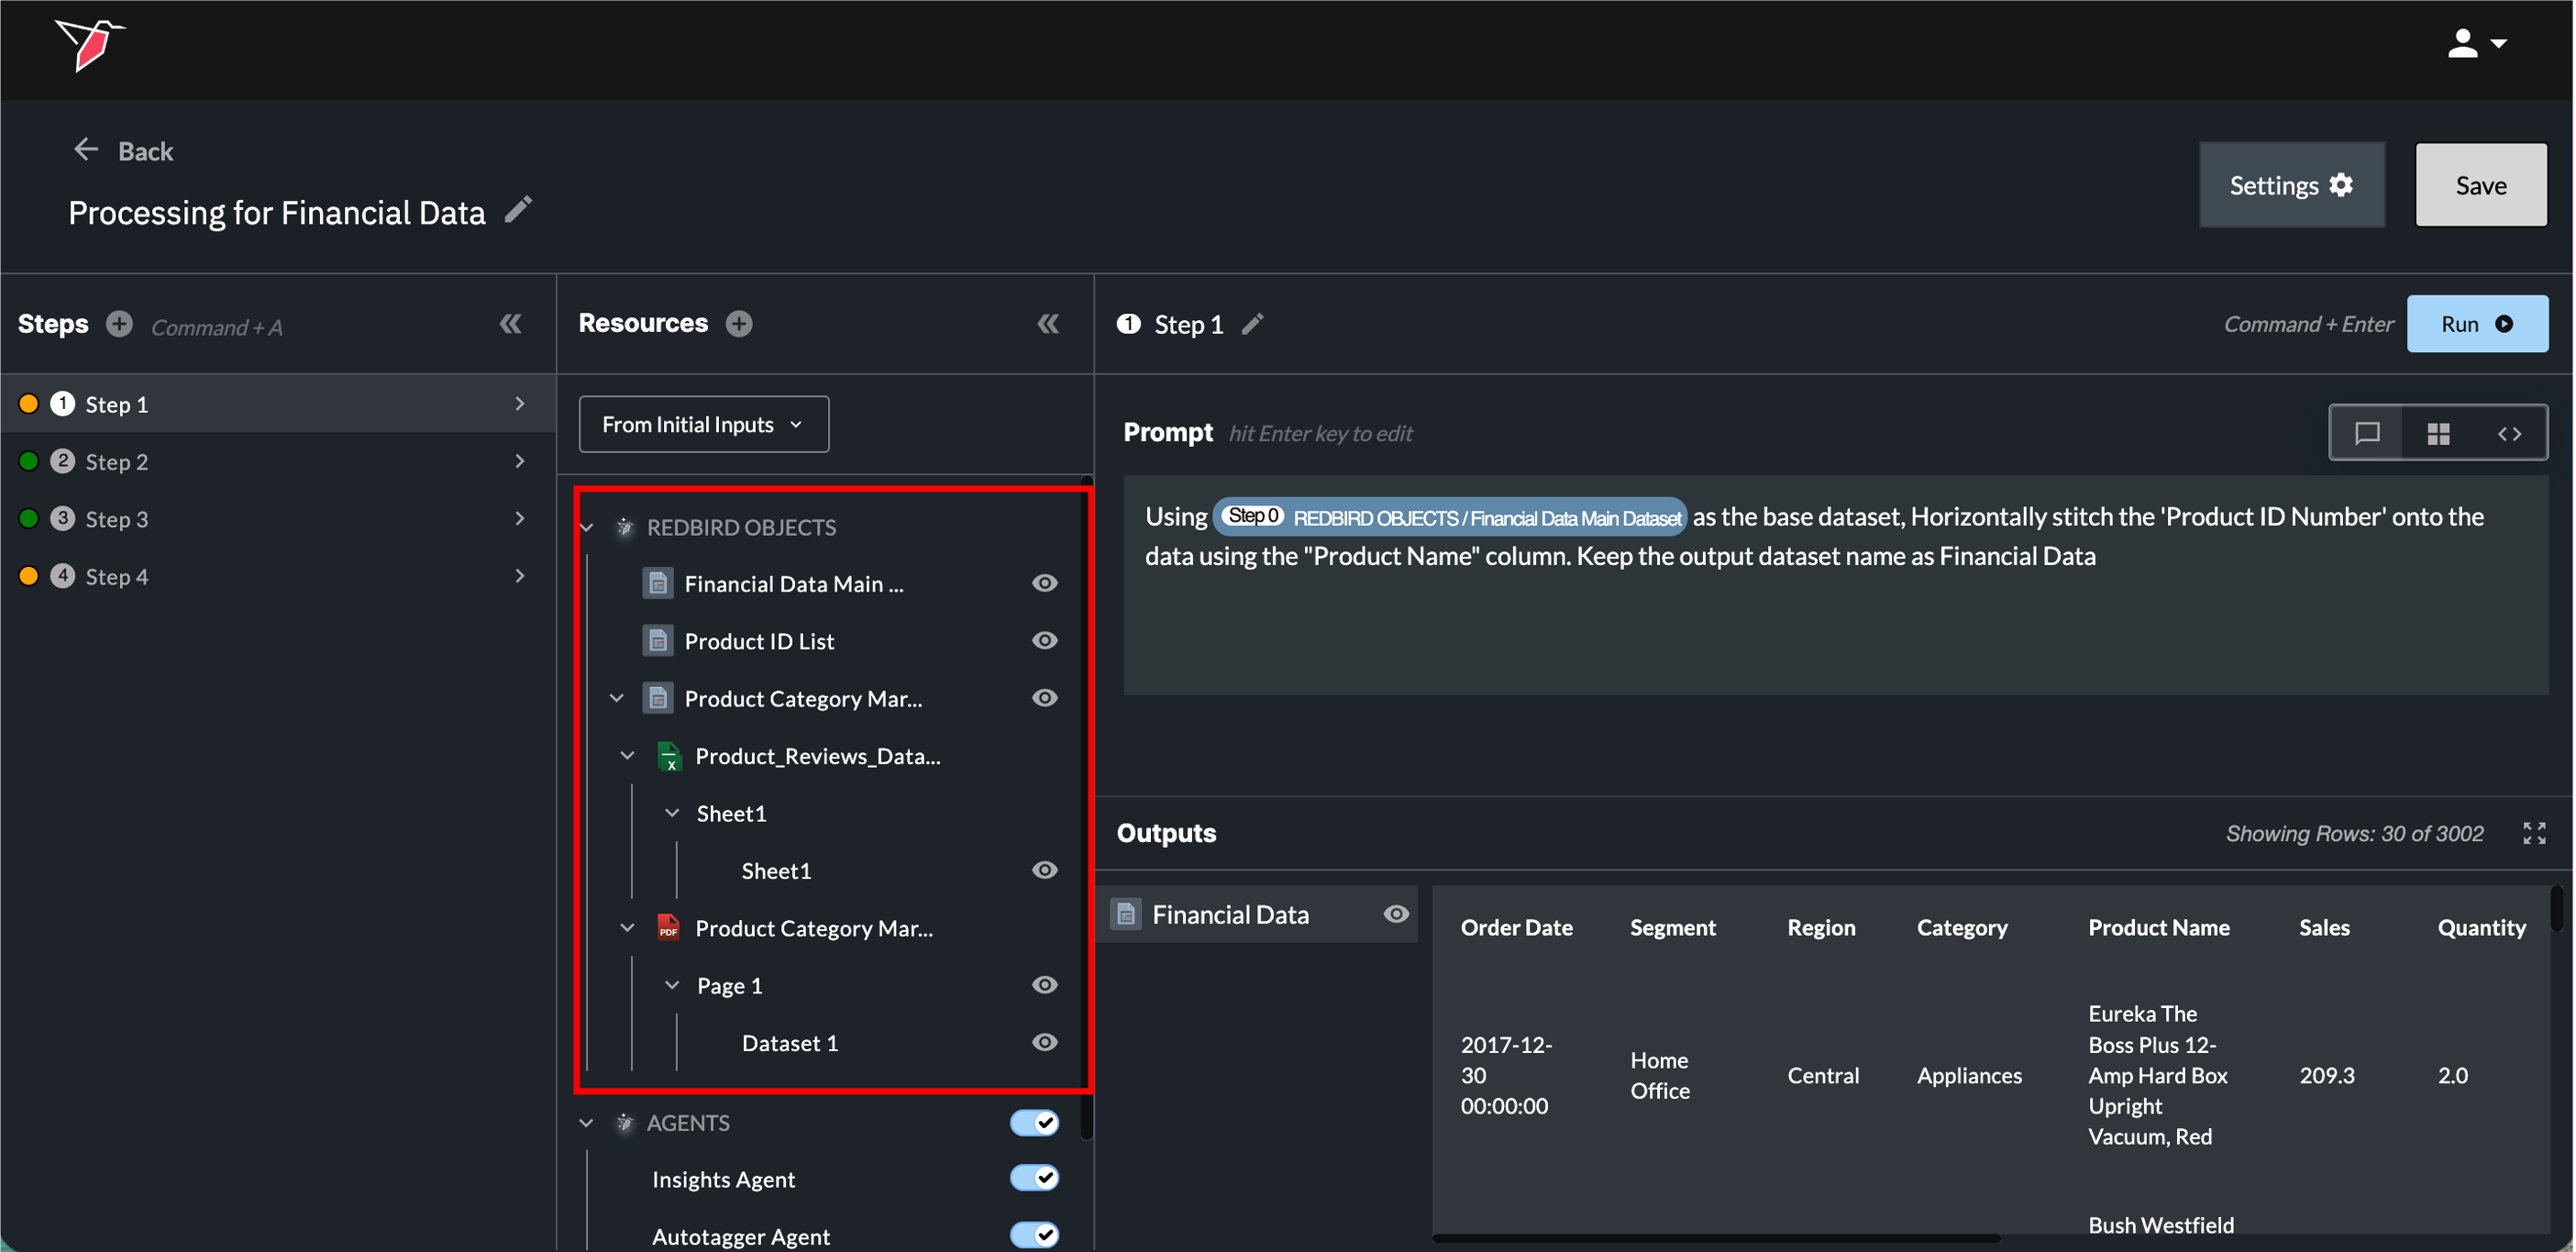
Unstructured Files:
These documents may contain mixed content such as unstructured text, tables, charts, images, or graphics. Supported formats include PDFs, Word documents, images, PowerPoint files, and more. They can be connected via File Uploader, Email Collect, or Cloud Storage apps. Redbird uses AI to extract relevant information, such as tables and charts, from these documents and identifies them as structured data tables that can be used in AI DT. You can use natural language prompts to extract and transform these unstructured document contents into a structured format for downstream workflows. Unstructured documents appear within Redbird Objects as a hierarchy showing the following, and each item can be referenced in the prompt box with the forward slash menu:
- the object name (which represents the file collection of all files uploaded)
- the document name,
- the page or slide number (for PDFs, PPTs, word docs etc.) or the Tab/Sheet name (for Google Sheets/Excel),
- and the extracted object name (e.g., a table or chart extracted from a PDF or PPT).
For more complex unstructured data, you may want to consider disabling code generation to more flexibly leverage AI to extract or transform data from unstructured documents into a structured output. If the default code generation mode does not give you the desired output, simply toggle to Code View (see the 'View Modes' section below) and disable the toggle in the header next to 'Code'.
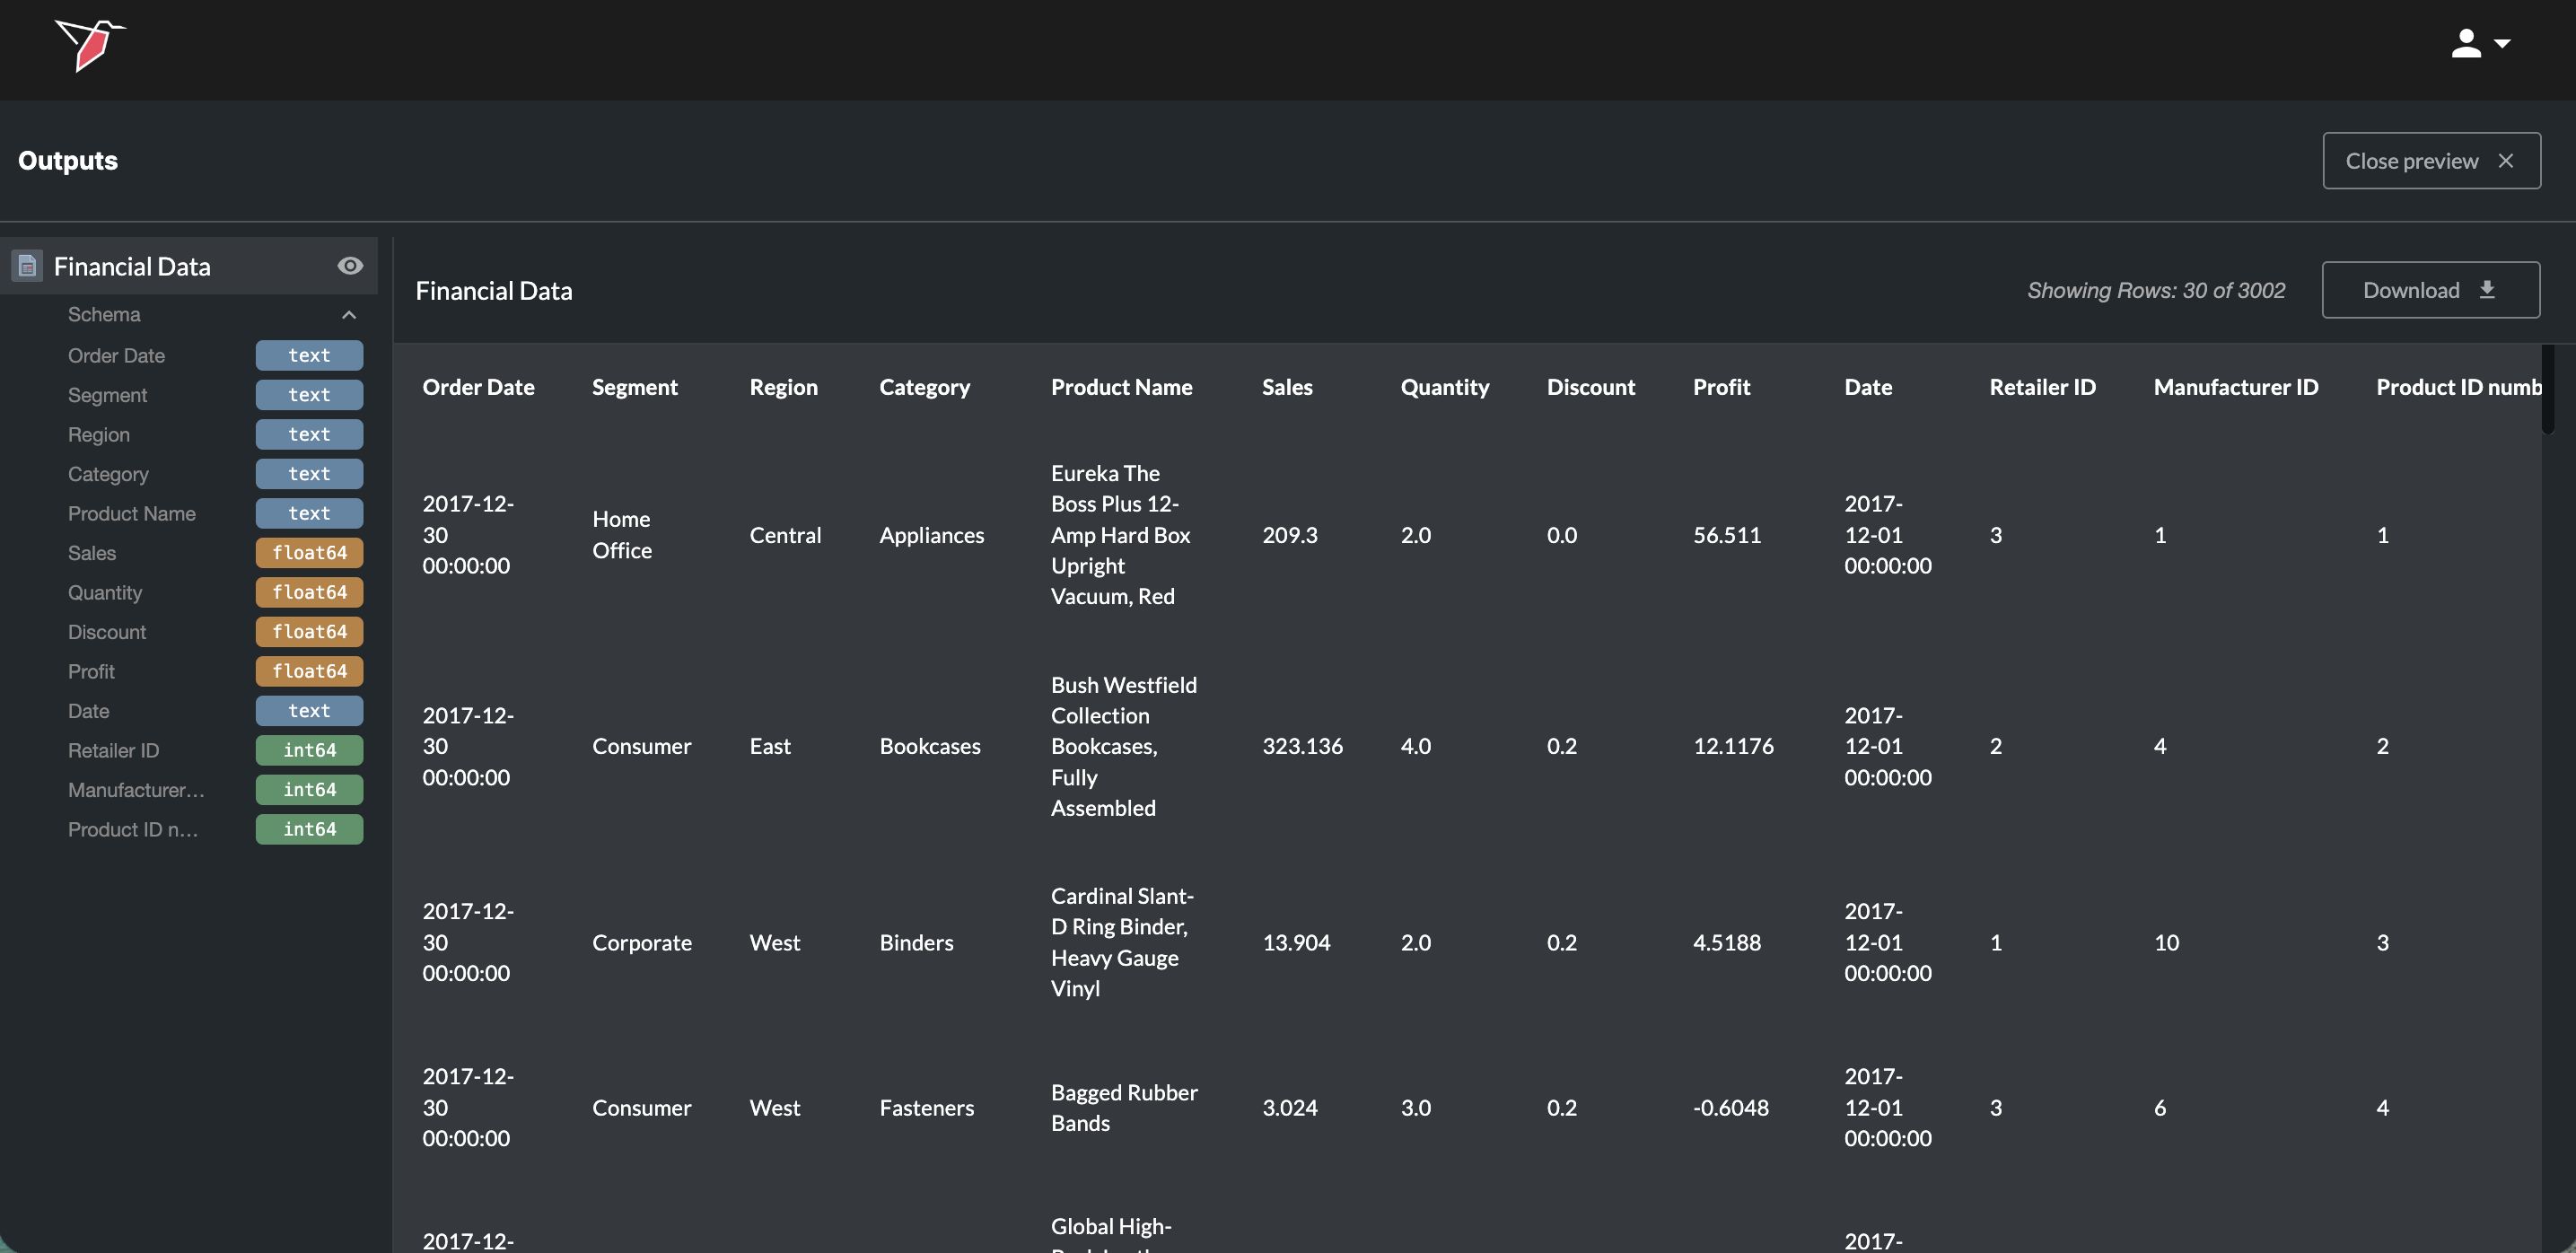
Click the eye button next to a Redbird object, will enable you to preview it. You can also download the full dataset by clicking Download. Click Close Preview in the top-right to close it.
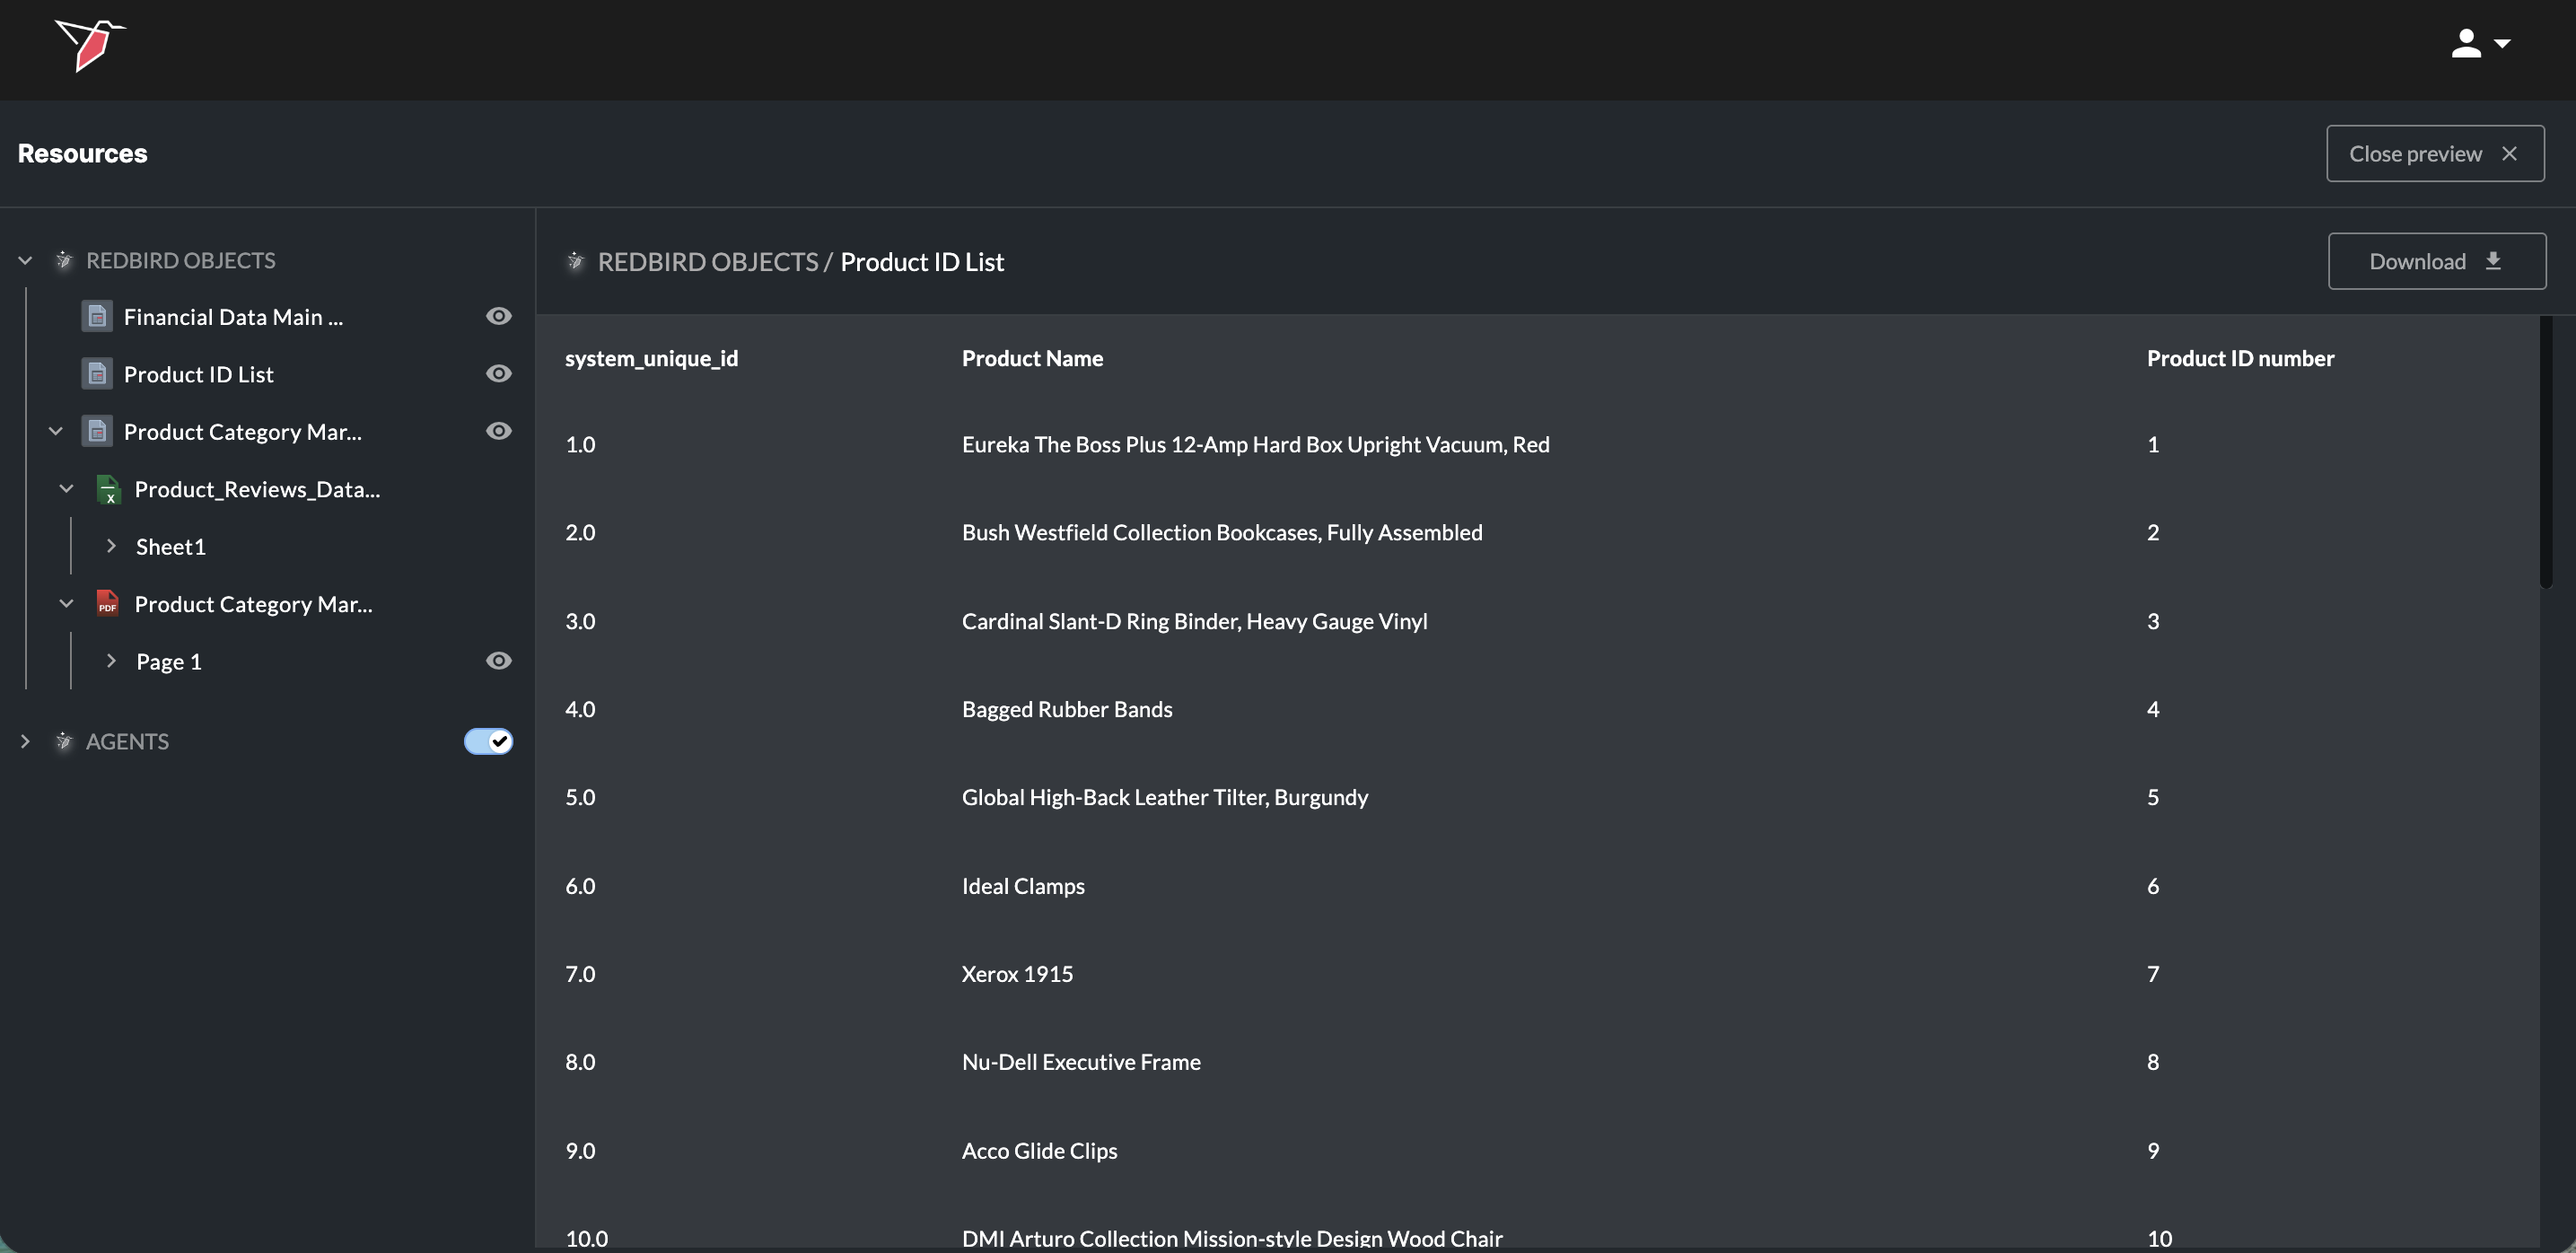
Click the arrow icons to the left of items in the Inputs section to expand or collapse the items nested within.
3. Data Science Models
These are data science models created via macros, via a previous AI DT step, or uploaded. If uploading a Tensorflow, Pytorch, or Sklearn model, it must be converted to ONNX. See here for more details on uploading an external Data Science Model.
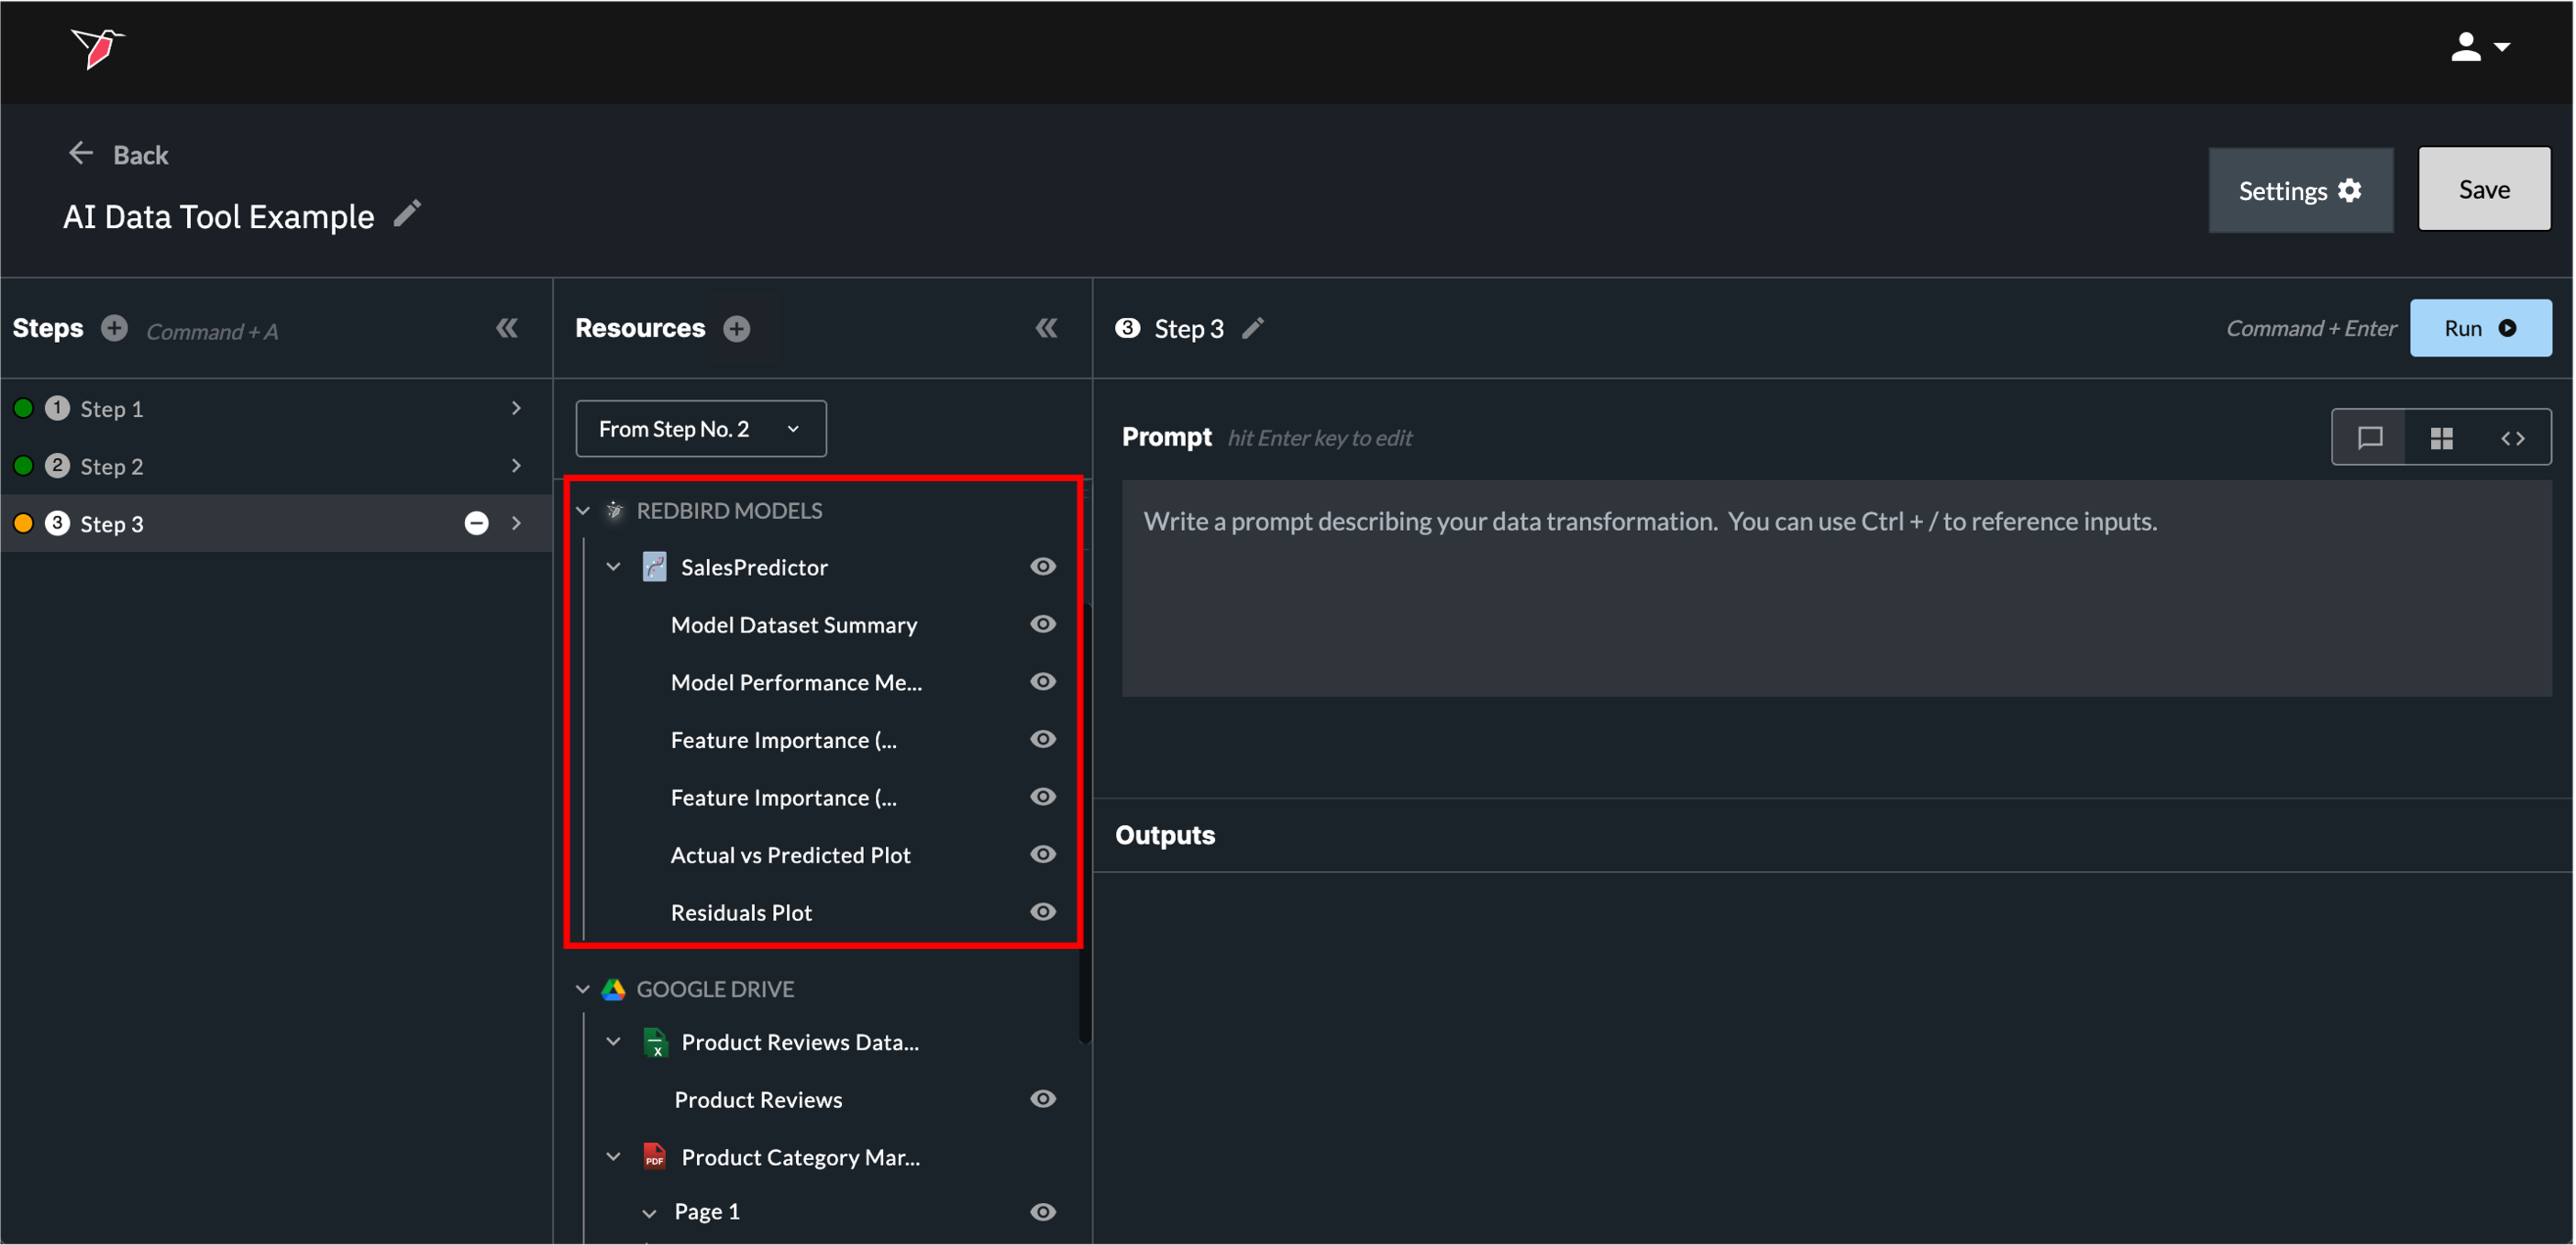
Clicking the eye icon for a data science model opens a page showing its summary statistics.
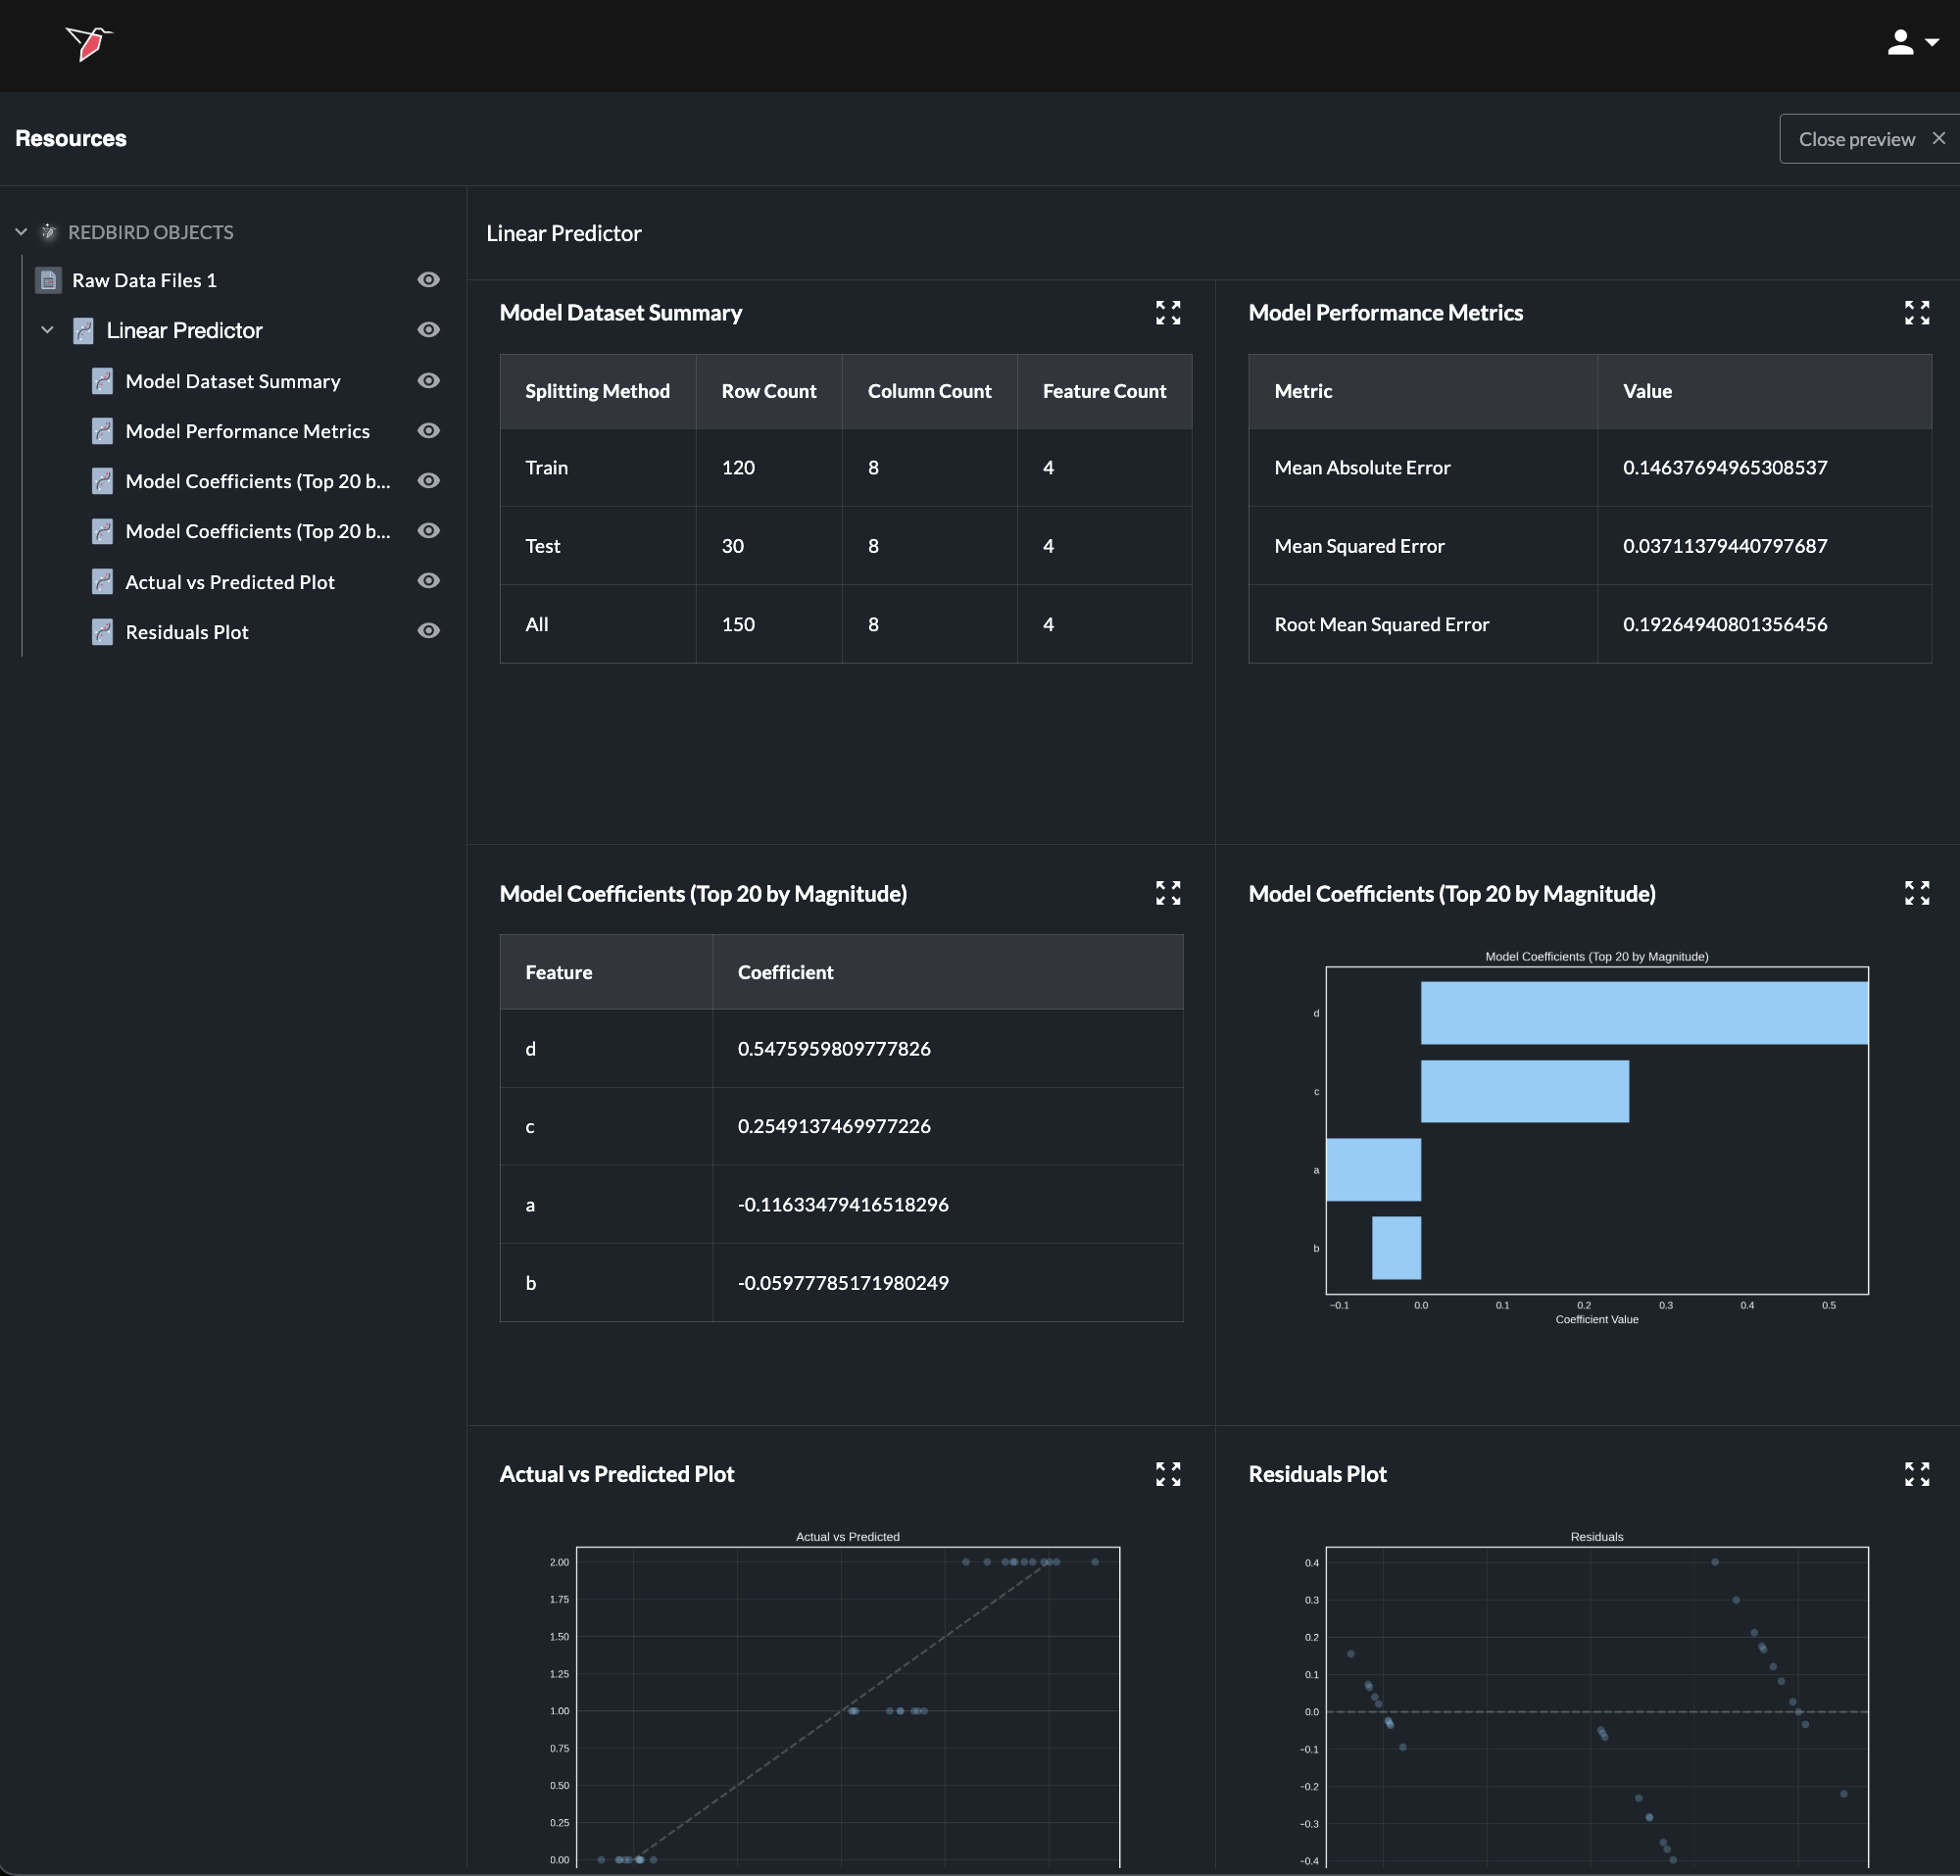
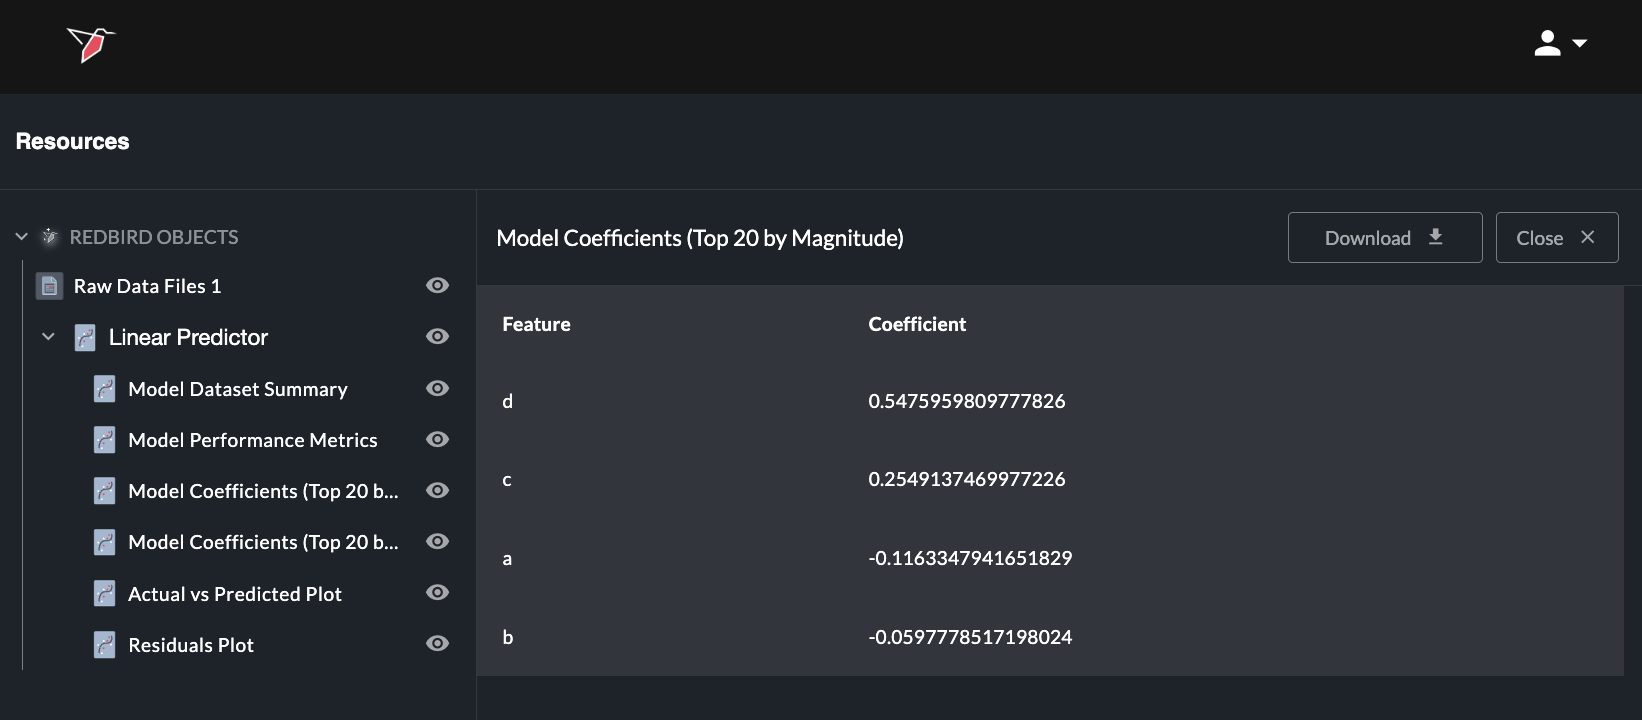
Any summary statistic can be viewed in full or can be downloaded as a CSV by opening the relevant object—either by clicking the eye icon next to it in the left-hand panel or by using the expand icon (four arrows) in the top-right corner of the object on the summary page— to view and then selecting Download. You can also ask in the prompt box to create a dataset from any summary object (by using the / reference) to use downstream in AI DT or in your workflow.
4. AI Context
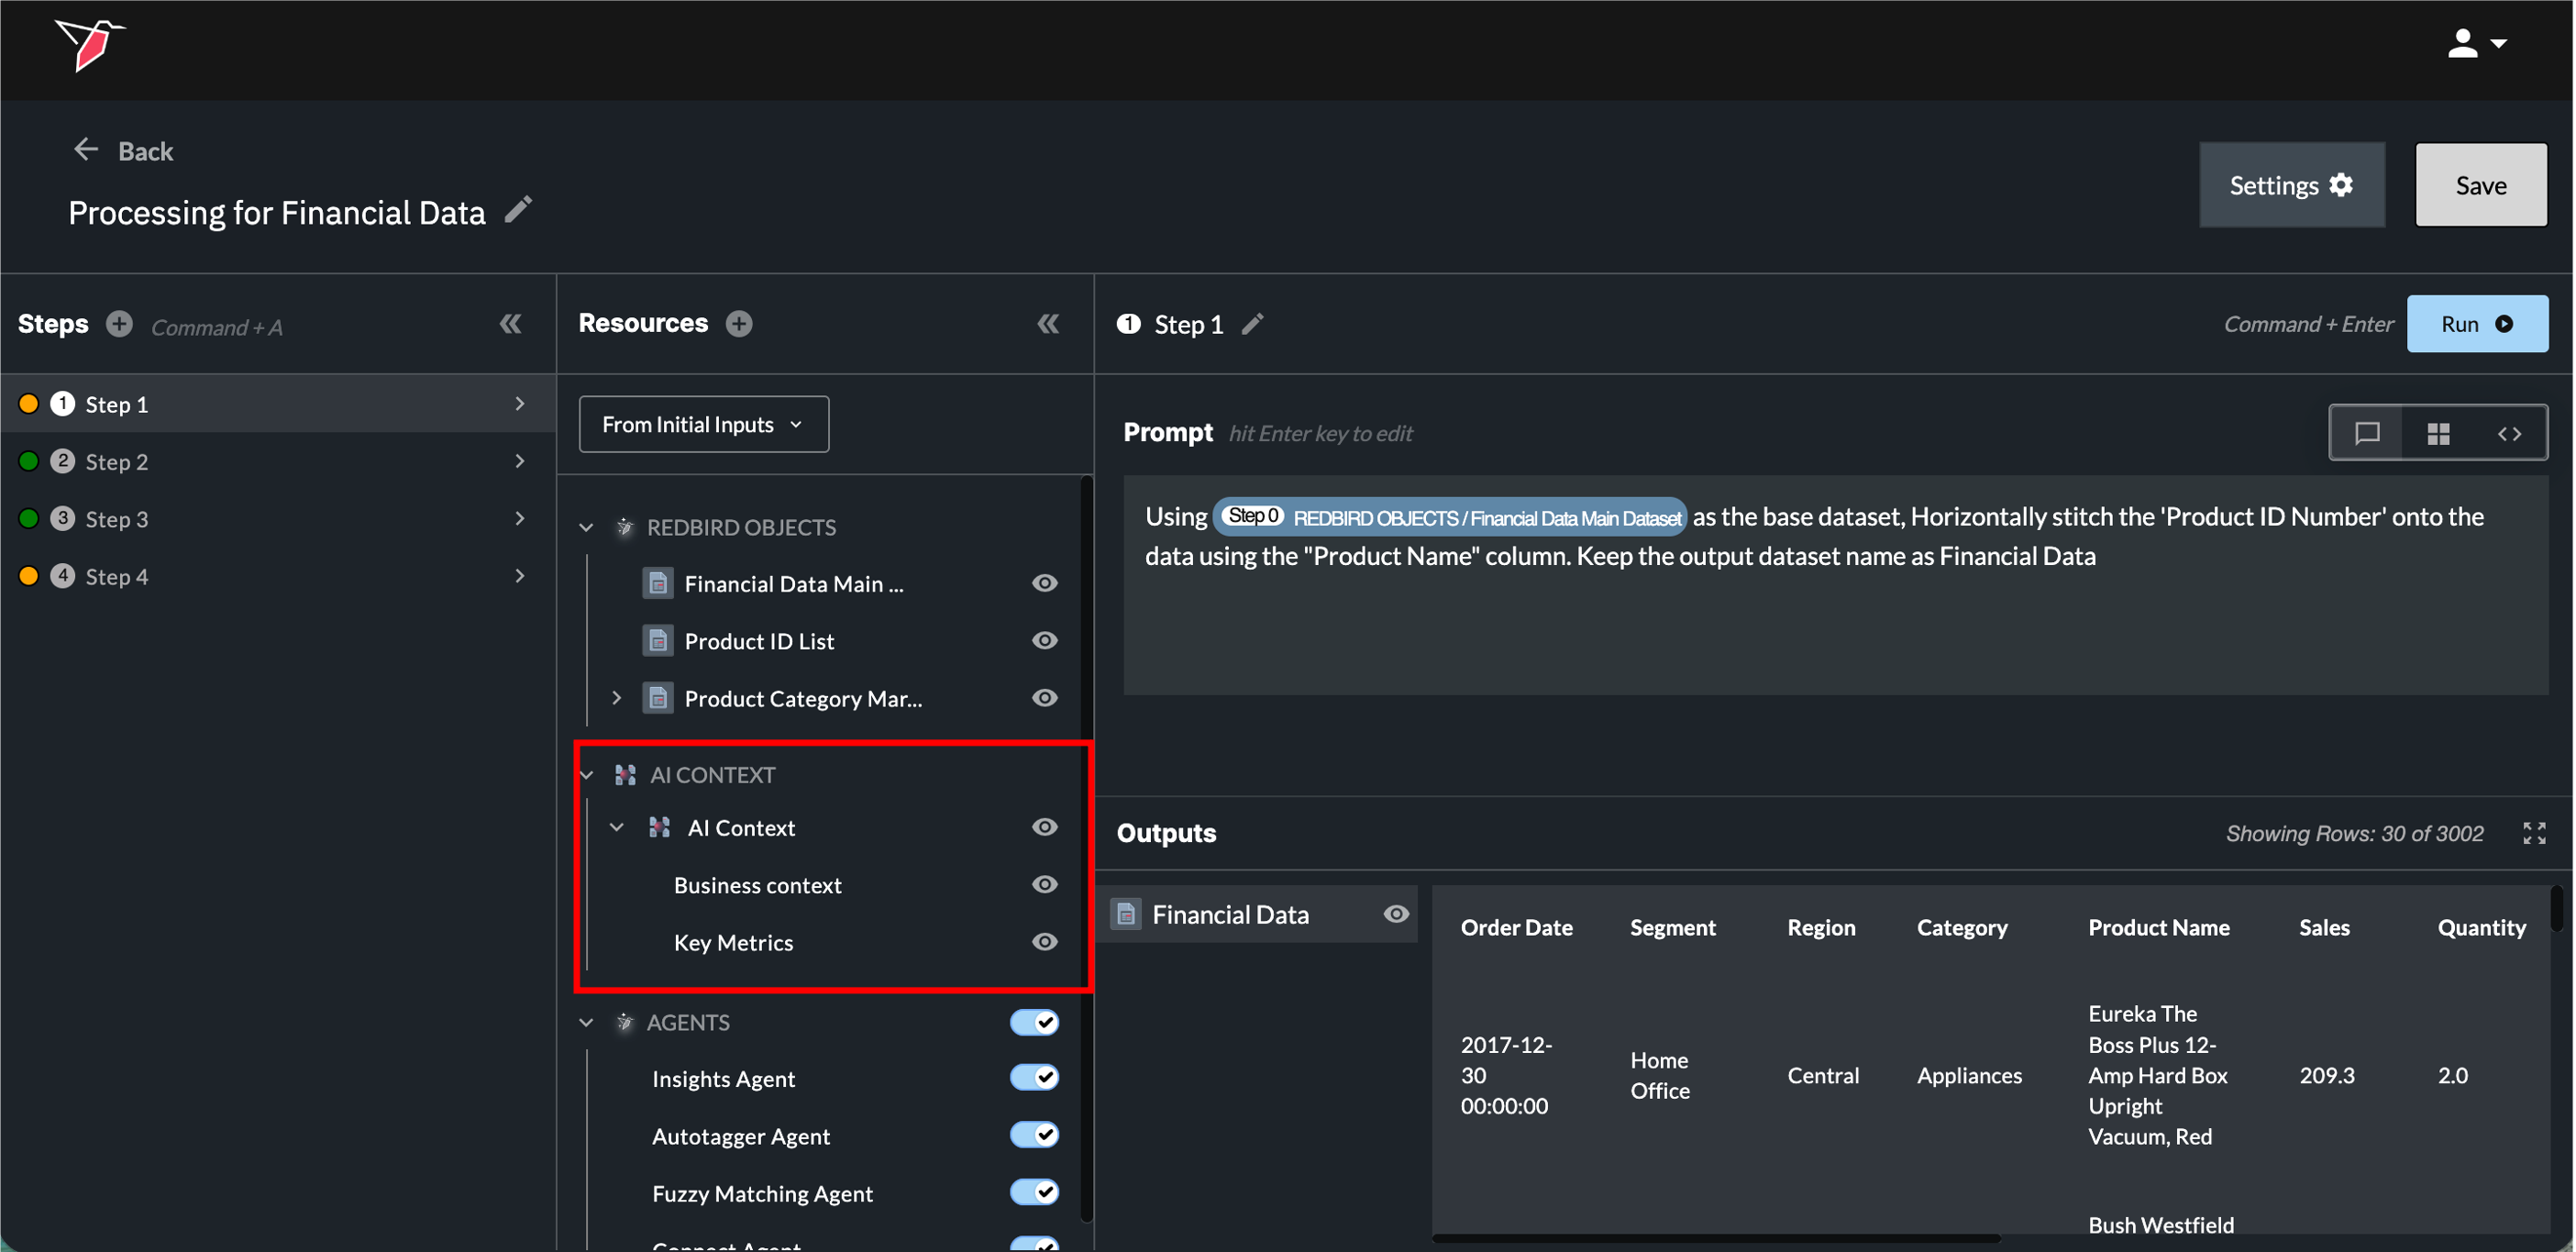
The AI Context node lets you provide shared business context that helps Redbird’s AI better understand how to interpret your data and answer questions. This is useful when your data relies on company-specific terminology, acronyms, assumptions, or metric definitions that wouldn’t be obvious from the data alone. See here for more information on creating and using AI context.
Once an AI Context node is added to the canvas and connected to the AI DT, it will appear in the Resources panel under the AI Context section. By default, this context is automatically taken into account every time a prompt is asked.
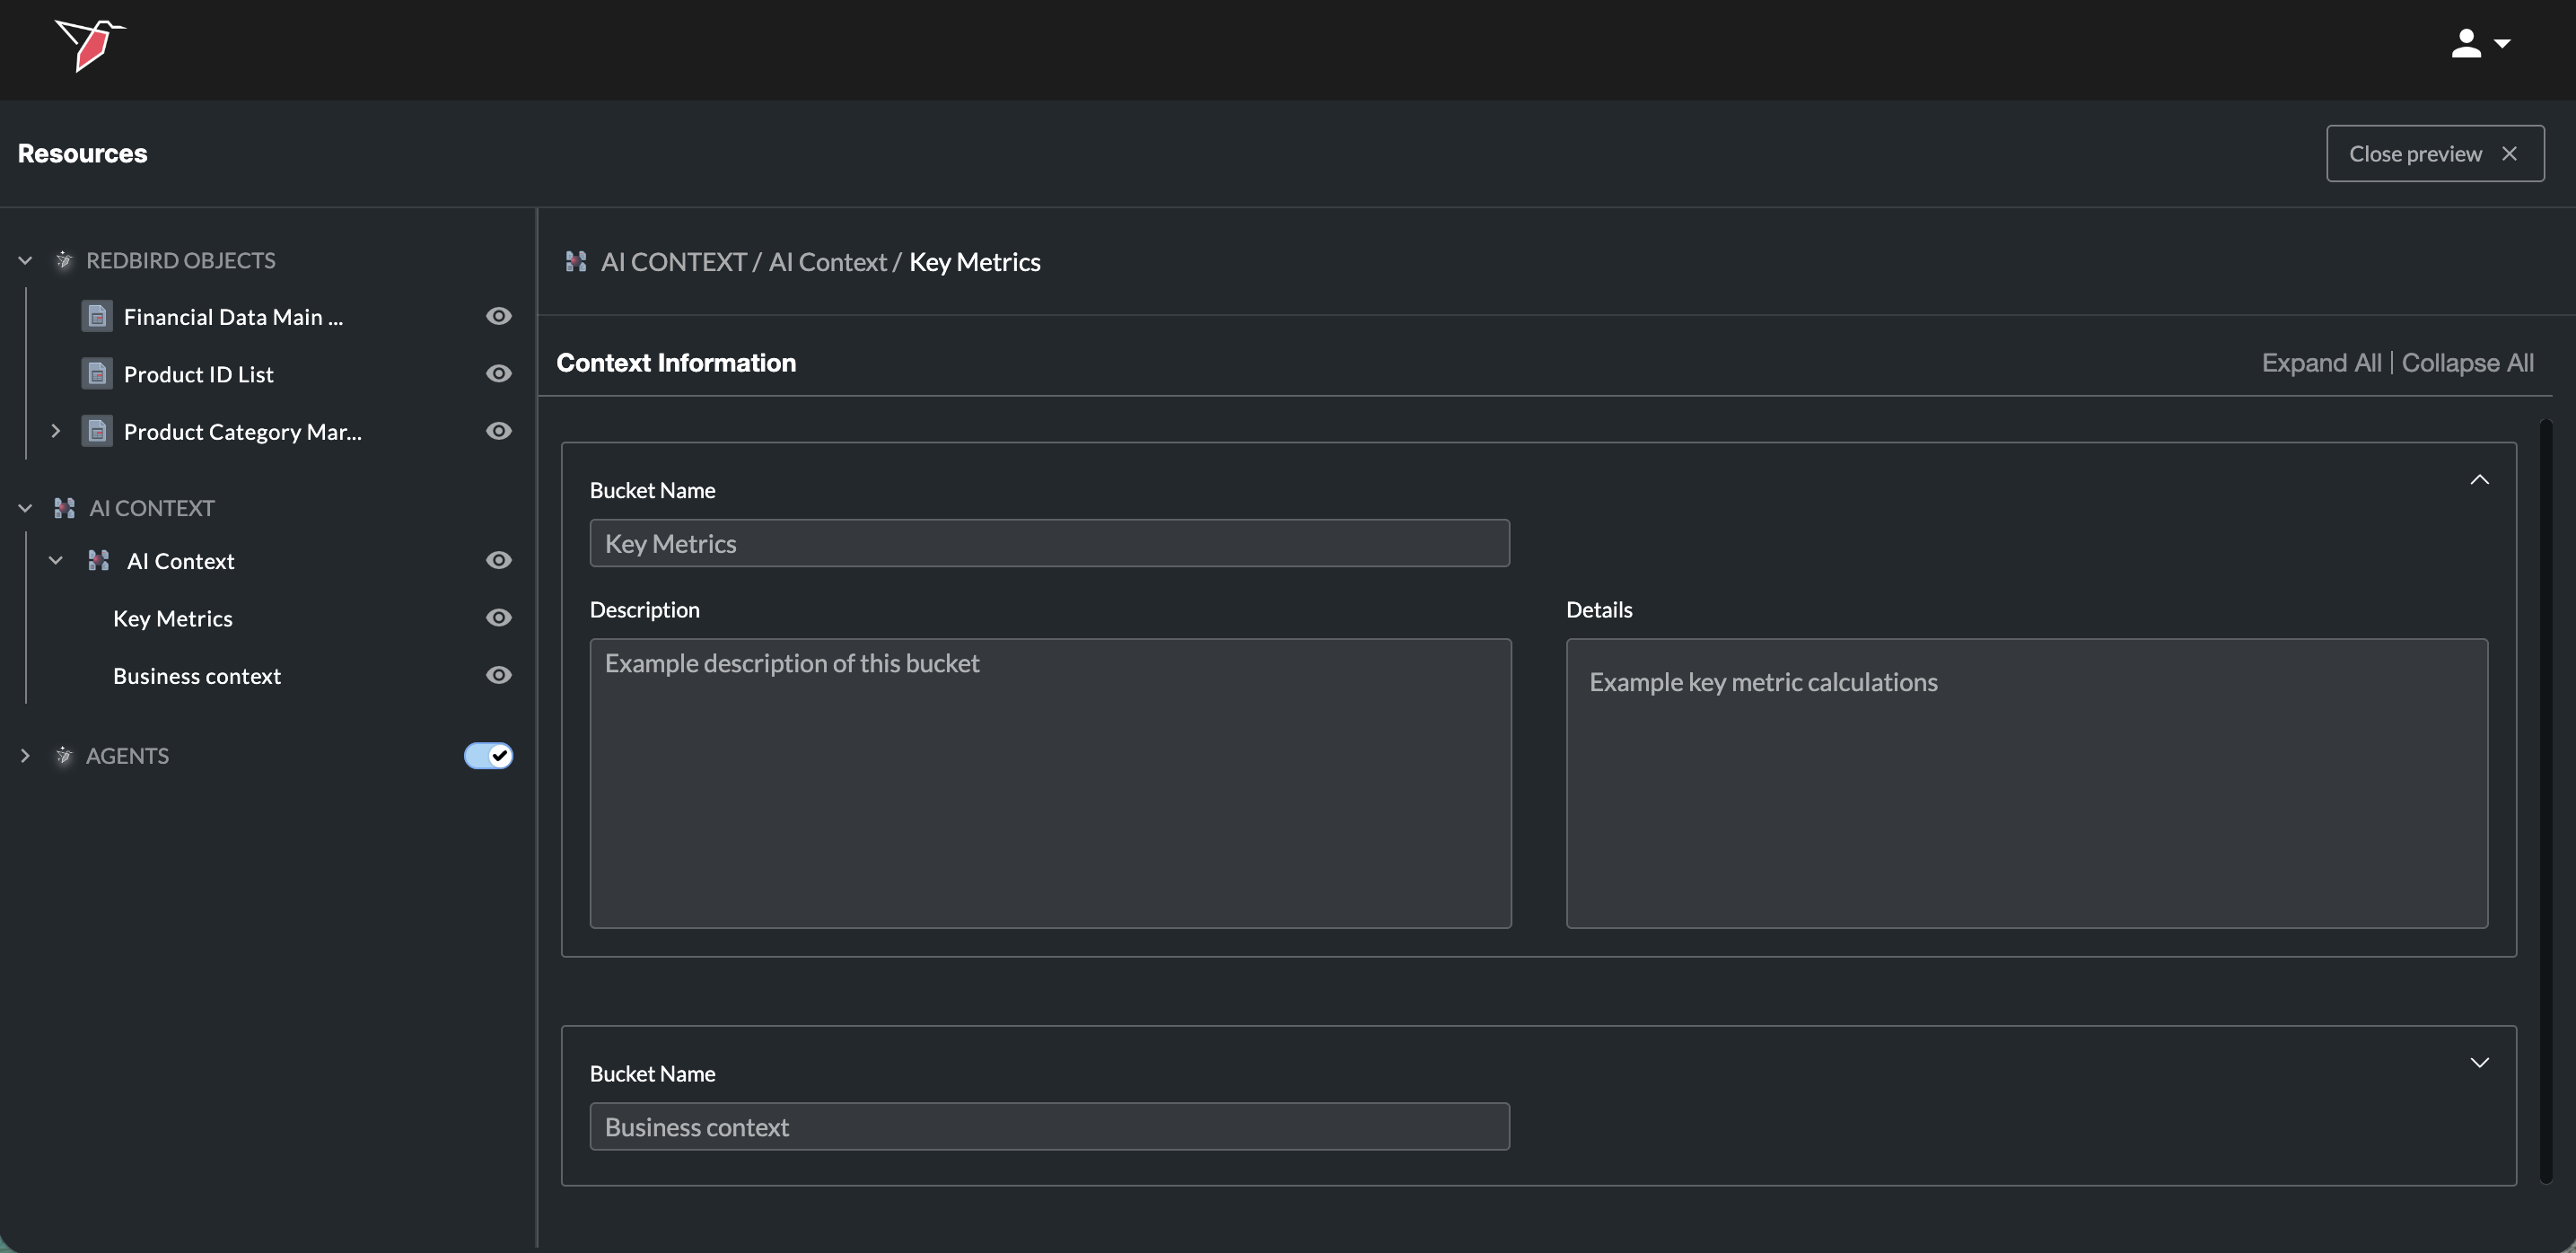
For any context node that’s been added, you can click the eye icon at the node level — or on individual context buckets — to preview its contents.
5. AI Connect Connections
You can also use AI to connect to data sources—either preset or custom—via APIs or web automation flows, all through natural language prompts using our AI Connect functionality. For more information on how it works, see here.
Once an AI Connect Connection has been established, it will appear in the Resources panel under the Connections section. You will then be able to reference it in like any other resource either in natural language or using the forward slash functionality.
For any connection node that’s been added, you can click the eye icon at the connection level to view a summary and edit any step if needed. You can also click the eye icon at the connections level to view top-level details of all connections, with the ability to edit or delete each one.

Use the From Steps dropdown to switch between the inputs available for each step.
For example, if you’re working in Step 2 and need access to a column that existed in the original dataset but was removed during a transformation in Step 1 (such as merging two datasets or creating a new dataset that significantly differs from the original input), select From Initial Inputs from the dropdown.
This will give the AI access to the original version of the dataset, including any columns that were removed or altered in earlier steps.

By default, the AI will automatically leverage the outputs from the preceding step unless otherwise specified.
You can collapse/expand this whole section by clicking the double arrow icon in the top right hand corner of the Resources panel.
Section 2b - Prompt
- Click in the prompt box or press Enter to activate it. Here, you can provide natural language instructions describing what you want the AI to do with your data — this is called a prompt. See the Example Prompts section of this document for examples of the types of transformations you can request and how to phrase your instructions effectively.
- You can use "/" to search and reference specific inputs you want to include in your transformation step.
- If only one input is available at the current step, the AI will automatically assume it should use that input. However, you can still use the forward slash shortcut if you want to reference inputs from a previous step (see section 2a for how to make those available).
- The dropdown lists all inputs available at the current step — you can scroll, type in the search box, or use the arrow keys to navigate.
- Each input shows its full path to help you understand where it originates from.
- Click an input (or press Enter) to insert it into the prompt box.
- You can reference multiple inputs in your prompt if needed.
- Click Escape or anywhere outside of the prompt box to close it.

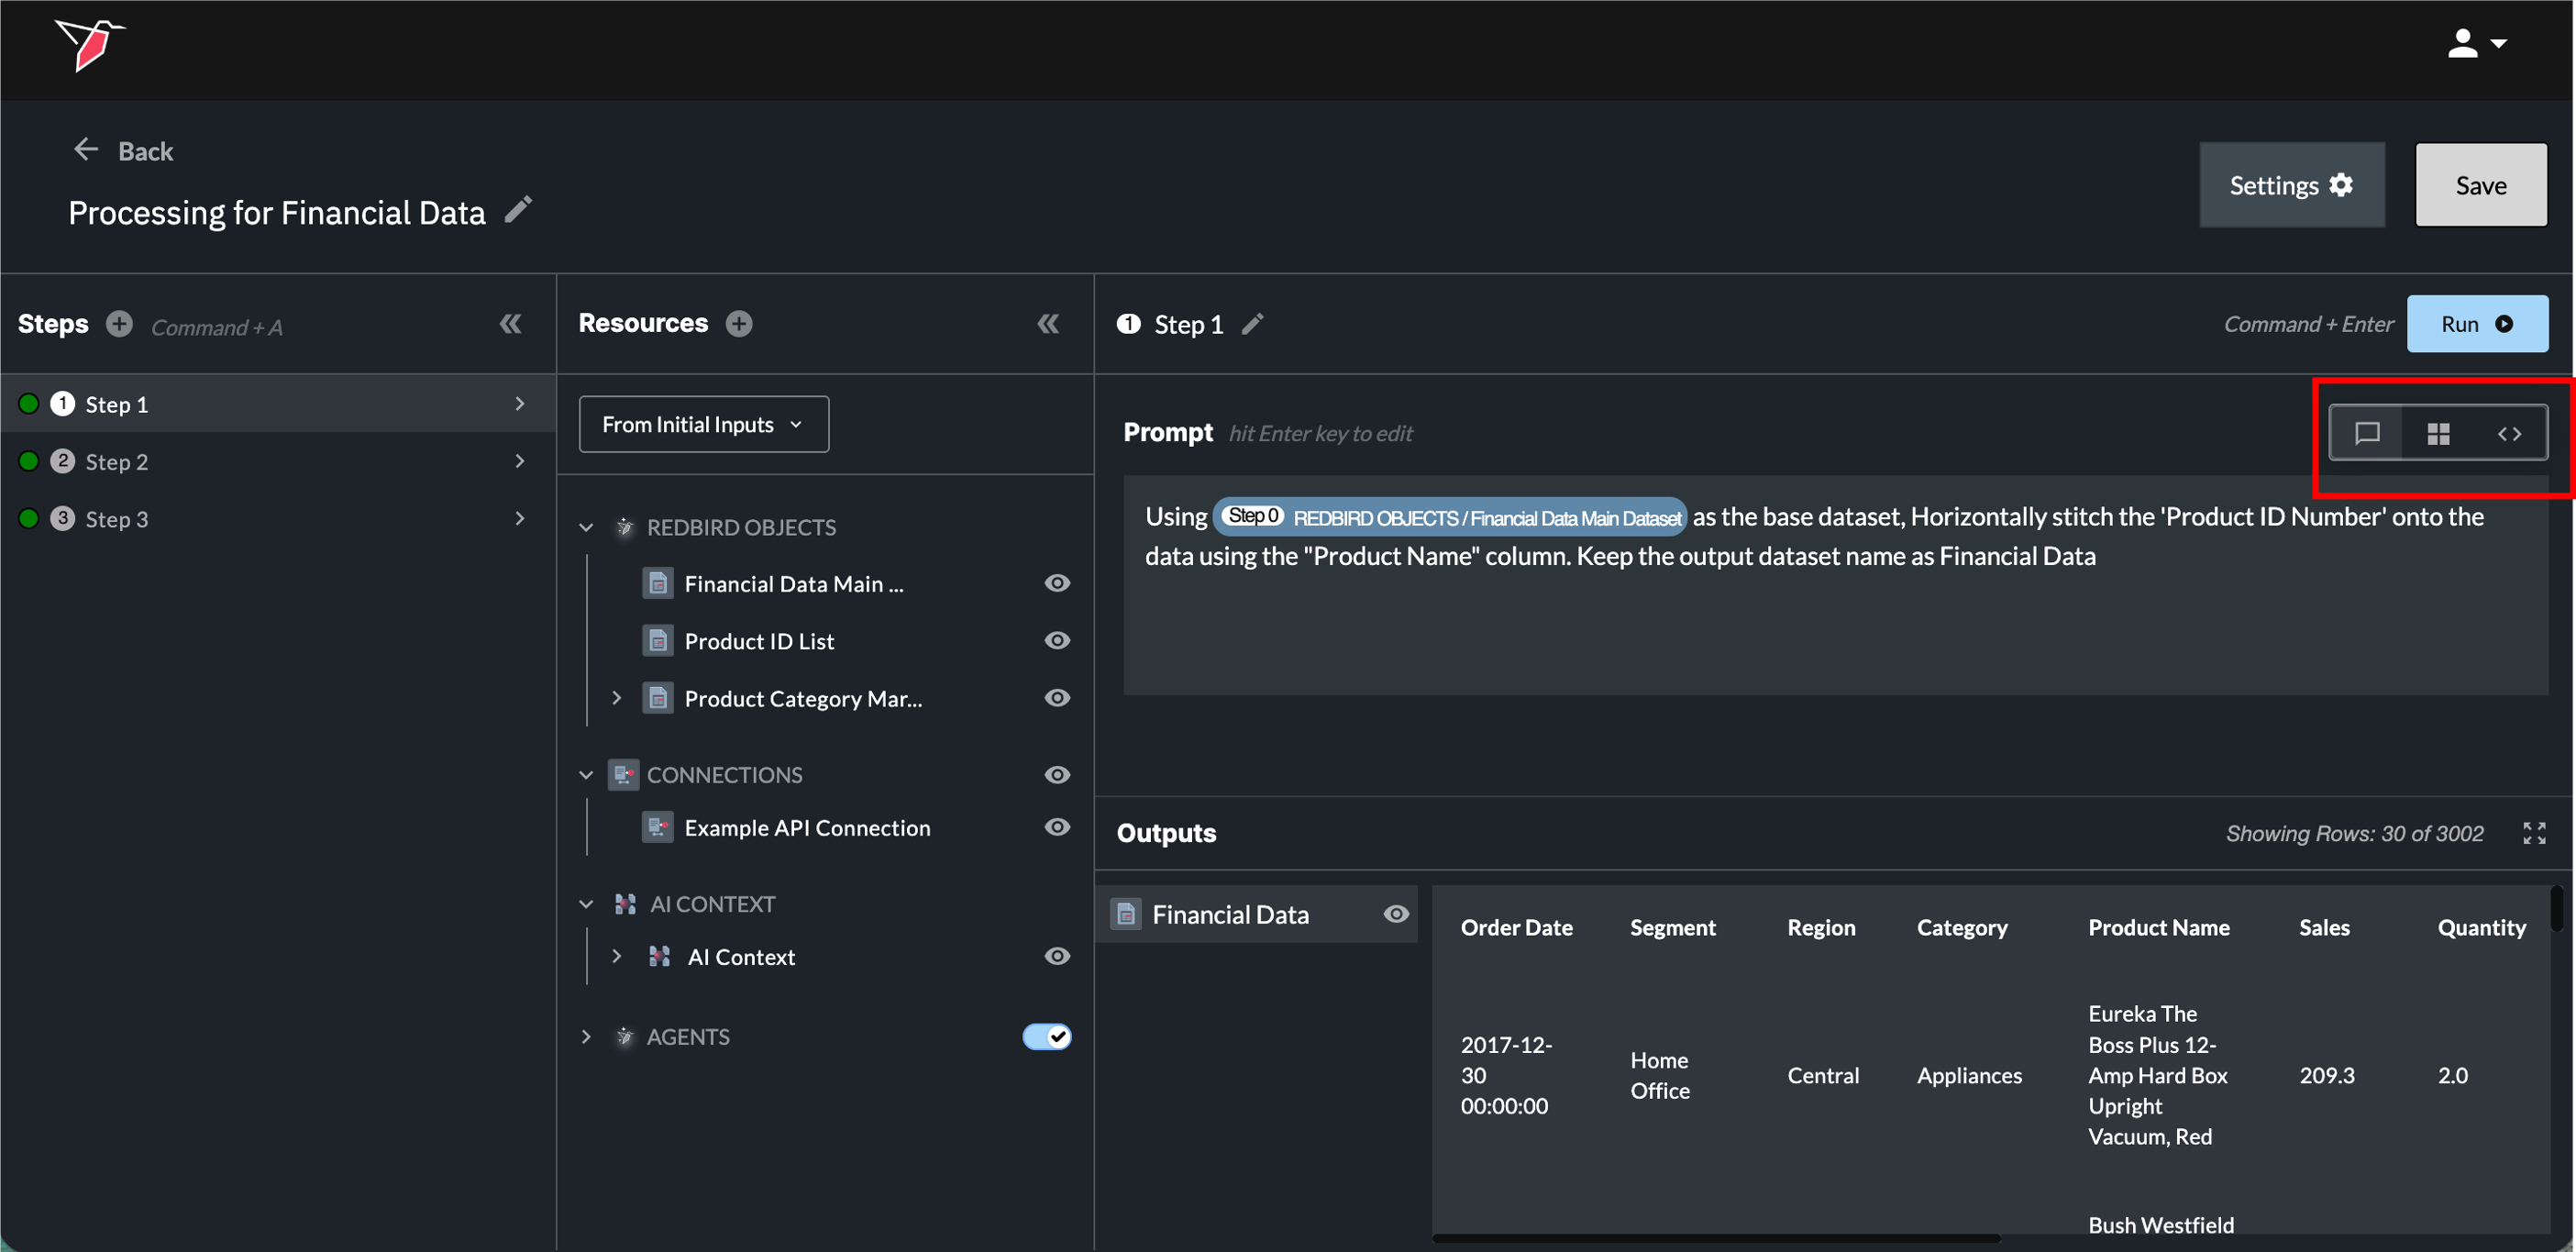
Once you have selected a resource through the dropdown menu, that resource will be added to the prompt box as a blue resource pill for visibility into which resources are being referenced and transformed. The pill will also reference the step number for the resource being referenced.
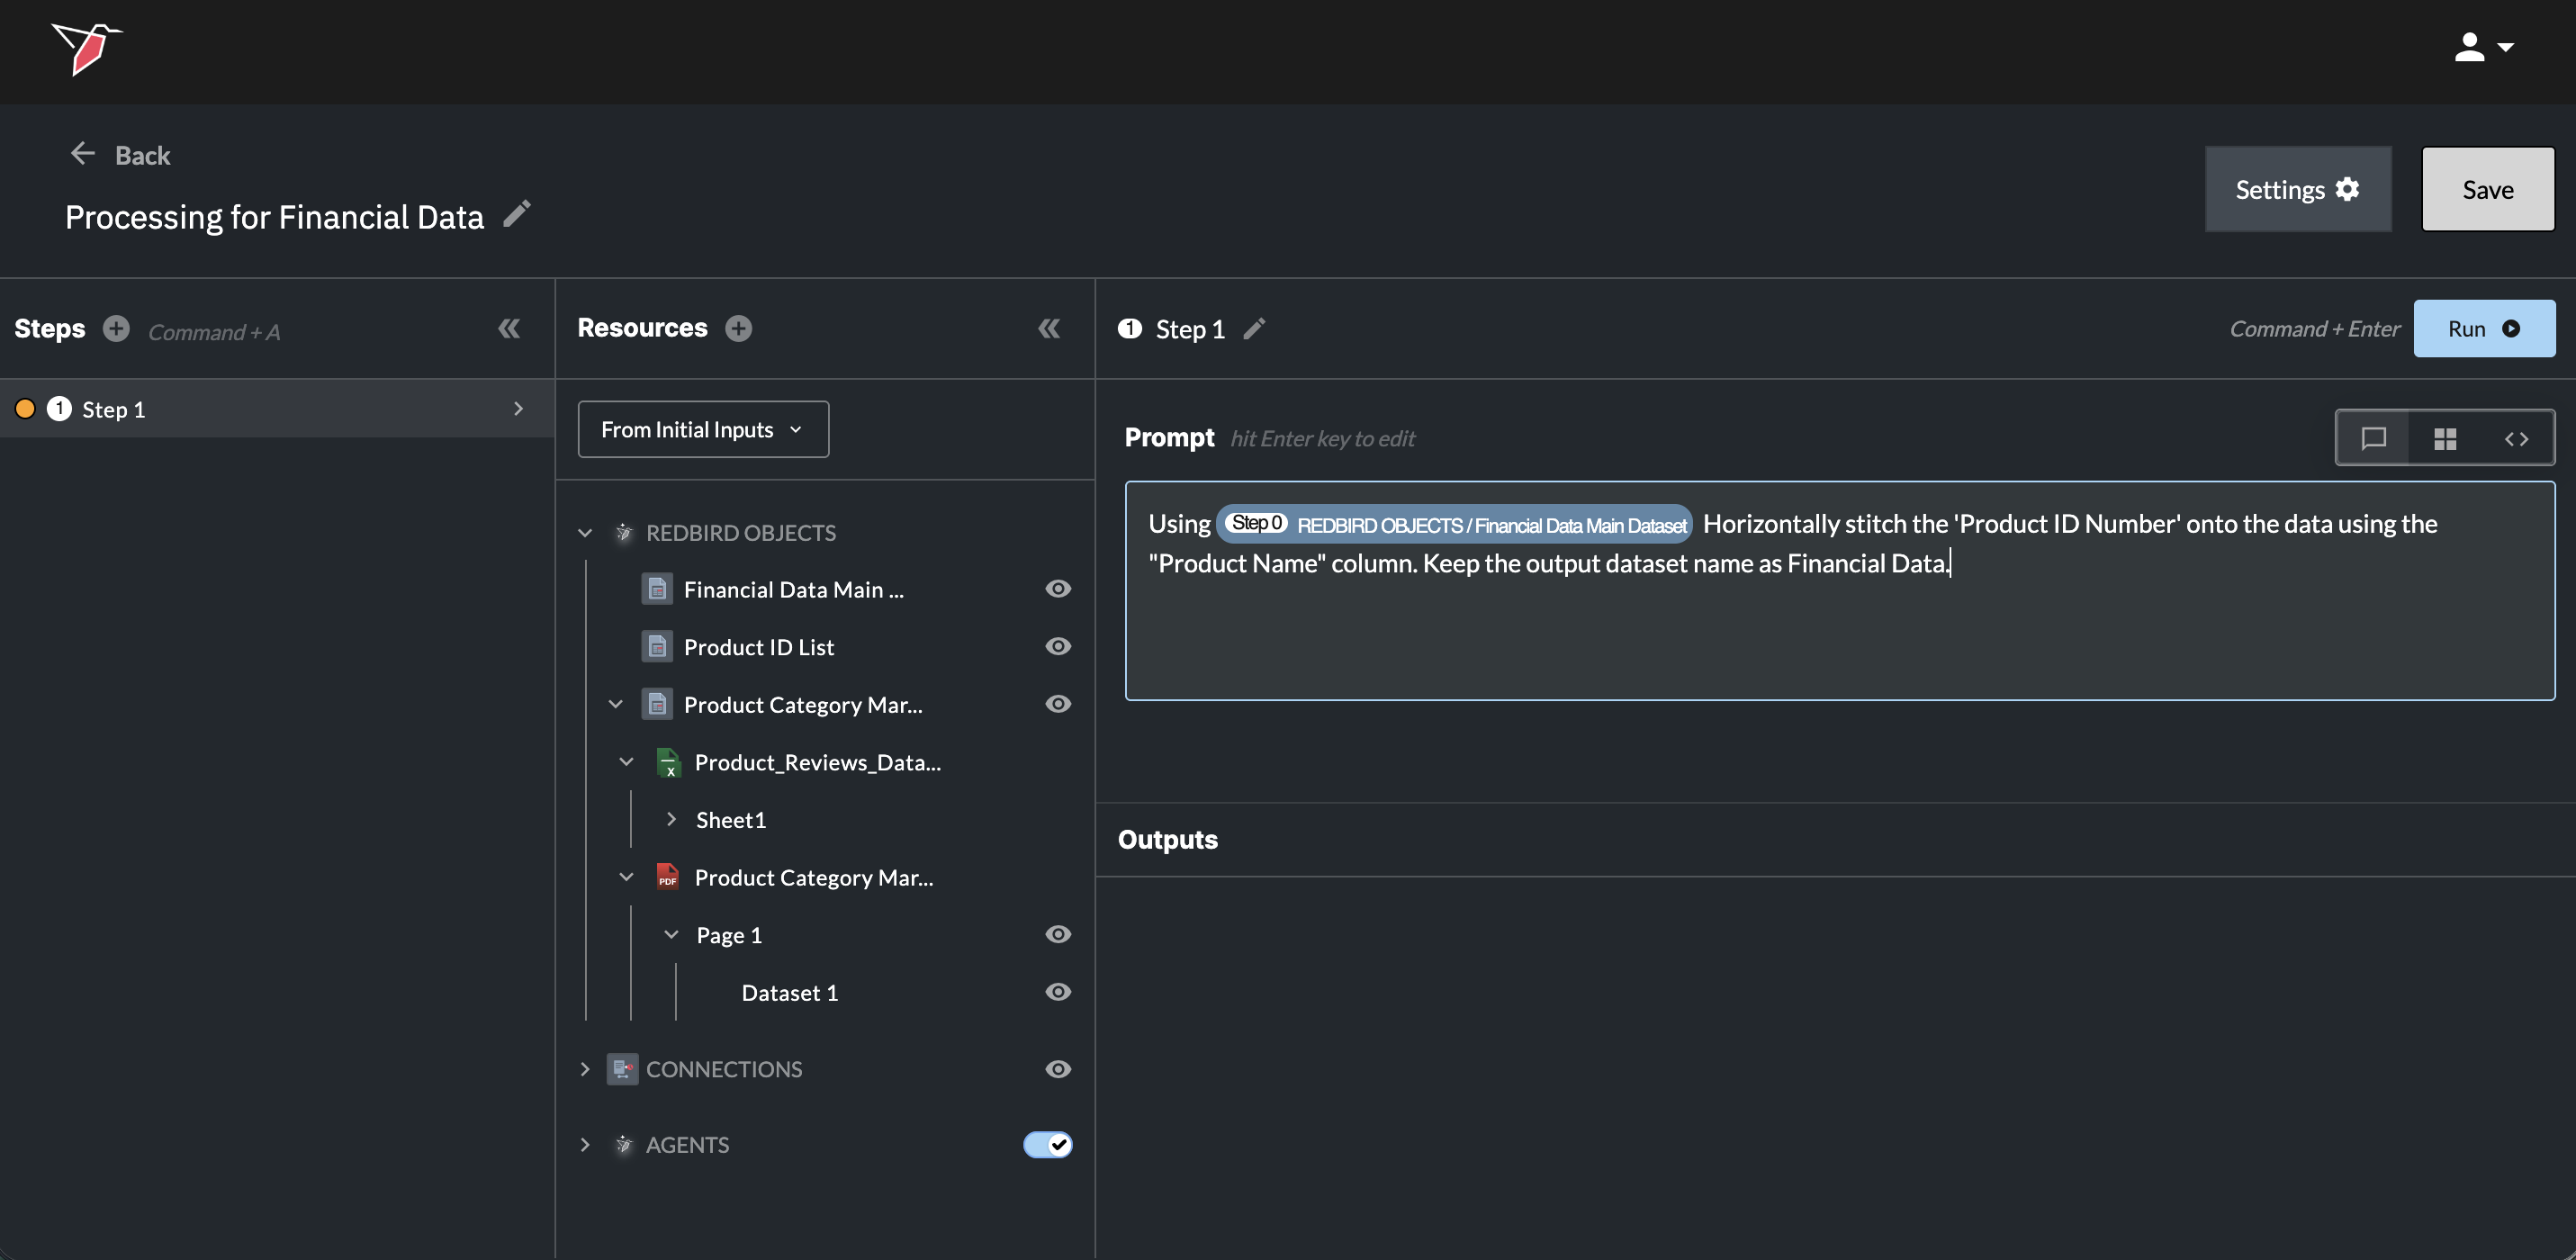
- After the instructions have been written, click Run or use the 'Command+Enter' (Mac) / 'Control+Enter' (Windows) hotkey to perform the data transformation.
Issues With the Prompt
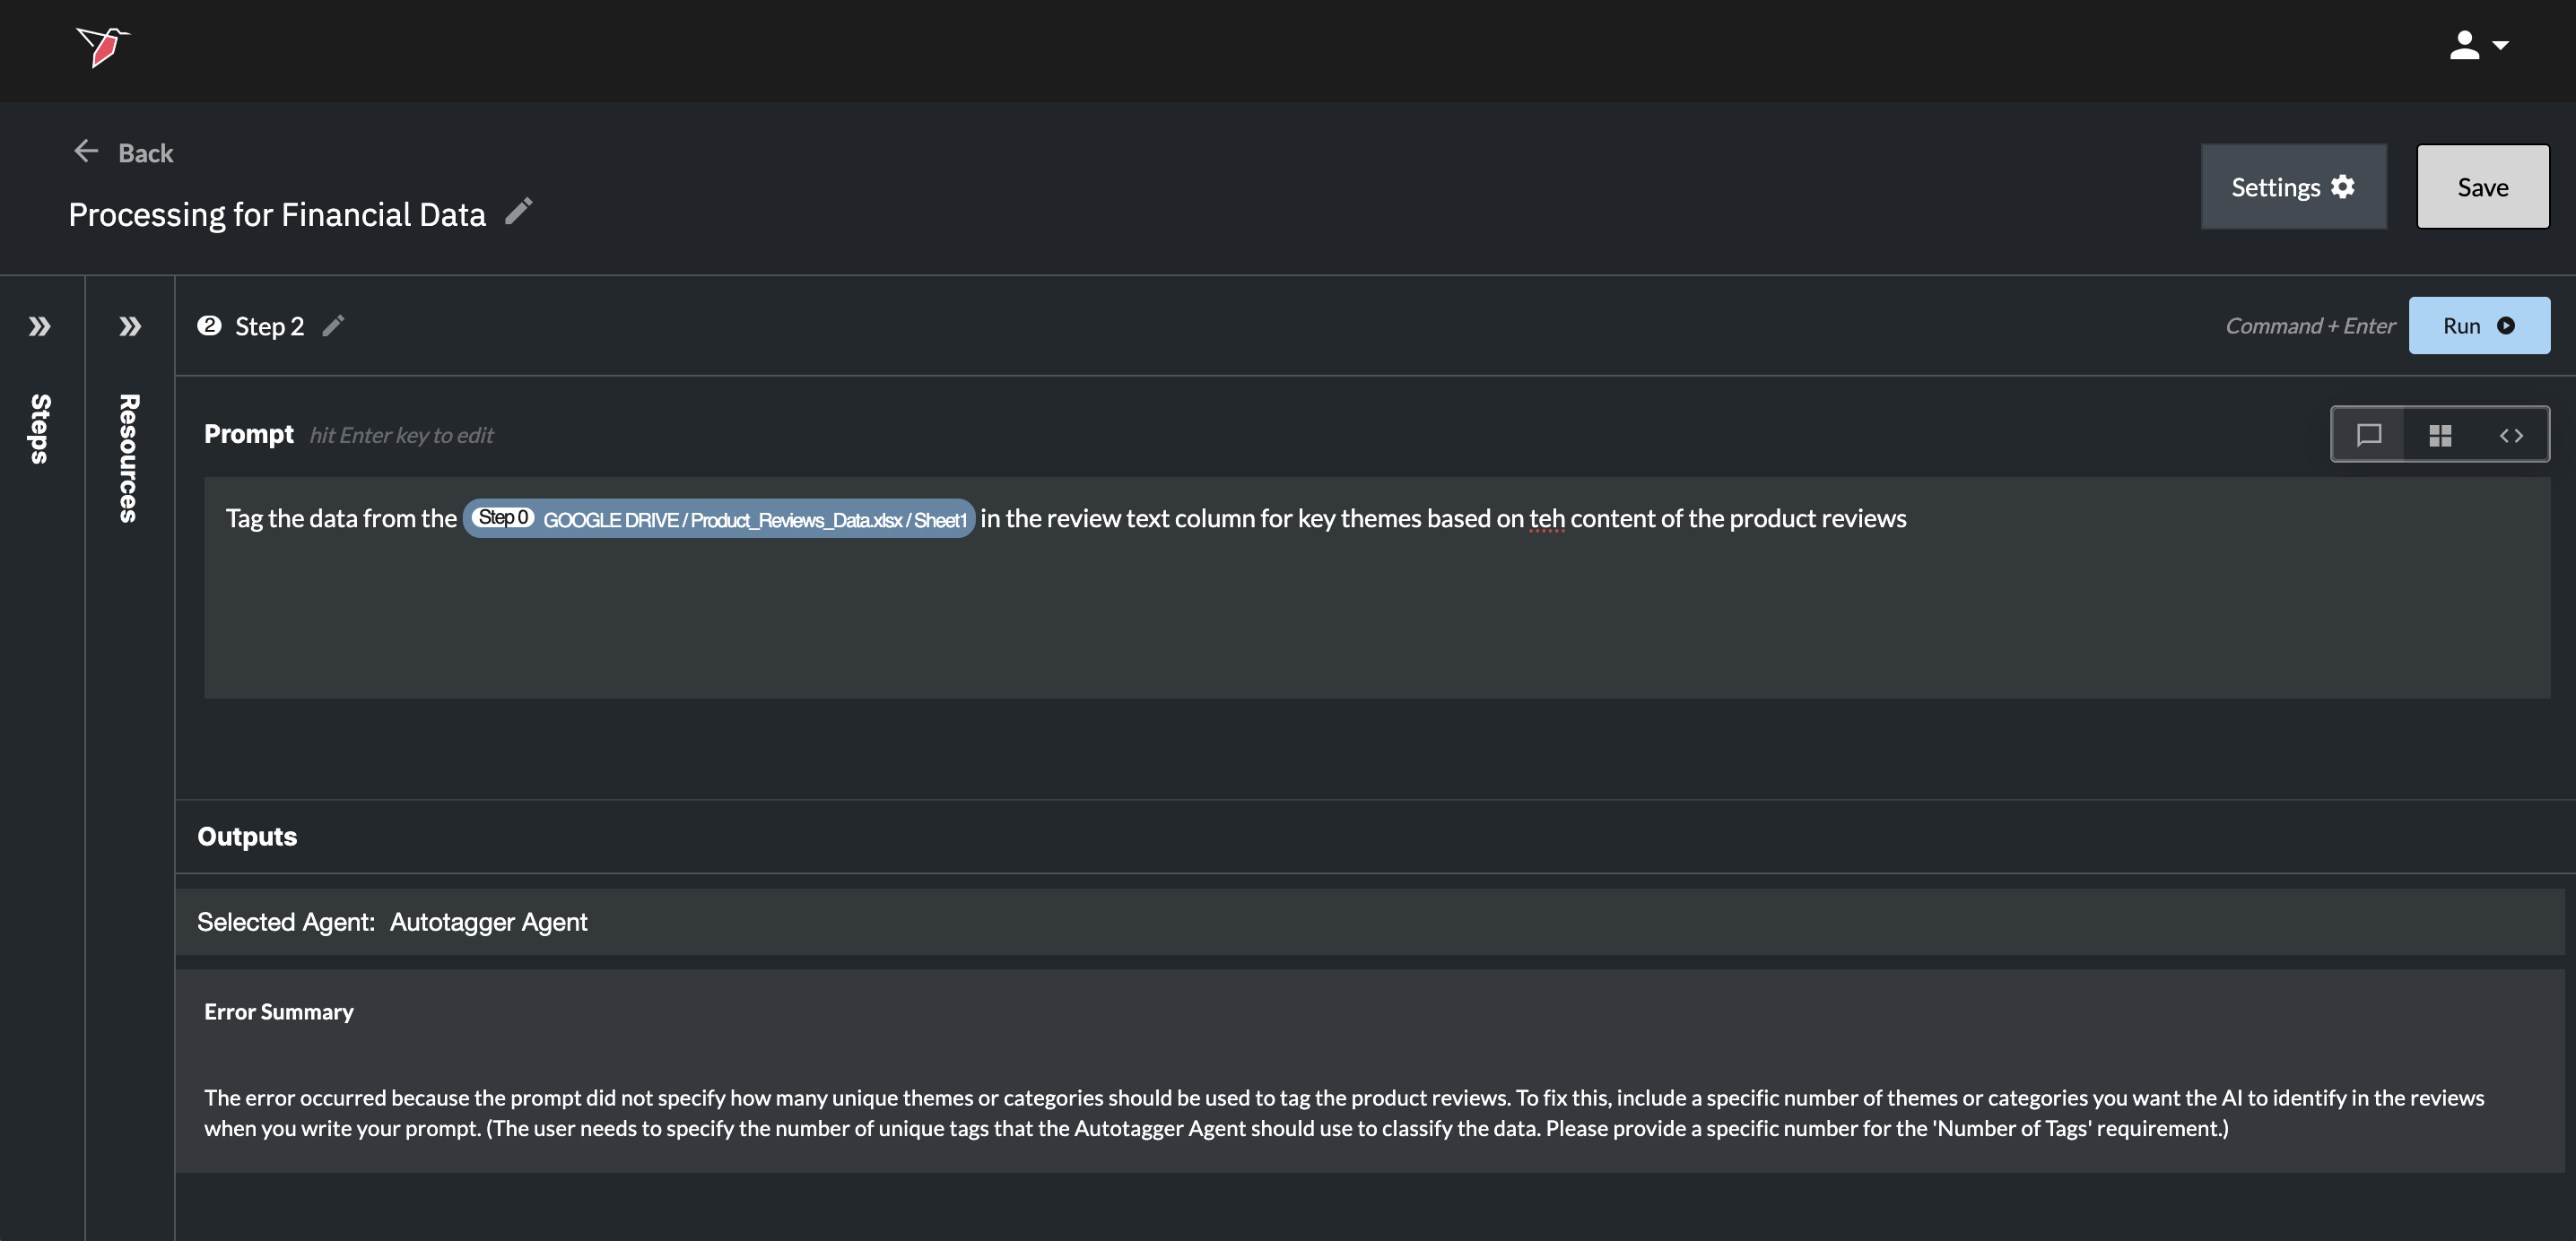
If there was an issue with the prompt, the color of your step in Section 1 will change to red, and you will see an error message in Section 2c with a user friendly summary of the issue. These will guide you how to edit your prompt accordingly.
Leveraging Agents Within AI DT
You can use Redbird agents directly inside an AI DT step to carry out specific tasks — for example, the Autotagger agent to tag your data, or the Fuzzy Matching agent to match records across datasets.
By default, all agents are enabled and Redbird will automatically route your request to the appropriate agent based on your prompt. Simply describe the task in natural language — for example:
- "Tag my data using up to 10 tags."
- "Fuzzy match this dataset against this one using the email column."
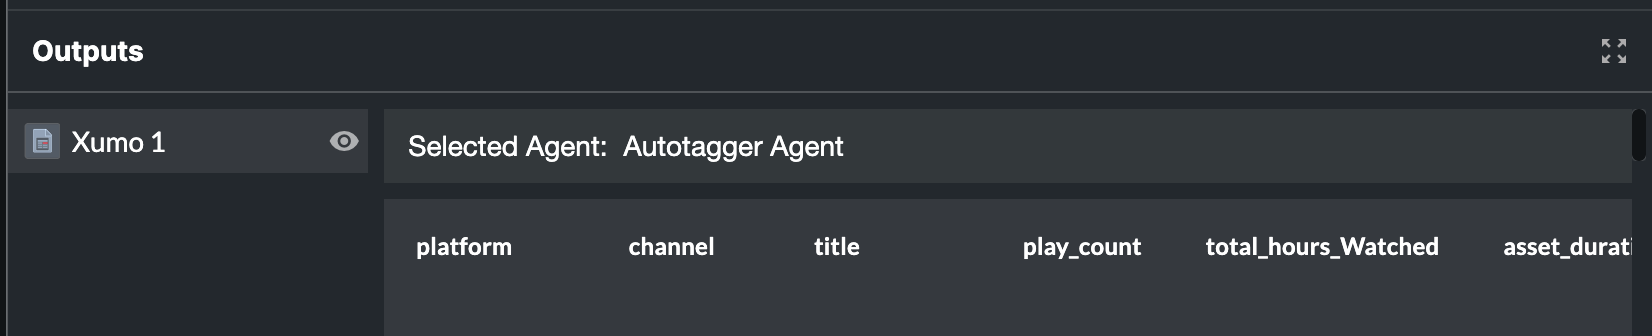
You don't need to specify which agent to use — Redbird selects it based on the task described. When an agent is leveraged, a note will appear above the output indicating which agent (or agents) were used. If you want to specifically select an agent for an action within a prompt you can also reference it using the resources drop-down within the prompt box (accessible by clicking "/").
Most agents have specific mandatory input requirements (see here for details). Define these directly in your prompt — for example, specifying the maximum number of tags. If you don't provide required inputs, Redbird will flag this in the error message and prompt you to supply the missing information.
Note: Optional parameters are only activated if you explicitly include them in your prompt. Otherwise, default settings will apply.
Toggling Agents On or Off
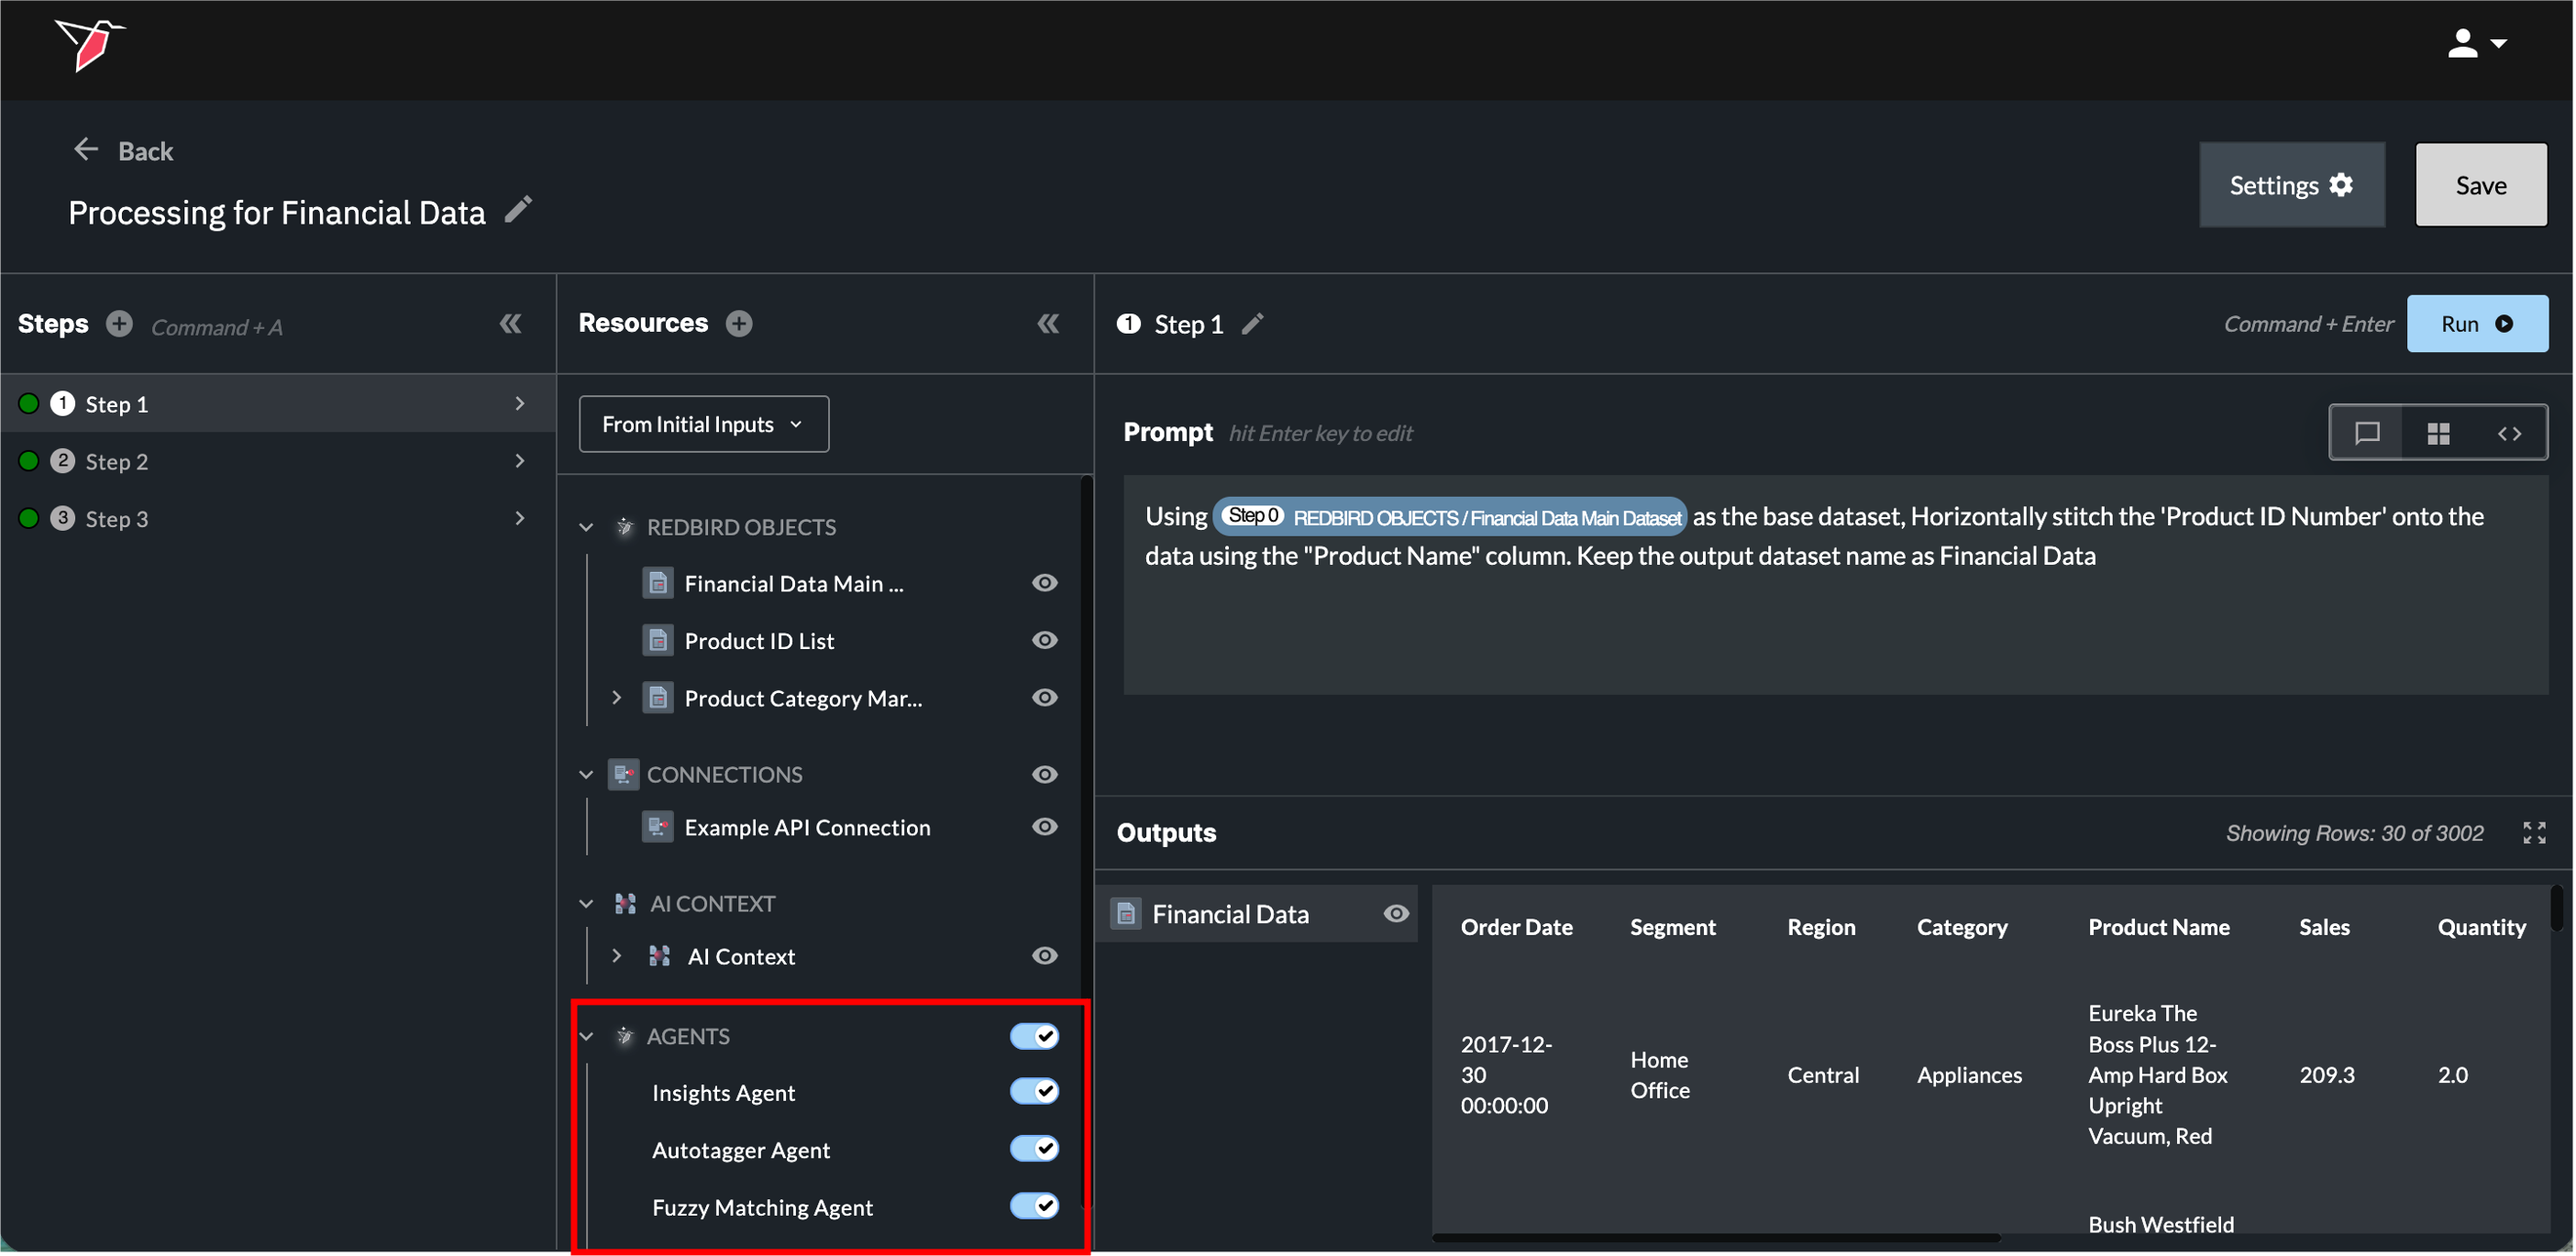
Agents appear in the Resources panel under the Agents section. From here you can control whether agents are available to a given AI DT step:
- Wholesale toggle: Use the toggle next to the Agents header to disable all agents at once.
- Individual toggle: Expand the Agents section to enable or disable specific agents independently.
Disabling an agent prevents Redbird from routing requests to it, even if the prompt would otherwise trigger it. This is useful when you want to handle a task with custom code or a different approach rather than the default agent behavior.
Section 2c - Outputs
Exploring Outputs
By clicking on the name of the output under the output section you will see a preview to the right of it. Click the eye icon to enter a full-screen preview. You can also download the full output by clicking Download. You can view previews from any other outputs by clicking on them in the left side panel. Click the arrow next to the Schema label underneath the dataset name in the left side panel to expand a list of its columns and data types — useful for quickly checking schema without scrolling through the preview. Click Close Preview in the top-right to exit the full preview mode.
Naming Multiple Datasets
Note: If you want more than one output to be created and need those outputs to keep the same name each time the workflow runs—especially when they are used downstream (for example, as inputs to AI chats or dashboards)—it’s best practice to explicitly specify the output names in your prompt.
If only a single dataset is used throughout the AI DT node, the output will be named automatically and you don’t need to specify a name.
If names do change between runs the AI agents will do their best to remap them to subsequent steps so that workflows remain intact.
View Modes
Underneath the Run button in Section 2b, there are a series of buttons representing 3 view modes you can toggle between:
- Prompt View (left icon) - The Prompt View is the default where users will only see the box to type their prompt into.
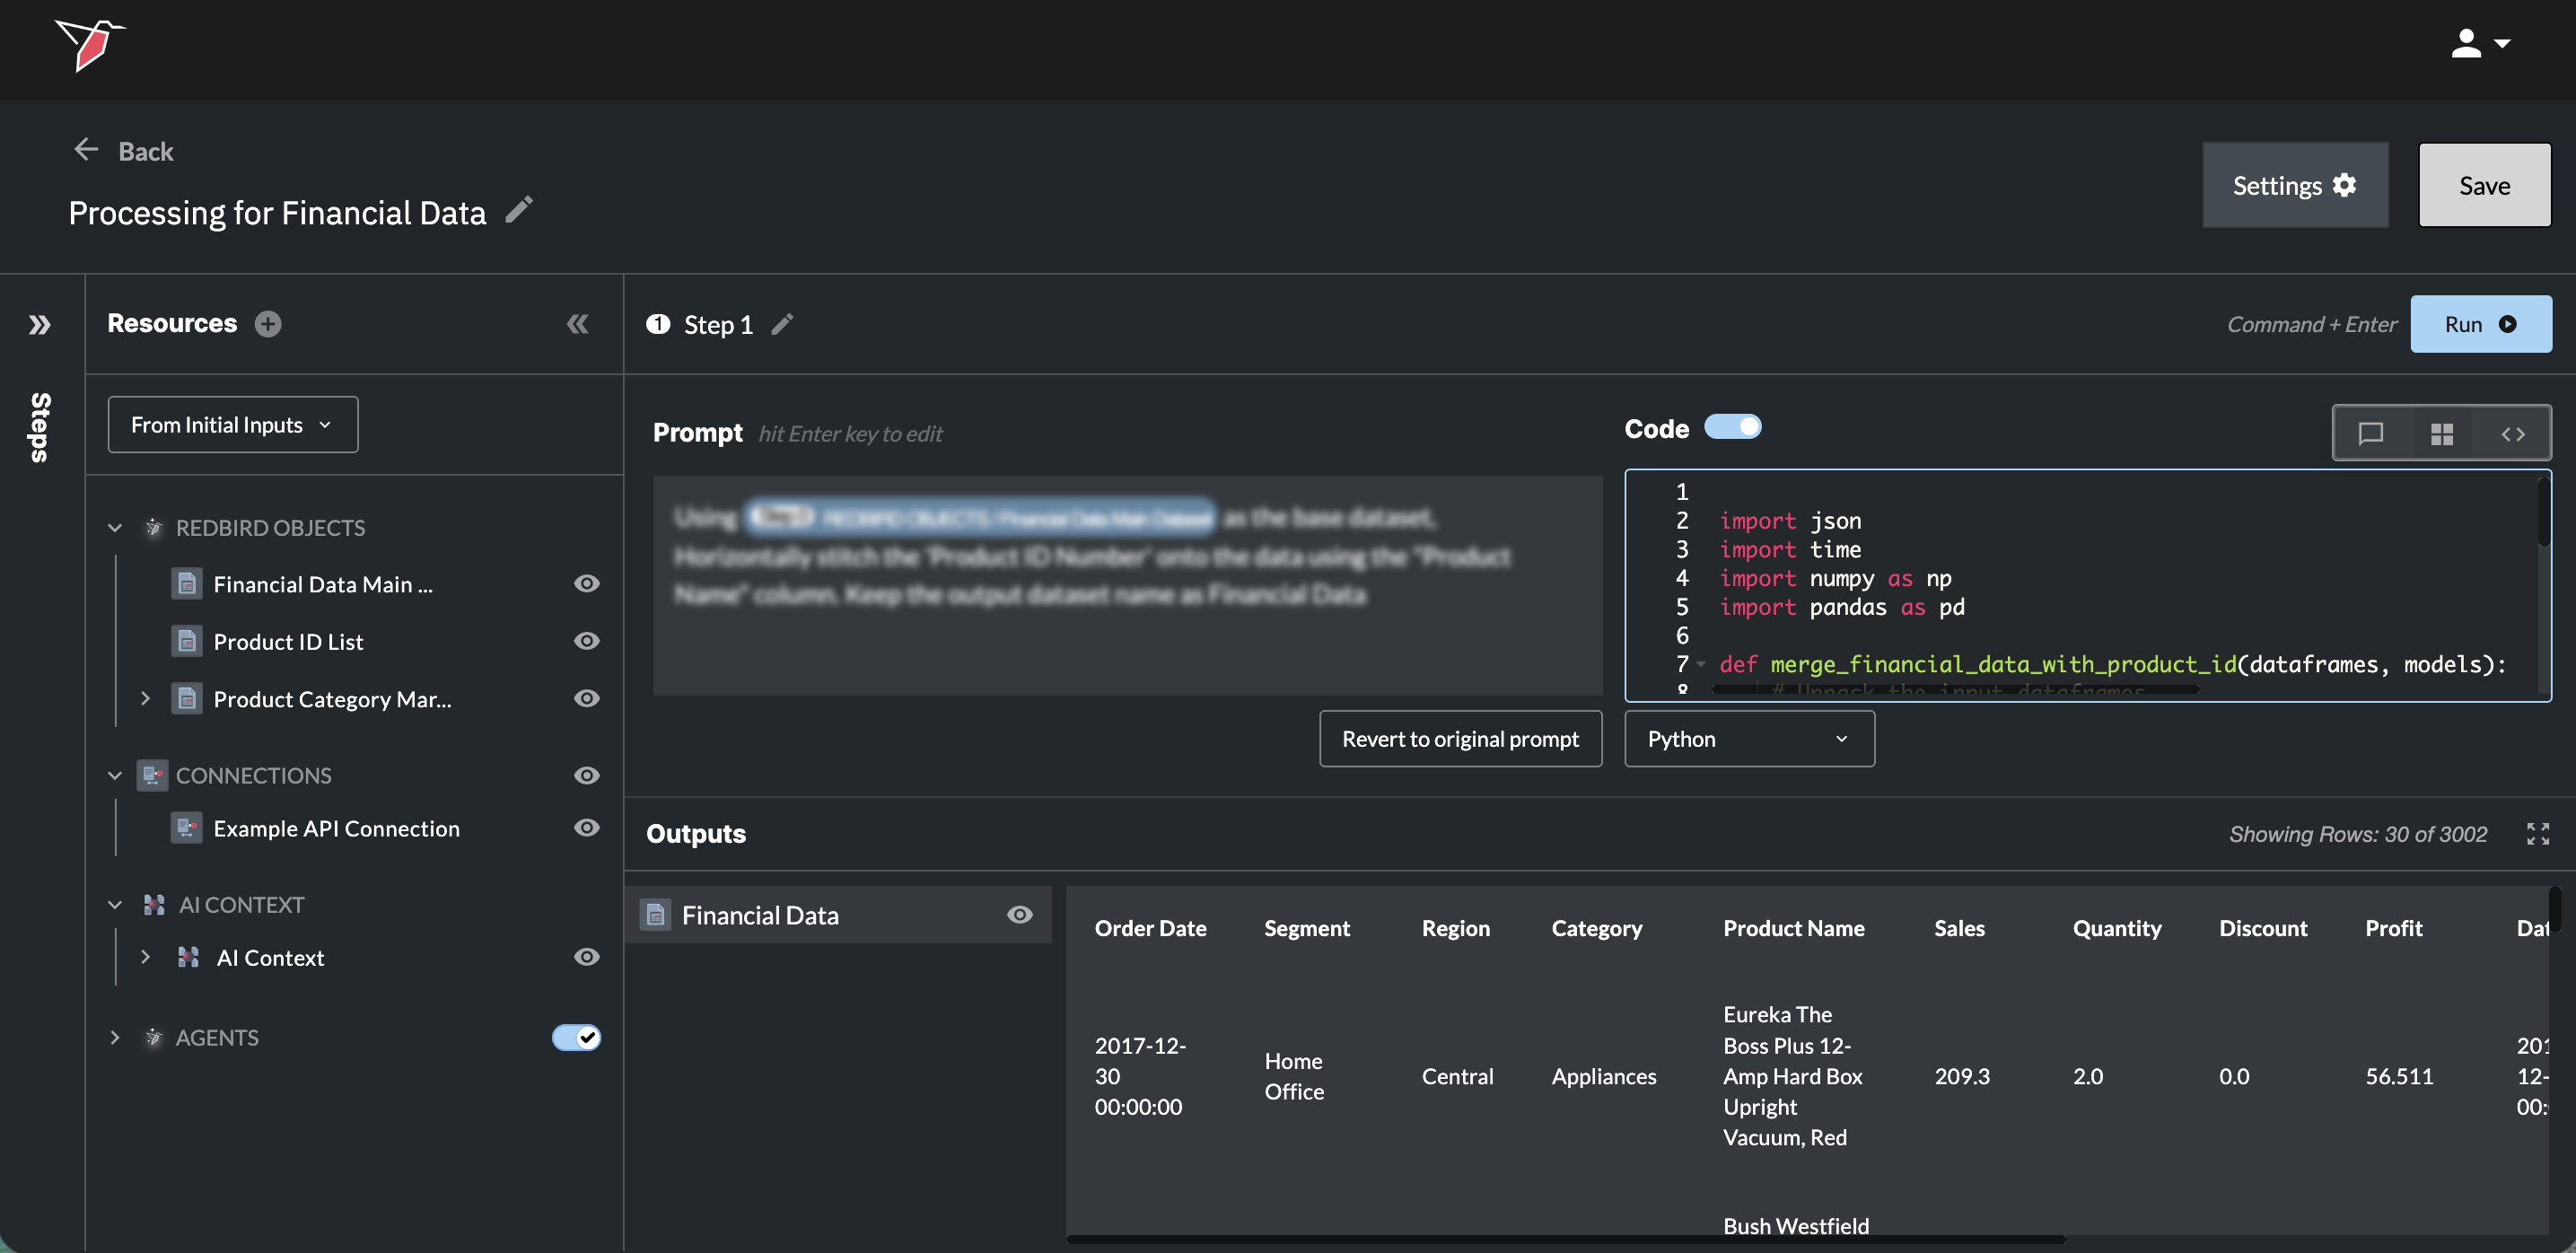
- Mixed View (middle icon) - The Mixed View allows users to see their prompt alongside the generated code.
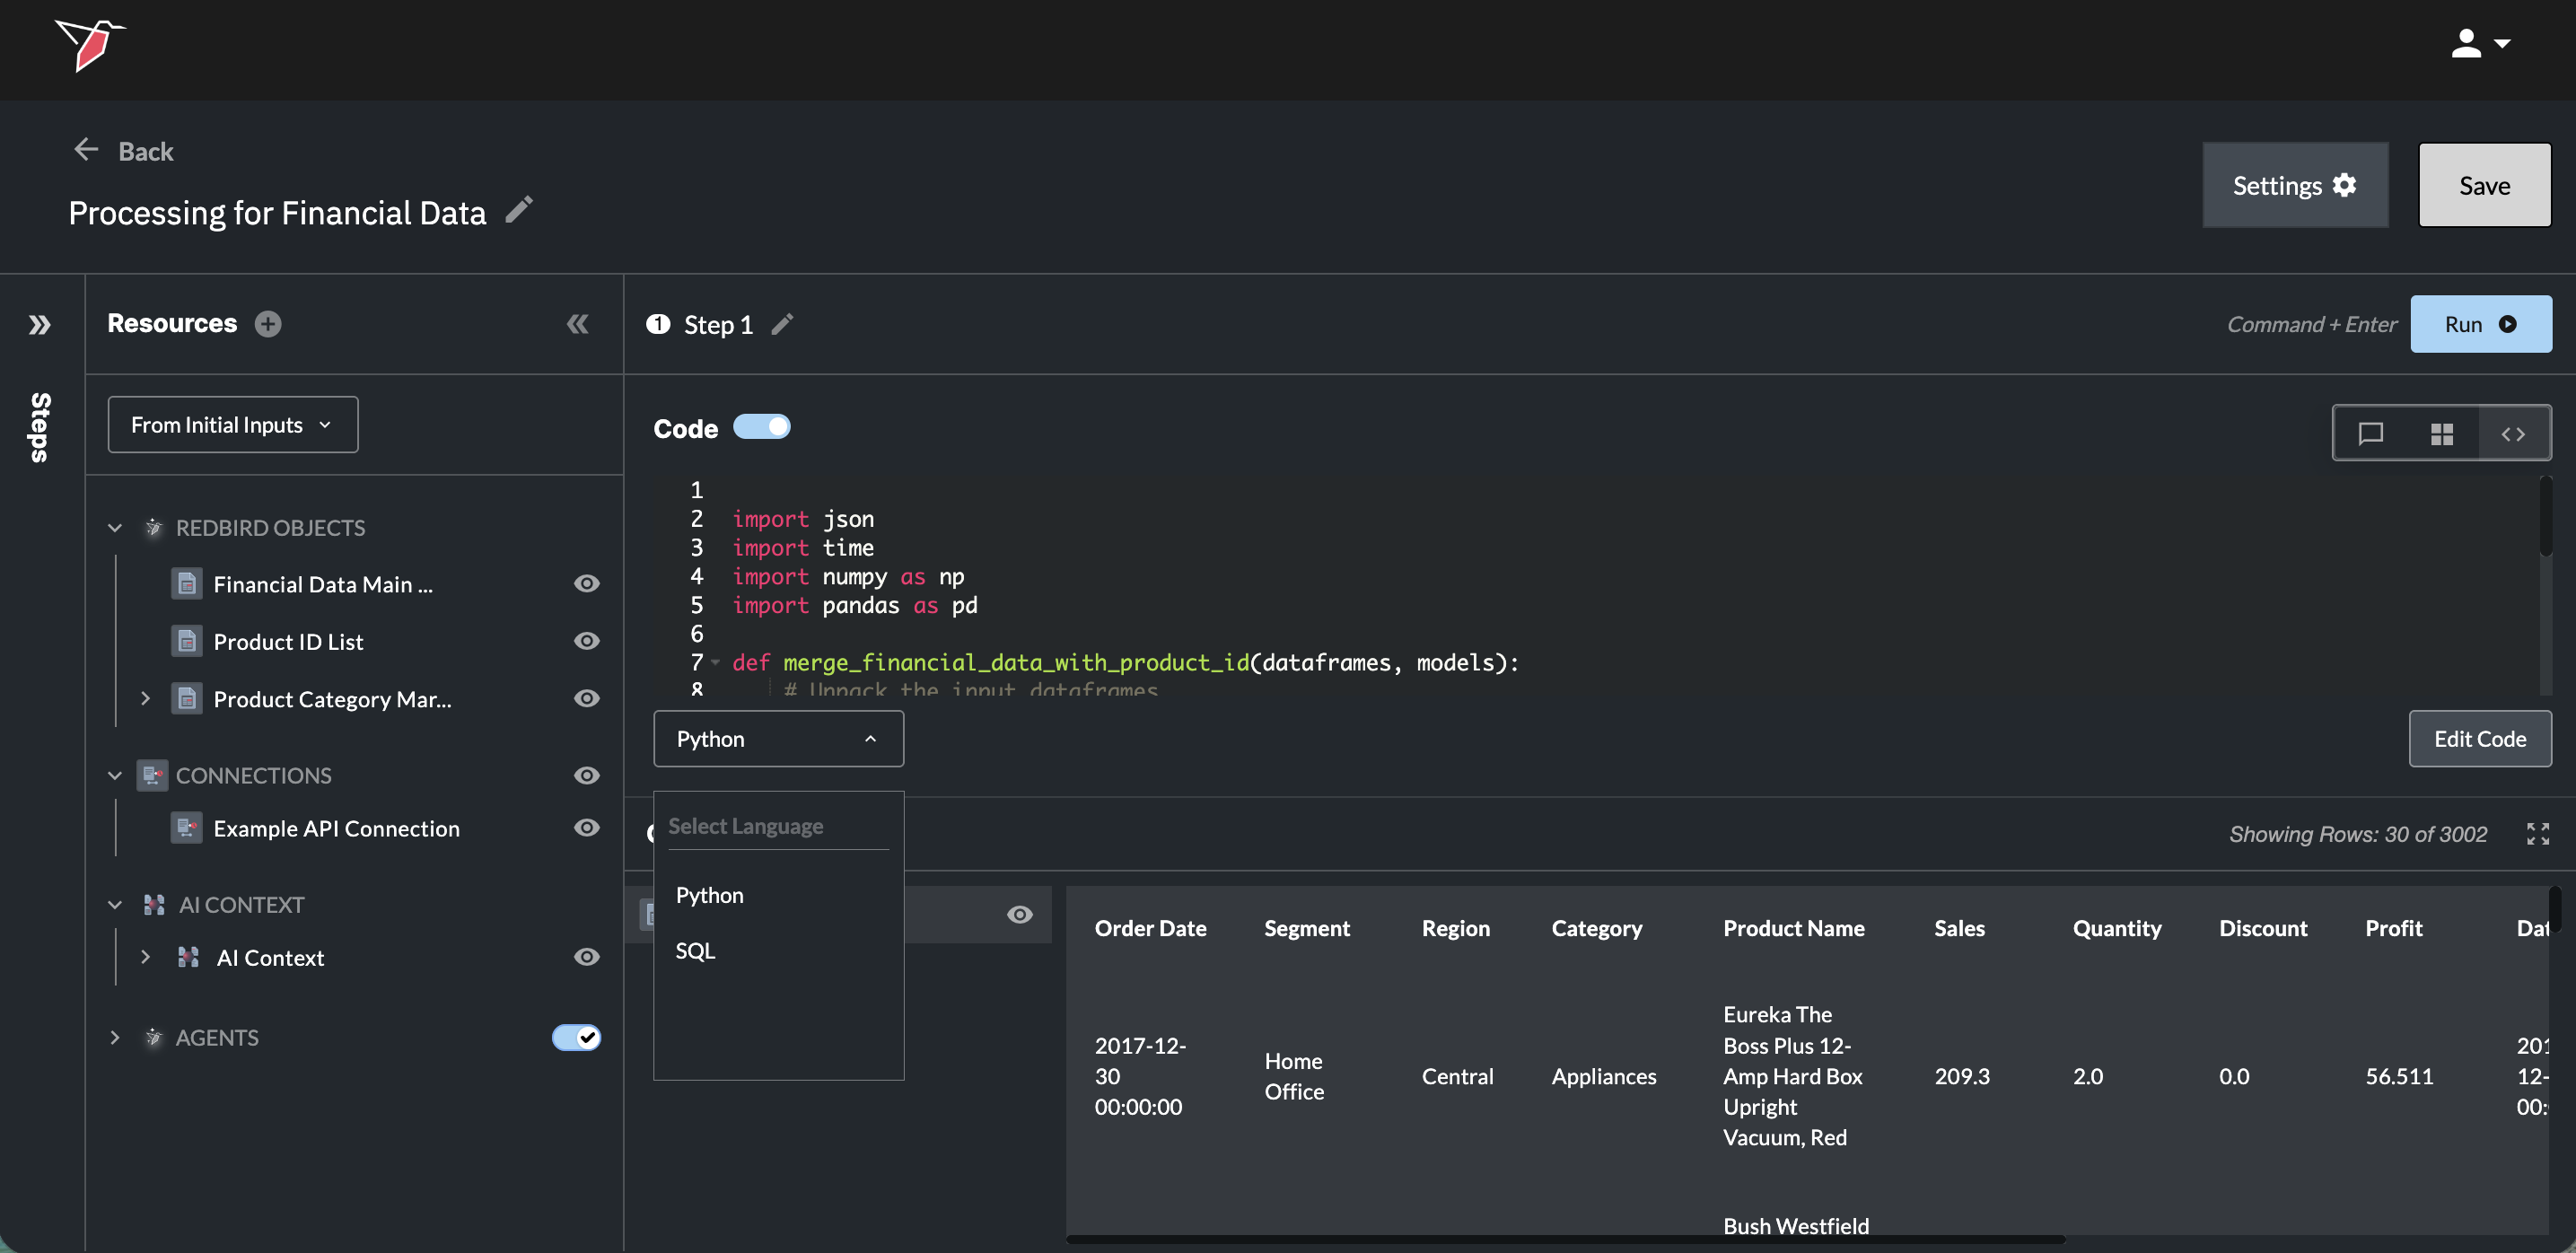
- Code View (right icon) - The Code View only shows the generated code.
In the Mixed View and Code Views:
-
You have the opportunity to change the language of your code between Python or SQL by choosing the desired language in the drop-down underneath the code output box.
- Switching between languages will cause new code to be generated, so you will need to wait for your prompt to be re-processed.
-
You can also directly edit the code that was generated.
- Edit the code by clicking the Edit Code button. You will now be able to adjust the code as needed.
- Once the edits have been made Run the step again.
- Editing the code will gray out the Prompt box, as the latest code version was not directly generated from the original prompt and is now out of sync. To return to the previous setup where the prompt generates your data, click Revert to original prompt to clear the code, then click Run to regenerate it.
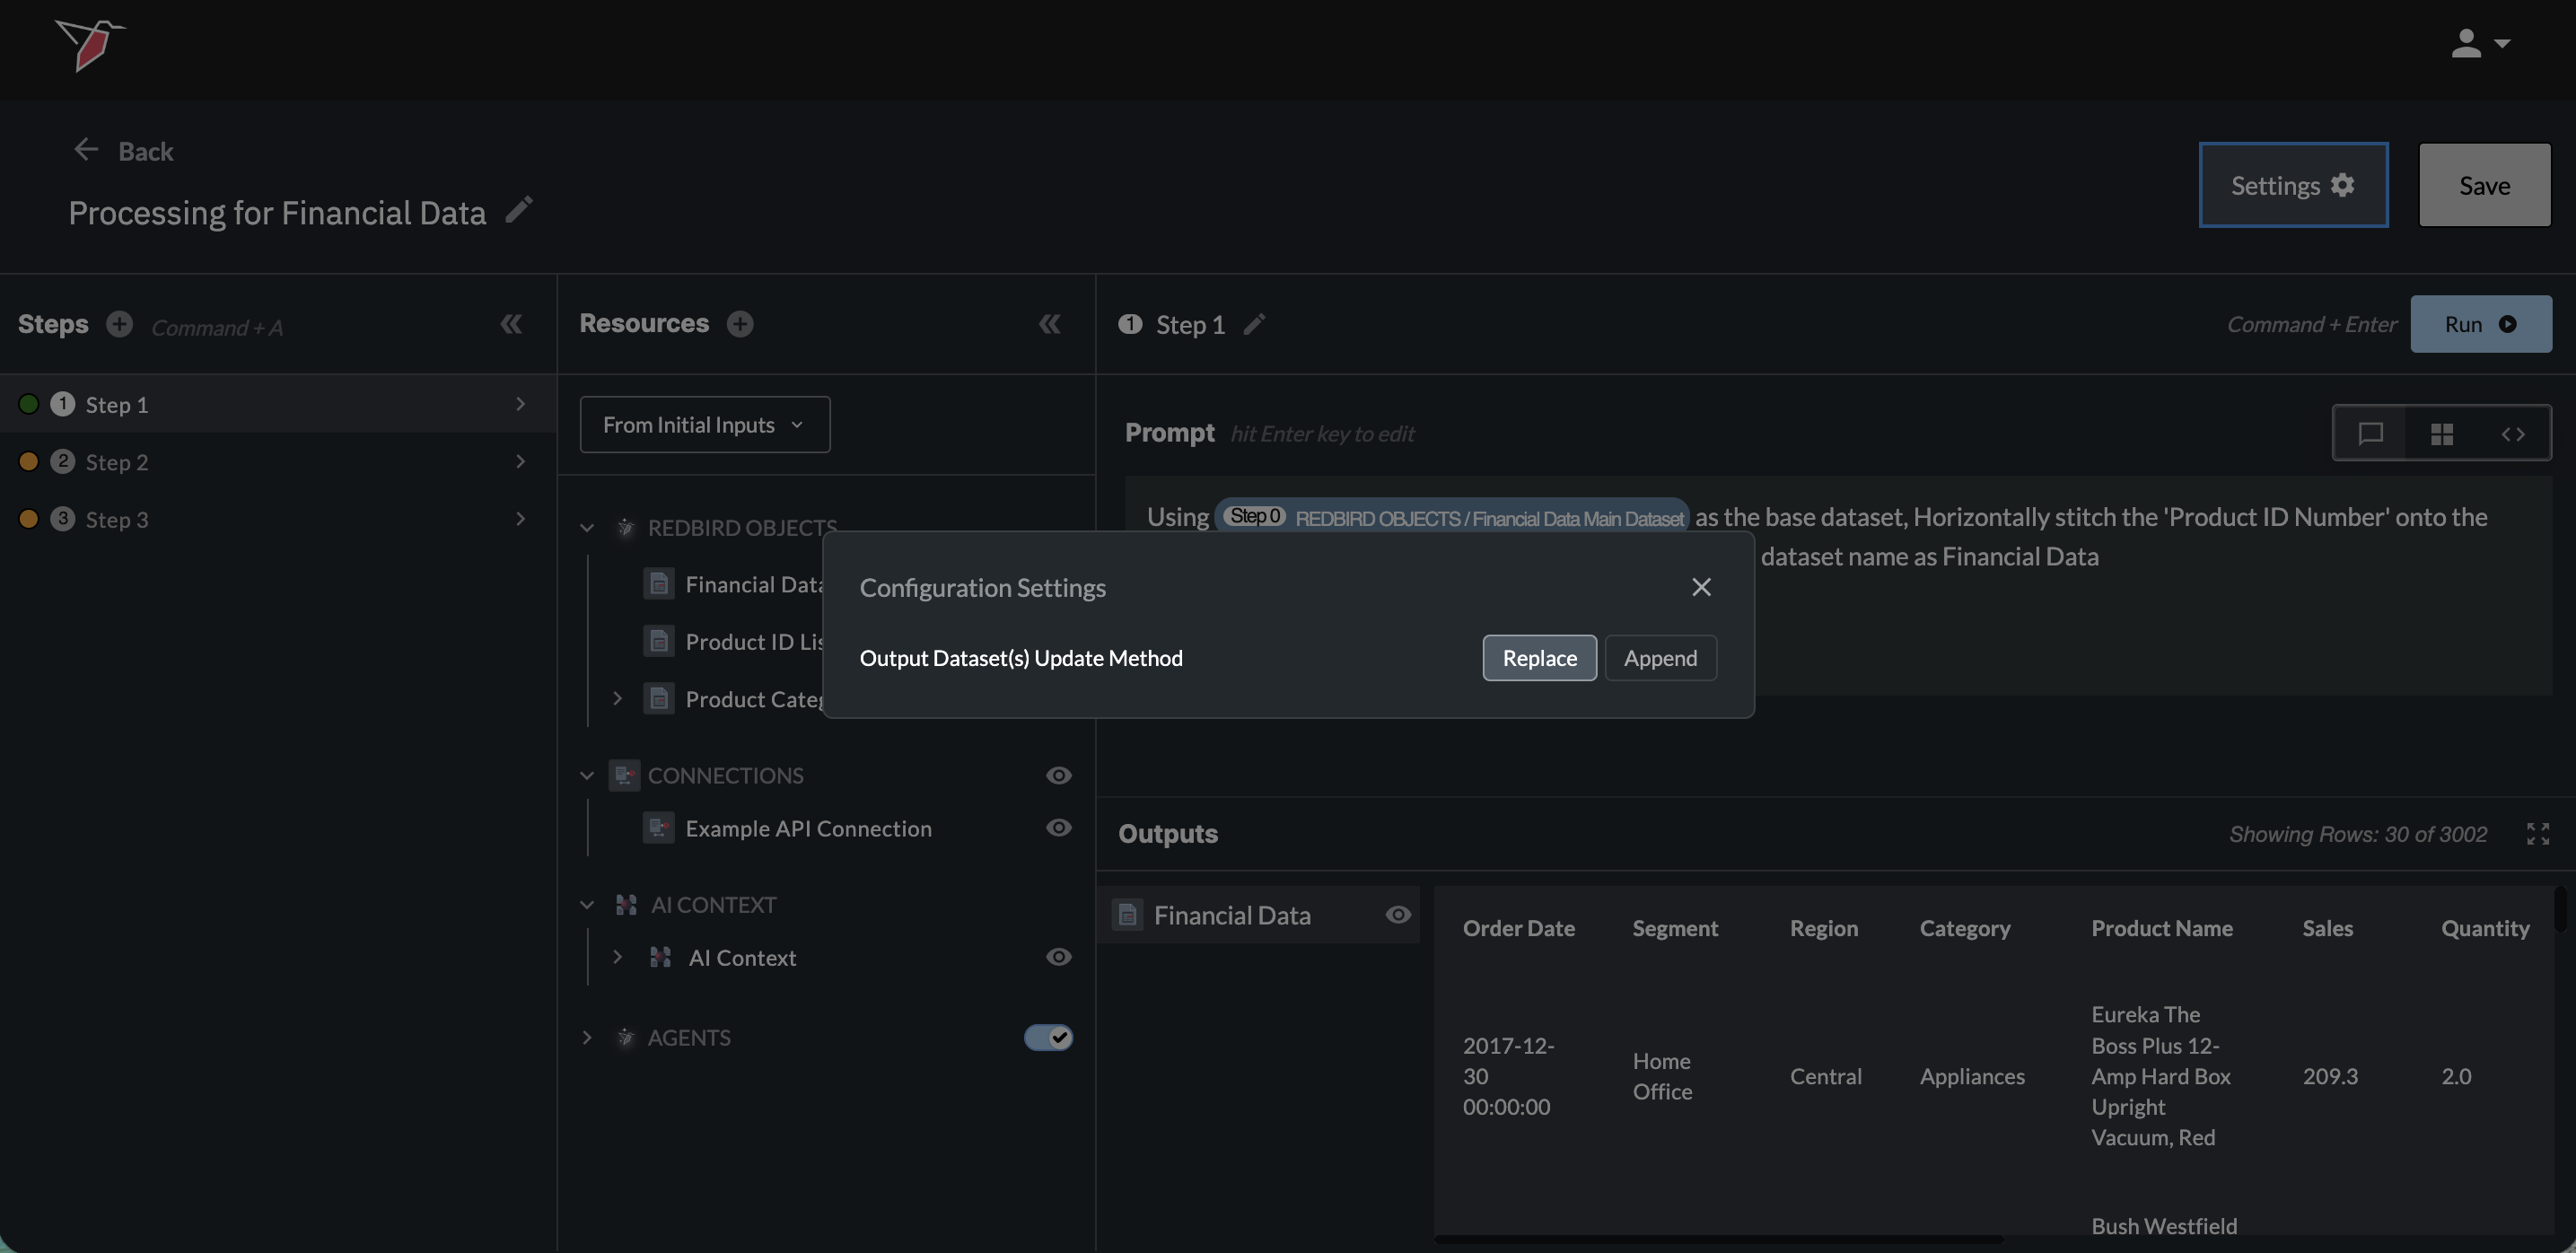
Append vs. Replace Output Data
By default, each AI DT run replaces the output dataset(s) on the canvas. You can switch to append mode — where each run adds to existing data instead of overwriting it — by clicking the settings icon next to Run and toggling the option in the modal. This can be changed at any time. In append mode, the dataset preserves the full column history across runs. Columns removed in a later run stay in the dataset with values only for the earlier runs that included them; columns added in a later run appear in the dataset and are blank for historical rows that didn't include them.
AI DT Signals
AI DT signals are events emitted by an AI DT node that other parts of the canvas can react to. A signal fires when a logical condition you define is met.
Signals can be used in two ways:
- Checkpoints: Gate whether a node proceeds based on the state of one or more signals.
- Triggered workflow runs: Initiate a workflow run when one or more signals fire. The logical condition itself is defined within the AI DT node using natural language. Checkpoints and triggered runs reference these signals to combine them with and/or logic and optional time-based conditions, but cannot define the underlying data or event logic themselves.
Creating a Signal
A signal can be created within any AI DT prompt, either as a standalone step or alongside other transformation instructions in an existing step.
- In the prompt box, press Shift + 2 to insert the @ symbol. This opens the signal creation menu.
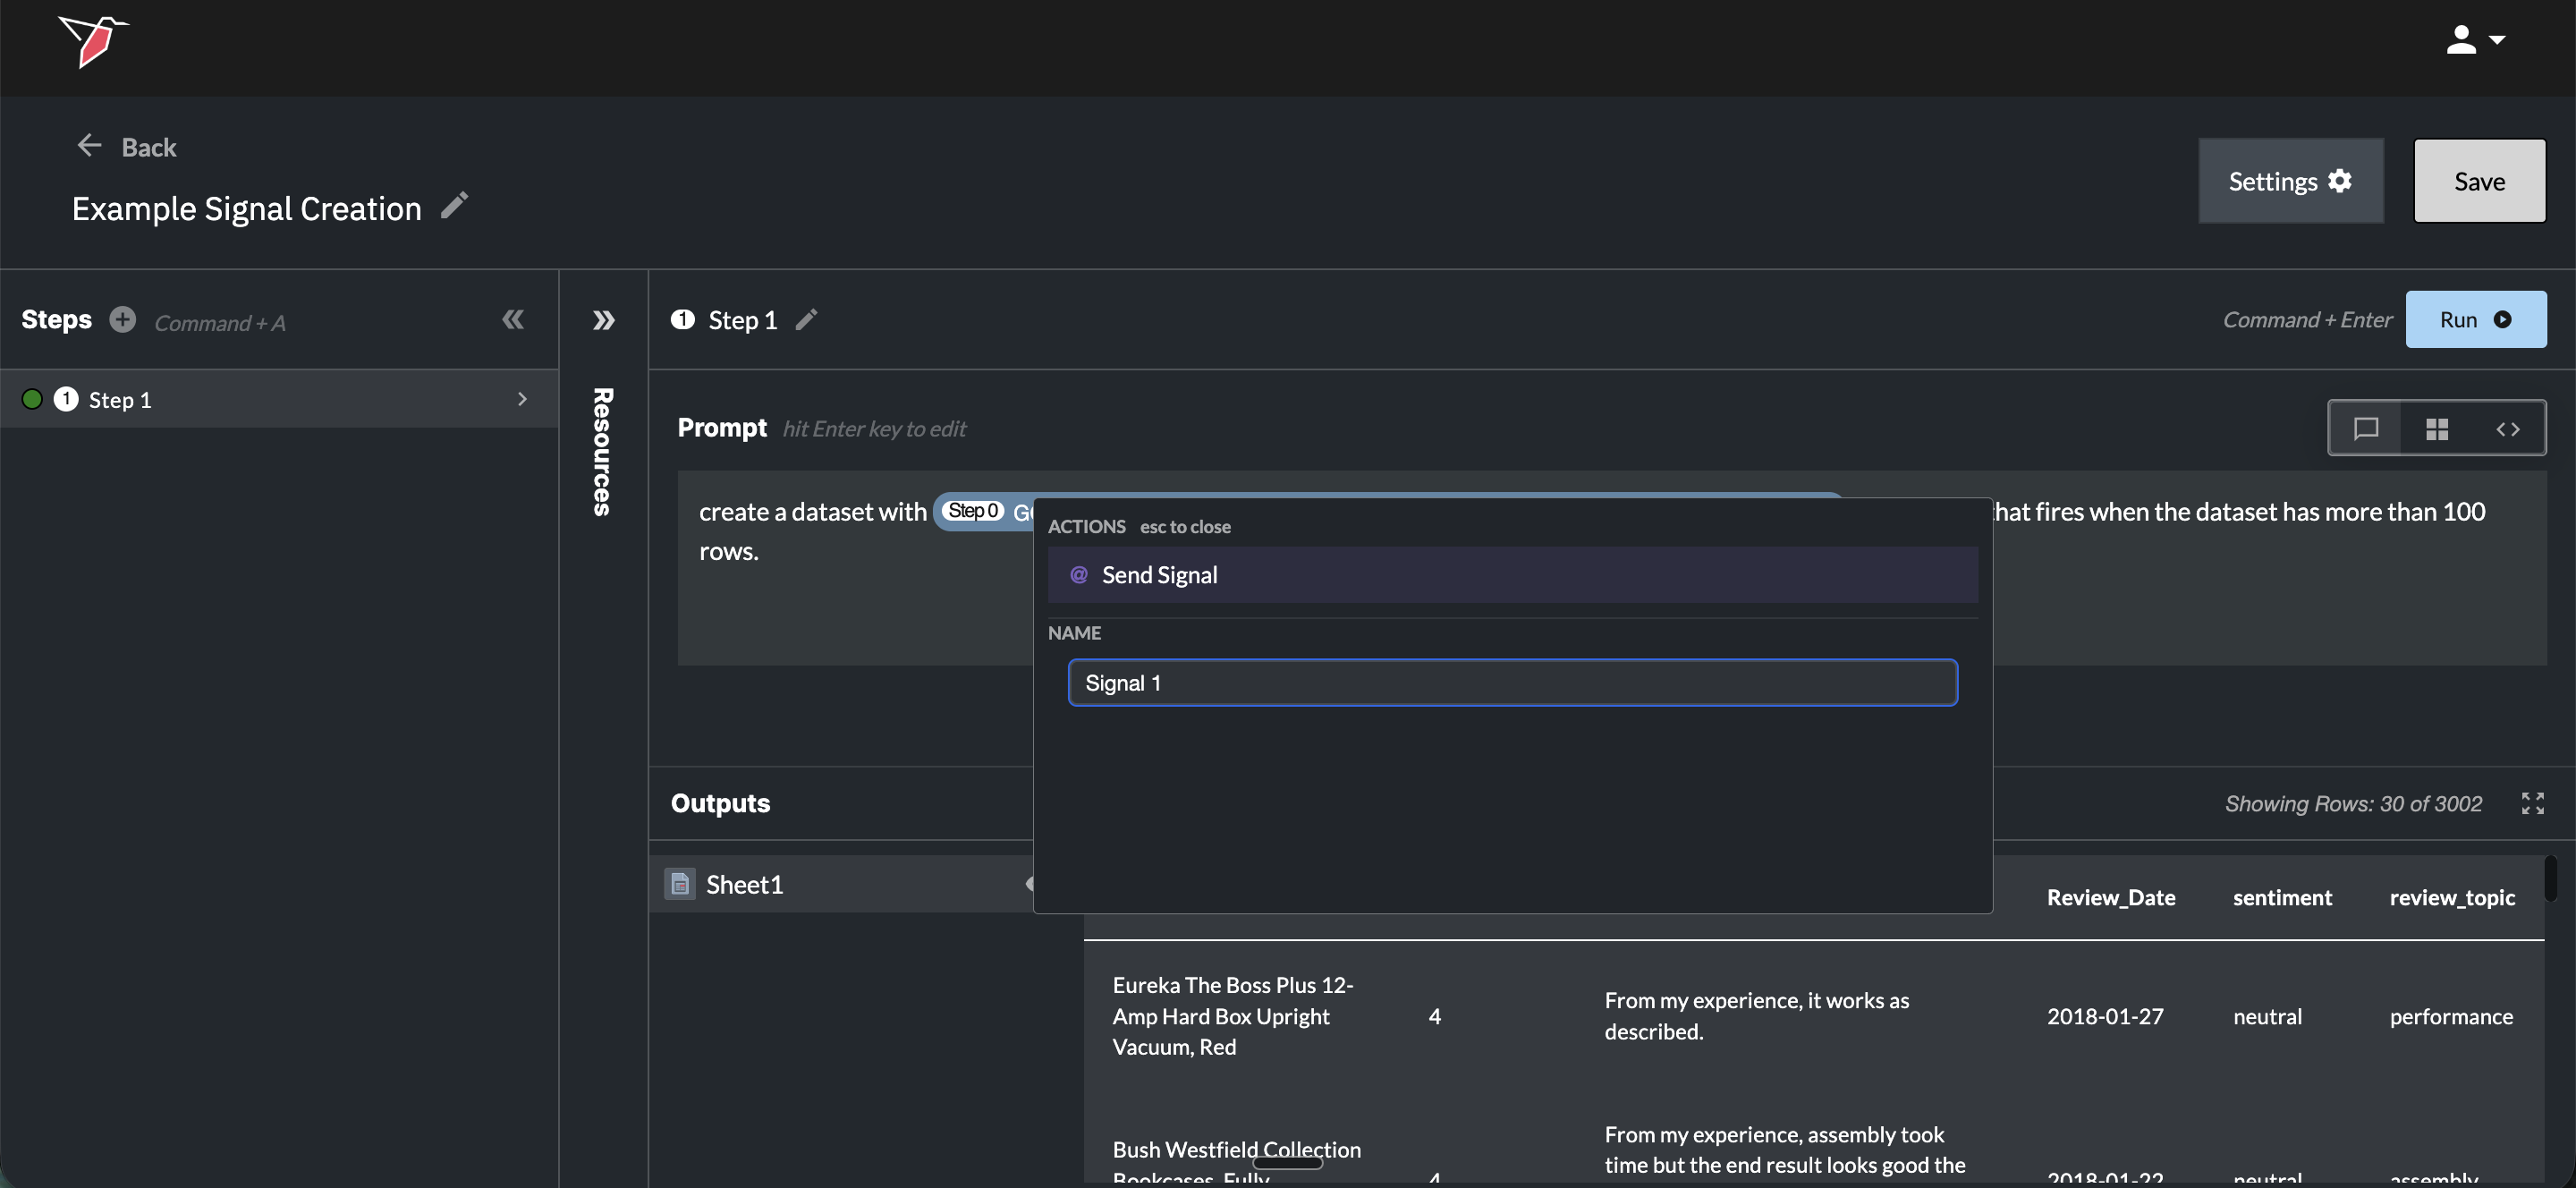
- Describe the logical condition for the signal in natural language. For example:
- "Create a @Signal 1 that fires when the dataset has more than 100 rows."
- "Create a @Signal 2 that fires when any value in the [column name] column exceeds 2x the median."
- "Create a @Signal 3 that fires when no rows have a null value in the email column."
- You can name the signal at this point by editing the signal name directly.
- Press Enter or click Send Signal to create the signal.
Note: If you want to use the @ symbol in your prompt for any other purpose (without creating a signal), press Esc to close the signal creation menu.
Using a Signal
Once created, the signal appears in the Outputs section alongside any output datasets from that step.
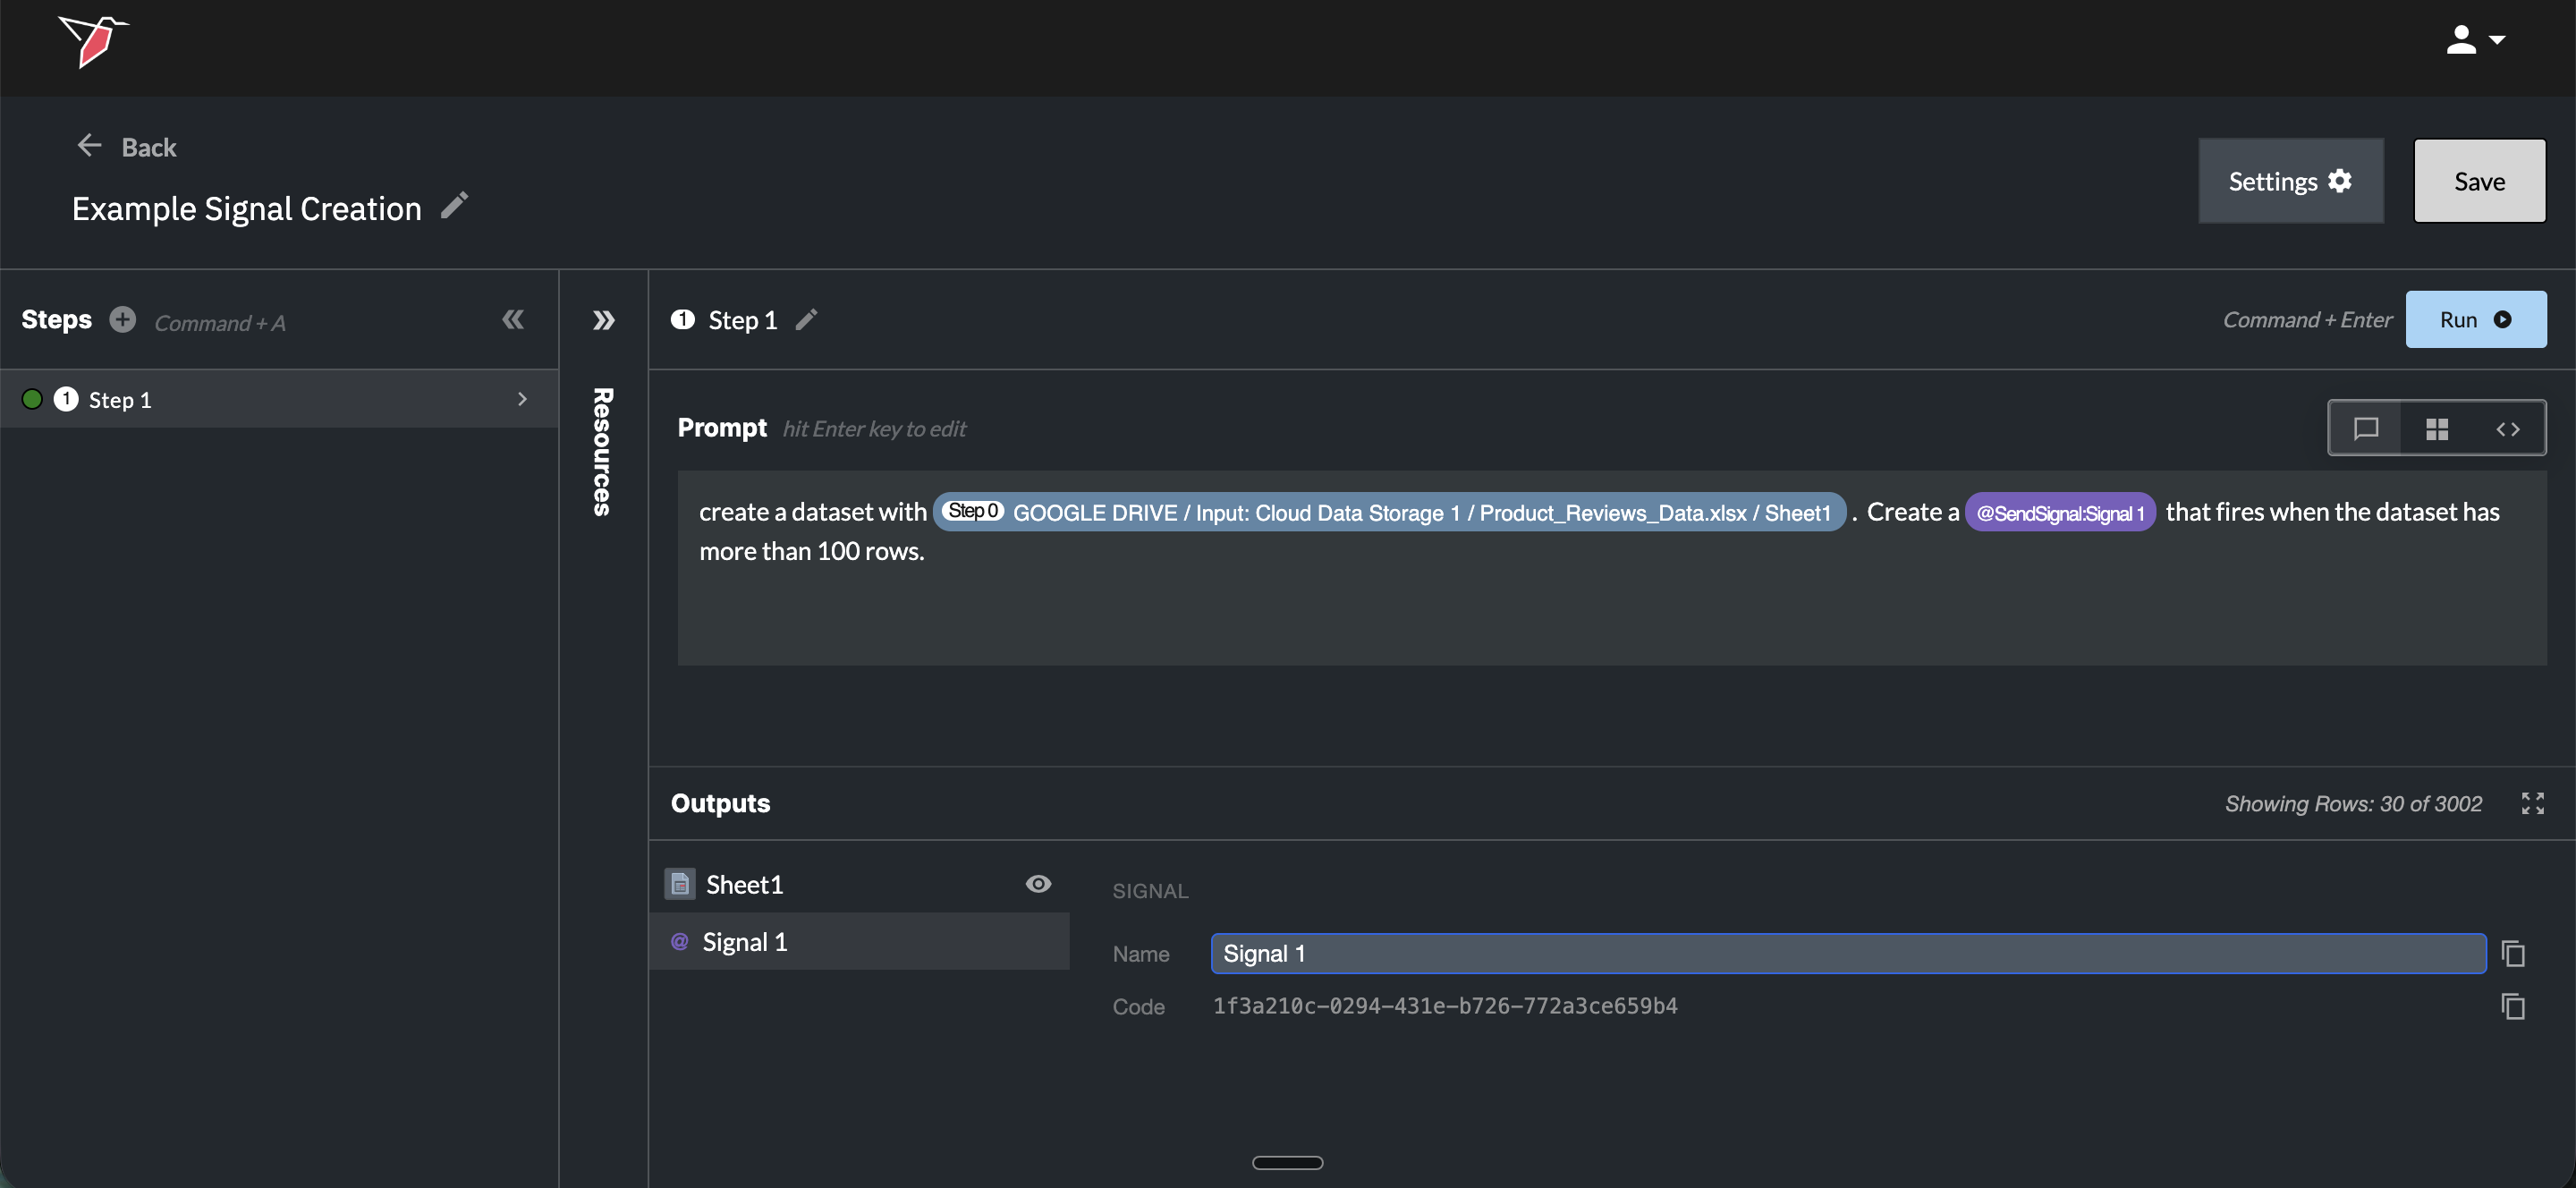
From here you can:
- Rename the signal by clicking on its name in the Outputs section.
- Copy the signal code by clicking the copy icon next to it. The signal code is needed to reference the signal from a checkpoint or triggered run that isn't directly connected to this AI DT node, or from another canvas.
Important: The AI DT node must be run at least once for the signal to become available for use in checkpoints or triggered workflow runs.
Example Prompts
Below are some examples of some end to end data transformation workflows and how you might write prompts to execute those steps as well as how you would split up the prompts into various step.
- Example 1: Pivot Data
- Step 1: Horizontally stitch the 'Product ID Number' onto the data using the "Product Name" column in both datasets.
- Step 2: Pivot the "Sales" column based on "Segment", "Region", "Product Name", and "Product ID Number" in the output.
- Step 3: Create a new column "Total Sales" and enter the overall sum of "Sales" in each row of this column.
- Example 2: Train a Data Science Model and Predict
- Step 1: Train a model to predict Sales using the provided dataset.
- Step 2: Predict using the trained model and the dataset provided.
- Example 3: Transform Data
- Step 1
- Convert the Period Start column name to Date, using the date format YYYY-MM.
- Create a column called Platform with the constant value Amazon DMR.
- Create a column called Channel with a constant null value.
- Change the Consumption Type column name to Viewer Type.
- Create a the following columns, all with null values: Asset ID, Number of Views (Total views) view count, Number of Unique Views - user count, Ad Impressions, Gross Revenue, Season No, Episode No.
- Step 2
- Rename the Duration Streamed column to View time(mins) mins viewed and divide all values by 60.
- Rename the Quantity column to Transactions.
- Rename the Unit Price column to Net Revenue.
- Rename the Season Name column to Series Info.
- Rename the Territory column to Country Code.
- Step 3
- Create a column called Distribution Medium with the constant value of Digital.
- For the Viewer Type column, change the following values: {ABCD: Prime, EFGH: Purchase, IFJK: Rental}.
- Step 1
Updated about 2 months ago
What’s Next
Now you have learnt how to process your data, click below to move to the outputs section to learn how to generate outputs