Configuring and Using AI Chats
Introduction
Redbird’s AI Chat provides an intuitive interface for interacting with workflows and your organization’s data ecosystem using natural language. Within AI Chat, users can ask questions or provide instructions, and Redbird’s AI will generate responses or take actions based on those prompts.
This enables non-technical users to self-serve for analytics and business intelligence use cases, while allowing more technical builders to maintain control and governance over how the AI Chat is configured and used.
This guide walks through how to configure and use Redbird’s AI Chat.
Getting Started
- Add an AI Chat node to the canvas by clicking the Add Objects (+) icon, selecting AI, and dragging the AI Chat node onto the canvas.
- Enter the edit view for the AI Chat node by double-clicking the node, or by selecting it and clicking Edit in the right-hand panel.
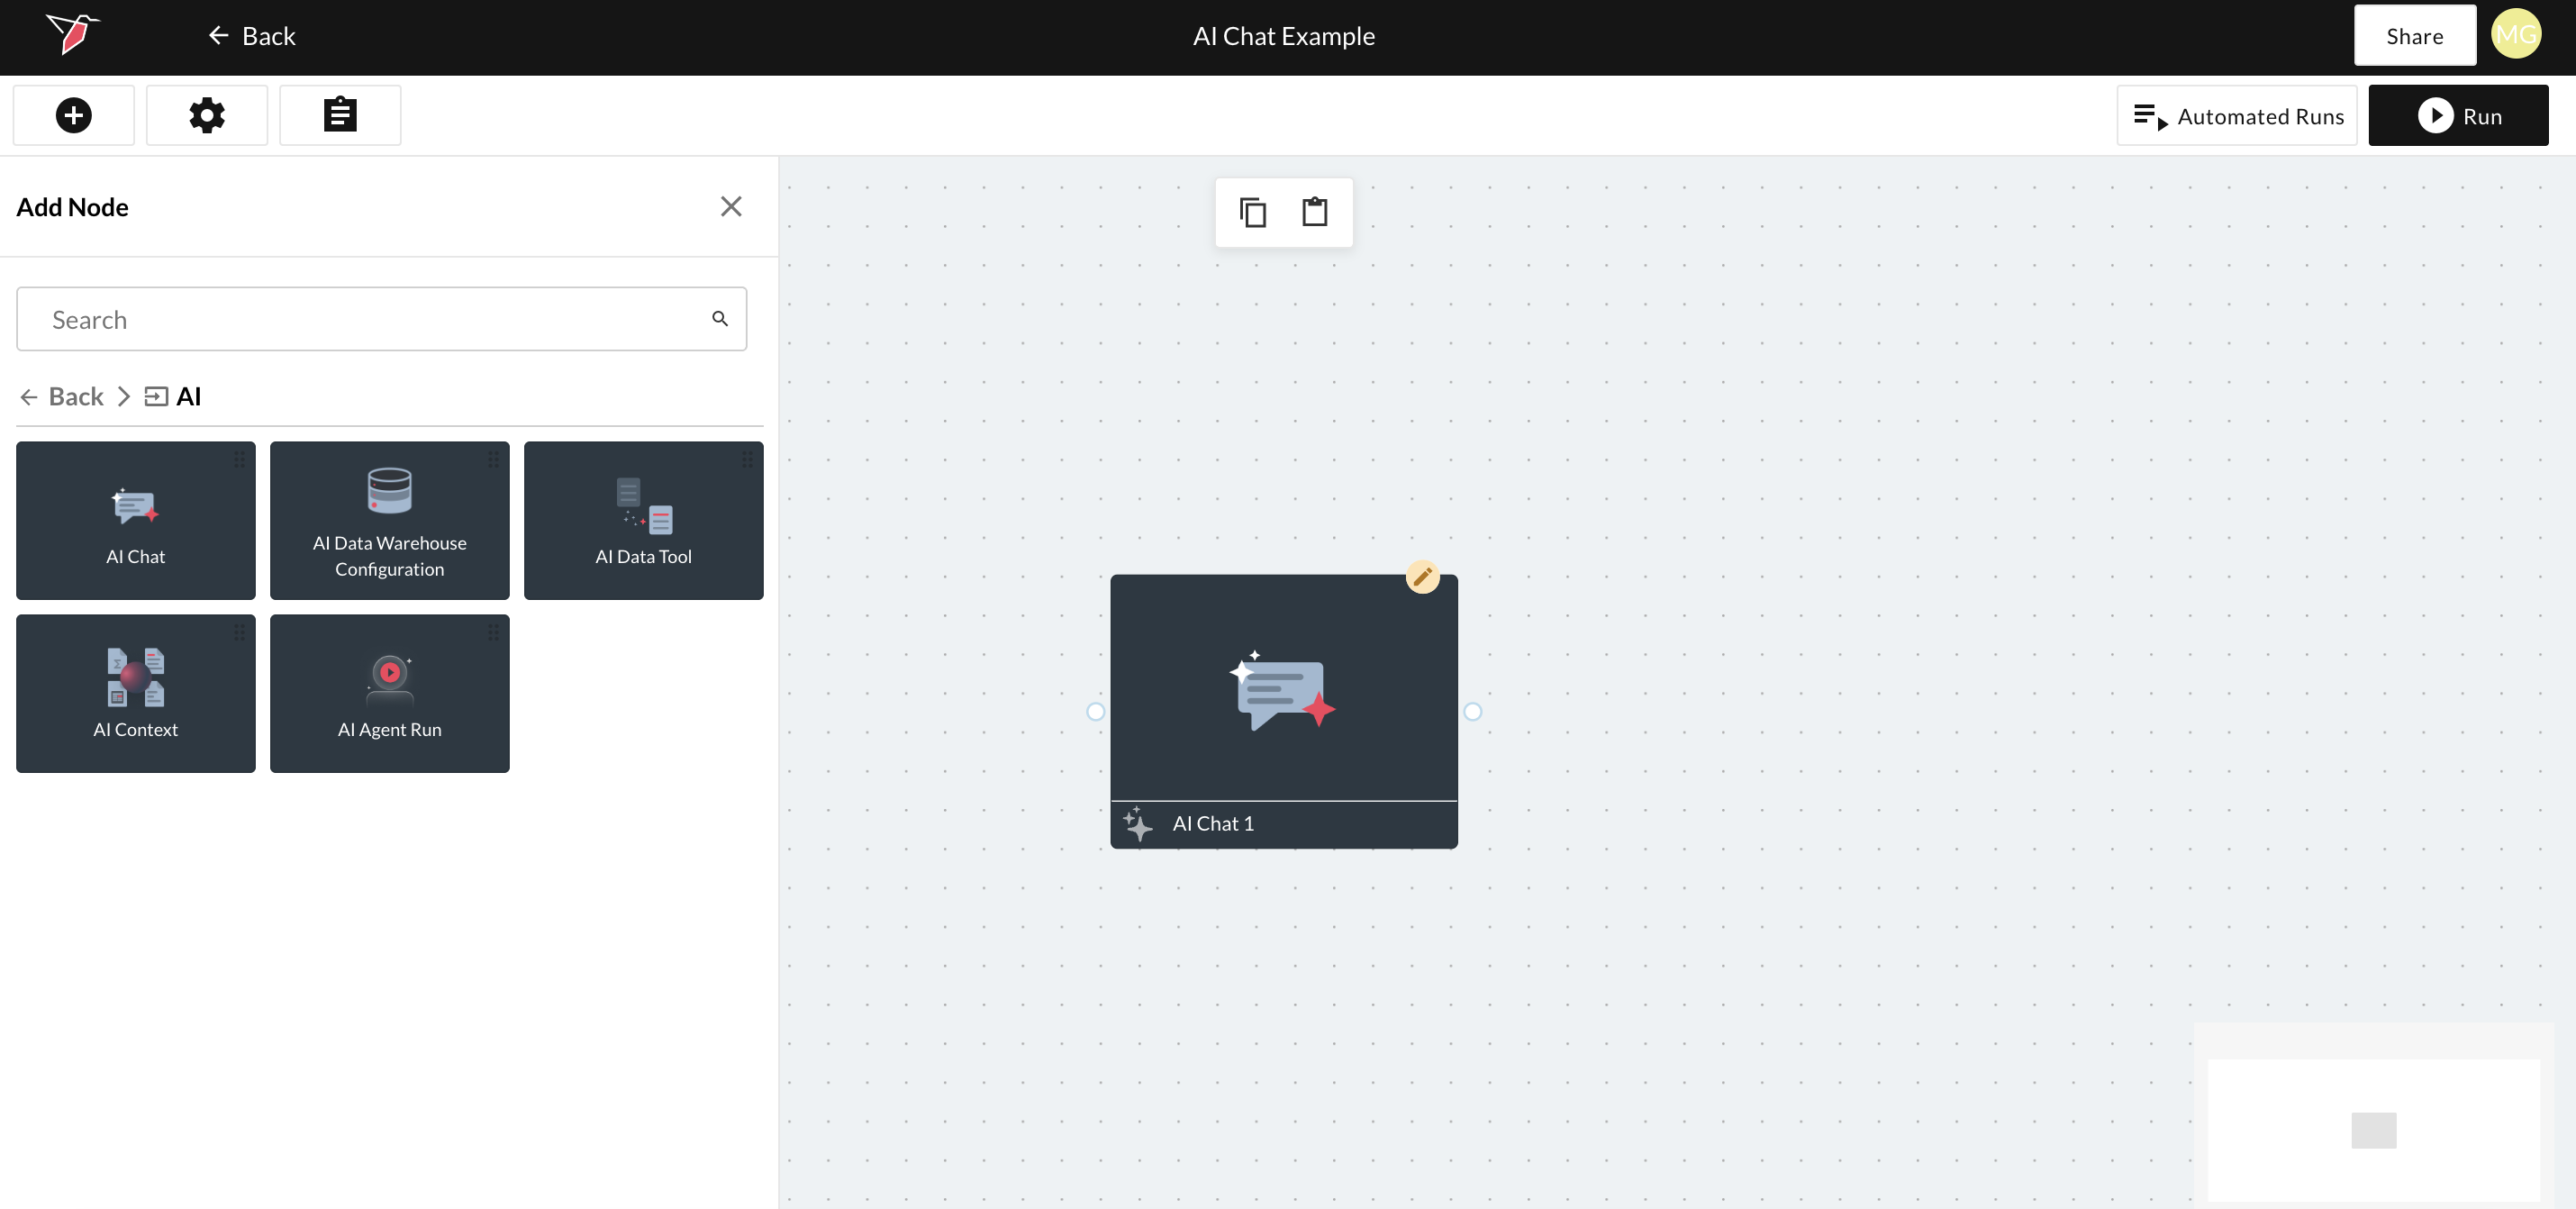
- You can rename the AI Chat node by clicking the pencil icon in the node header and entering a name (for example, Financial Analysis AI Chat).
The AI Chat node experience is made up of three main sections, which are highlighted in the image below and described in more detail in the following sections below: the Resources Panel, Chat Threads Panel, and Chat Interface.
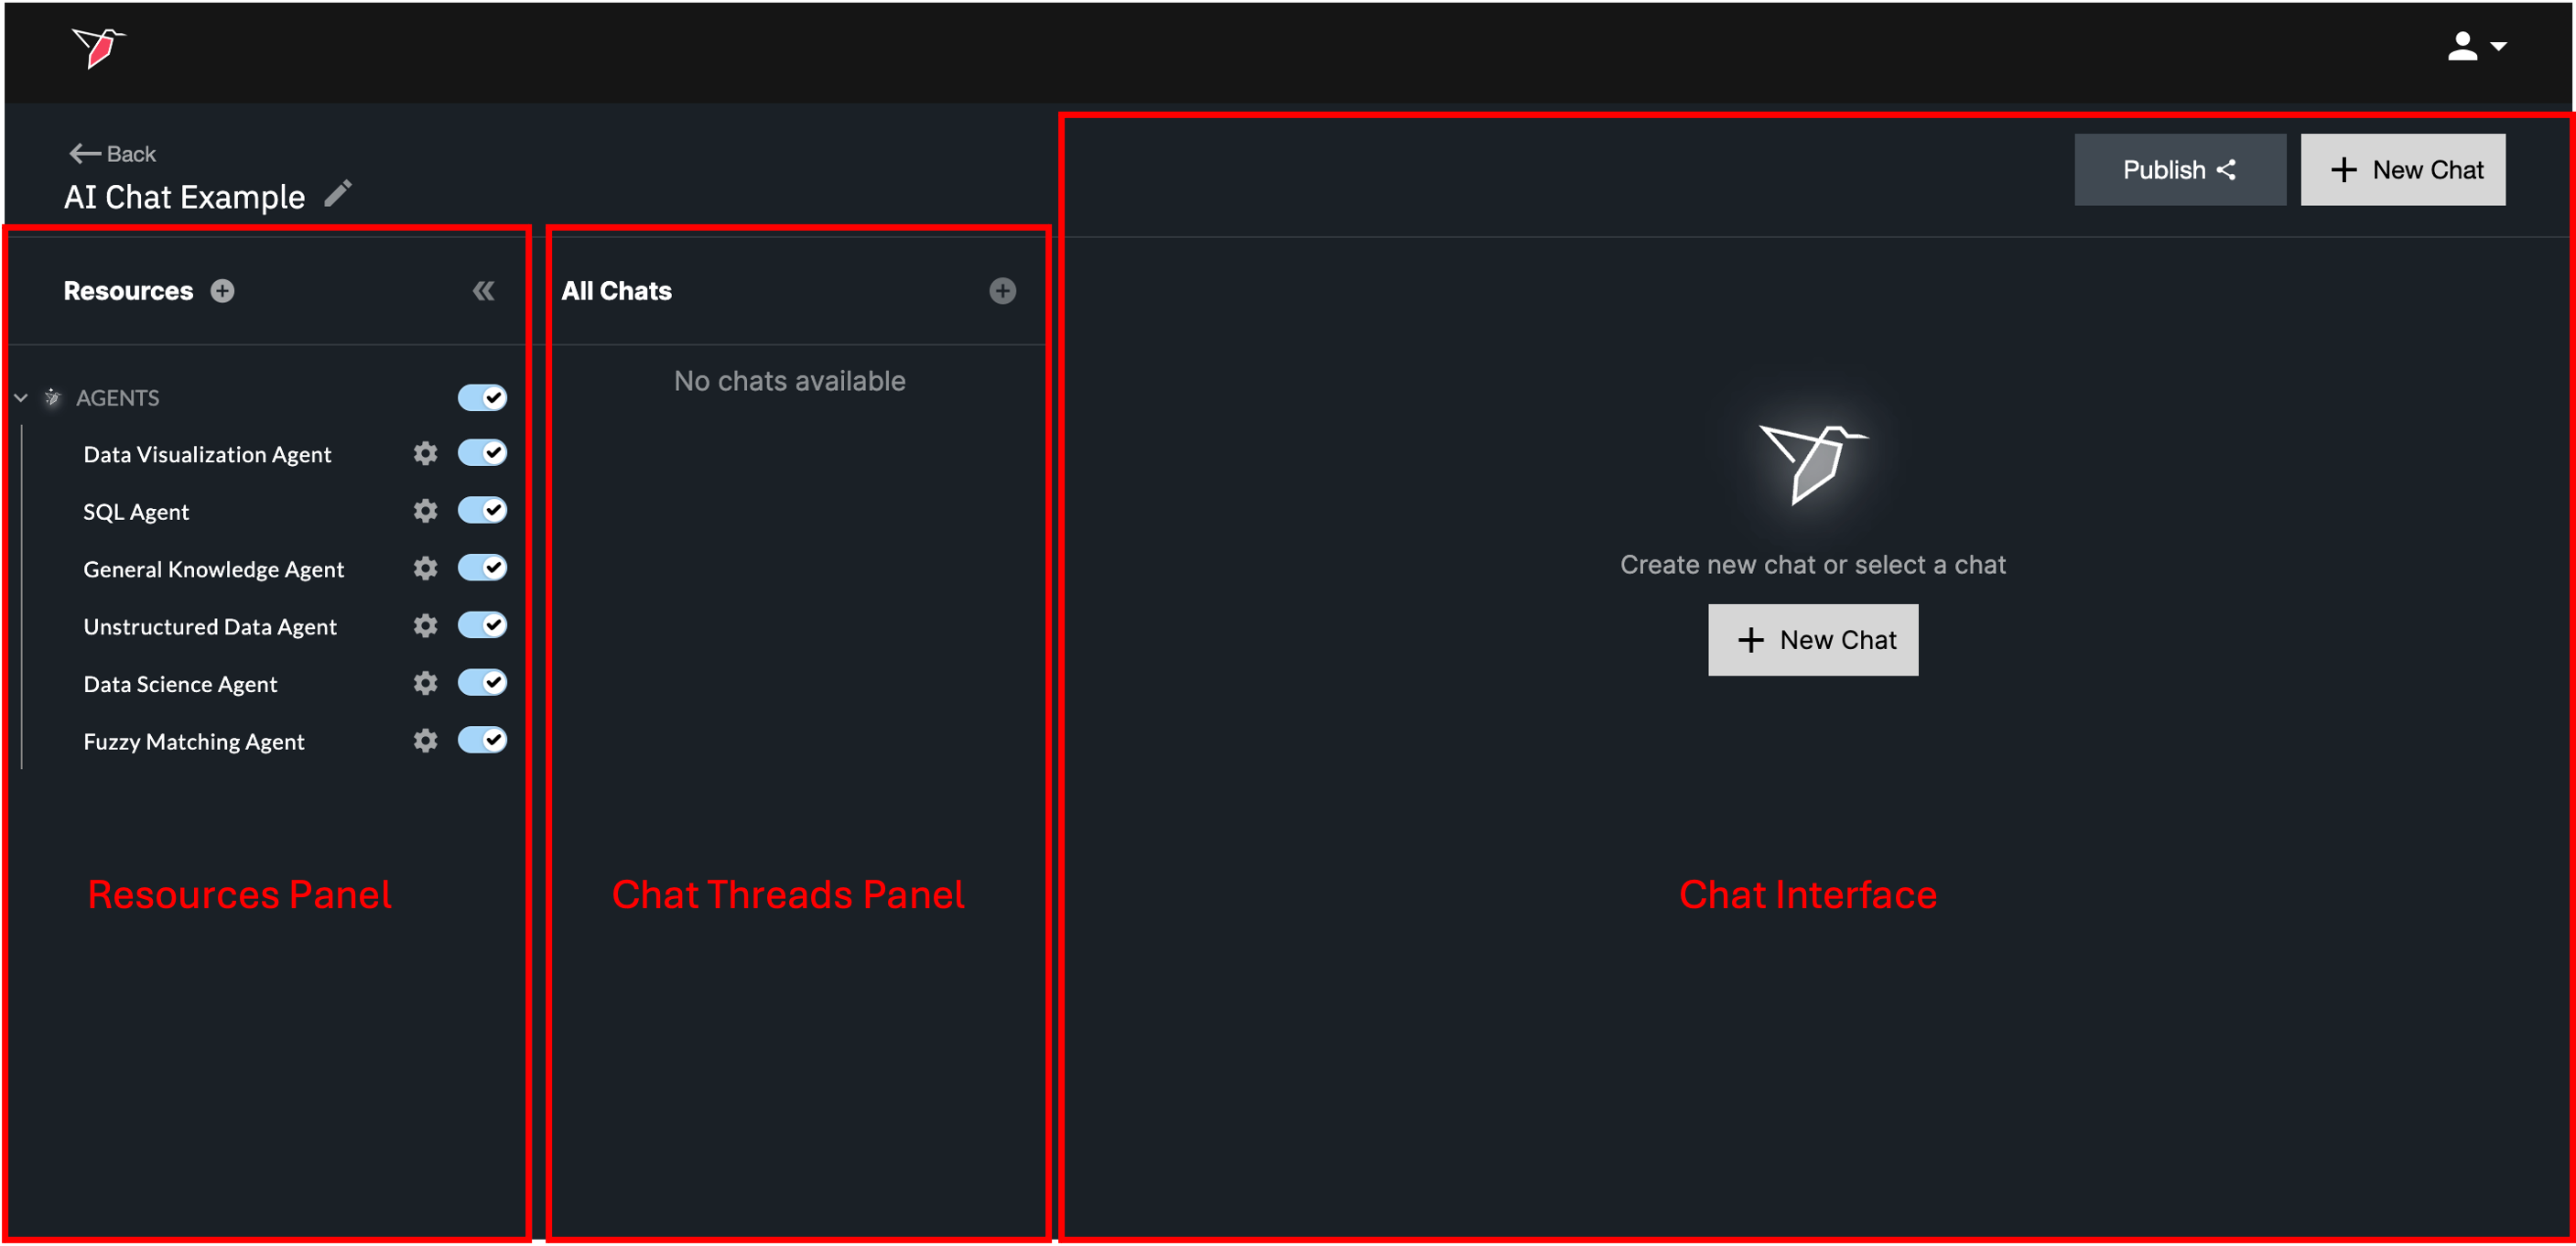
Configuring the Chat via the Resources Panel
The Resources panel is located on the left-hand side of the AI Chat interface and can be expanded or collapsed as needed. It allows you to manage the agents, input data sources, and contextual information that the AI Chat uses to generate responses.
Agents
When you first open a newly added AI Chat node, you’ll see a list of all AI agents that are enabled for your Redbird account. AI Agents are specialized in answering specific categories of questions or taking certain actions based on user prompts. See here for more information on agents. By default, all available agents are toggled on.
- Toggling Agents On/Off: Use the top-level toggle to enable or disable all agents at once. Use the individual toggles to control which agents the chat can access. Limiting agents can help guide responses and ensure the chat behaves in a more predictable or constrained way.
- Custom logic: Each agent also includes a cog icon, which allows you to configure custom logic for that agent. Depending on the base agent you select, there may be parts of the AI agent's logic that will be exposed for you to customize using natural language descriptions of the logic you would like to add. For more information on customizing logic and examples see here.
Custom Logic Vs. AI Context
Note: Use custom agent logic when you need to provide specific instructions for how an individual agent should behave or execute. For more general business context that should apply across all agents — such as acronyms used within your organization or how specific metrics are calculated — use AI Context instead. See here for more information on AI Context.
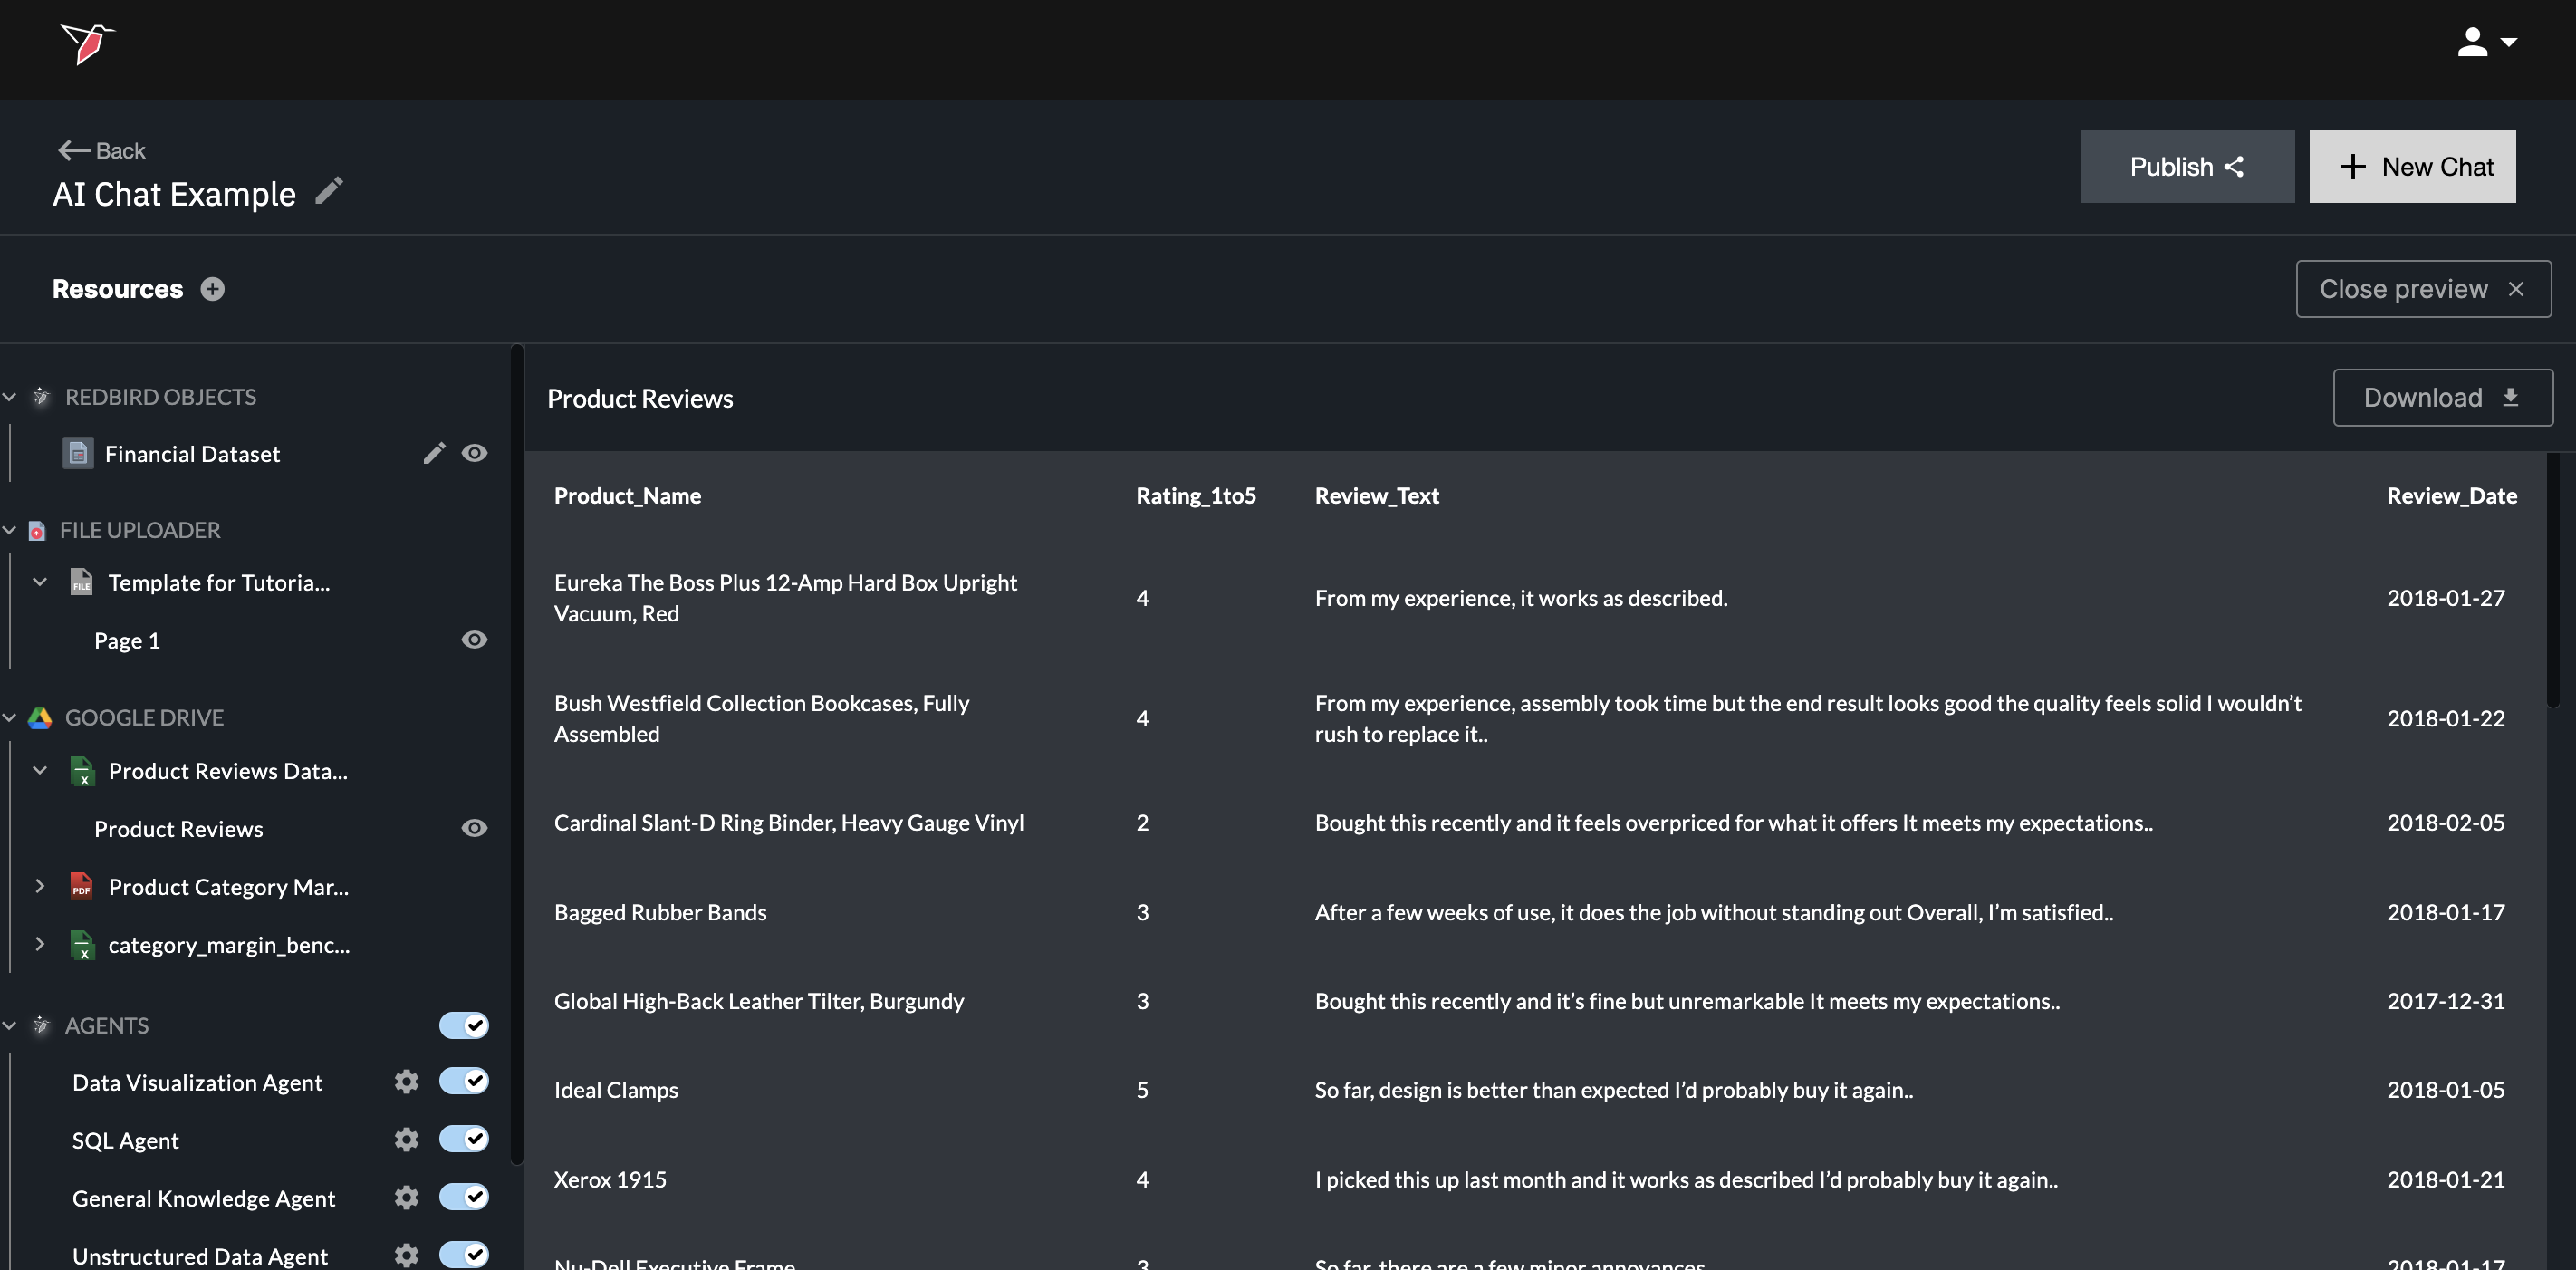
Data Sources
For the AI Chat to operate on data (with some exceptions such as general knowledge agent), you must provide one or more resources. You can do this in two ways:
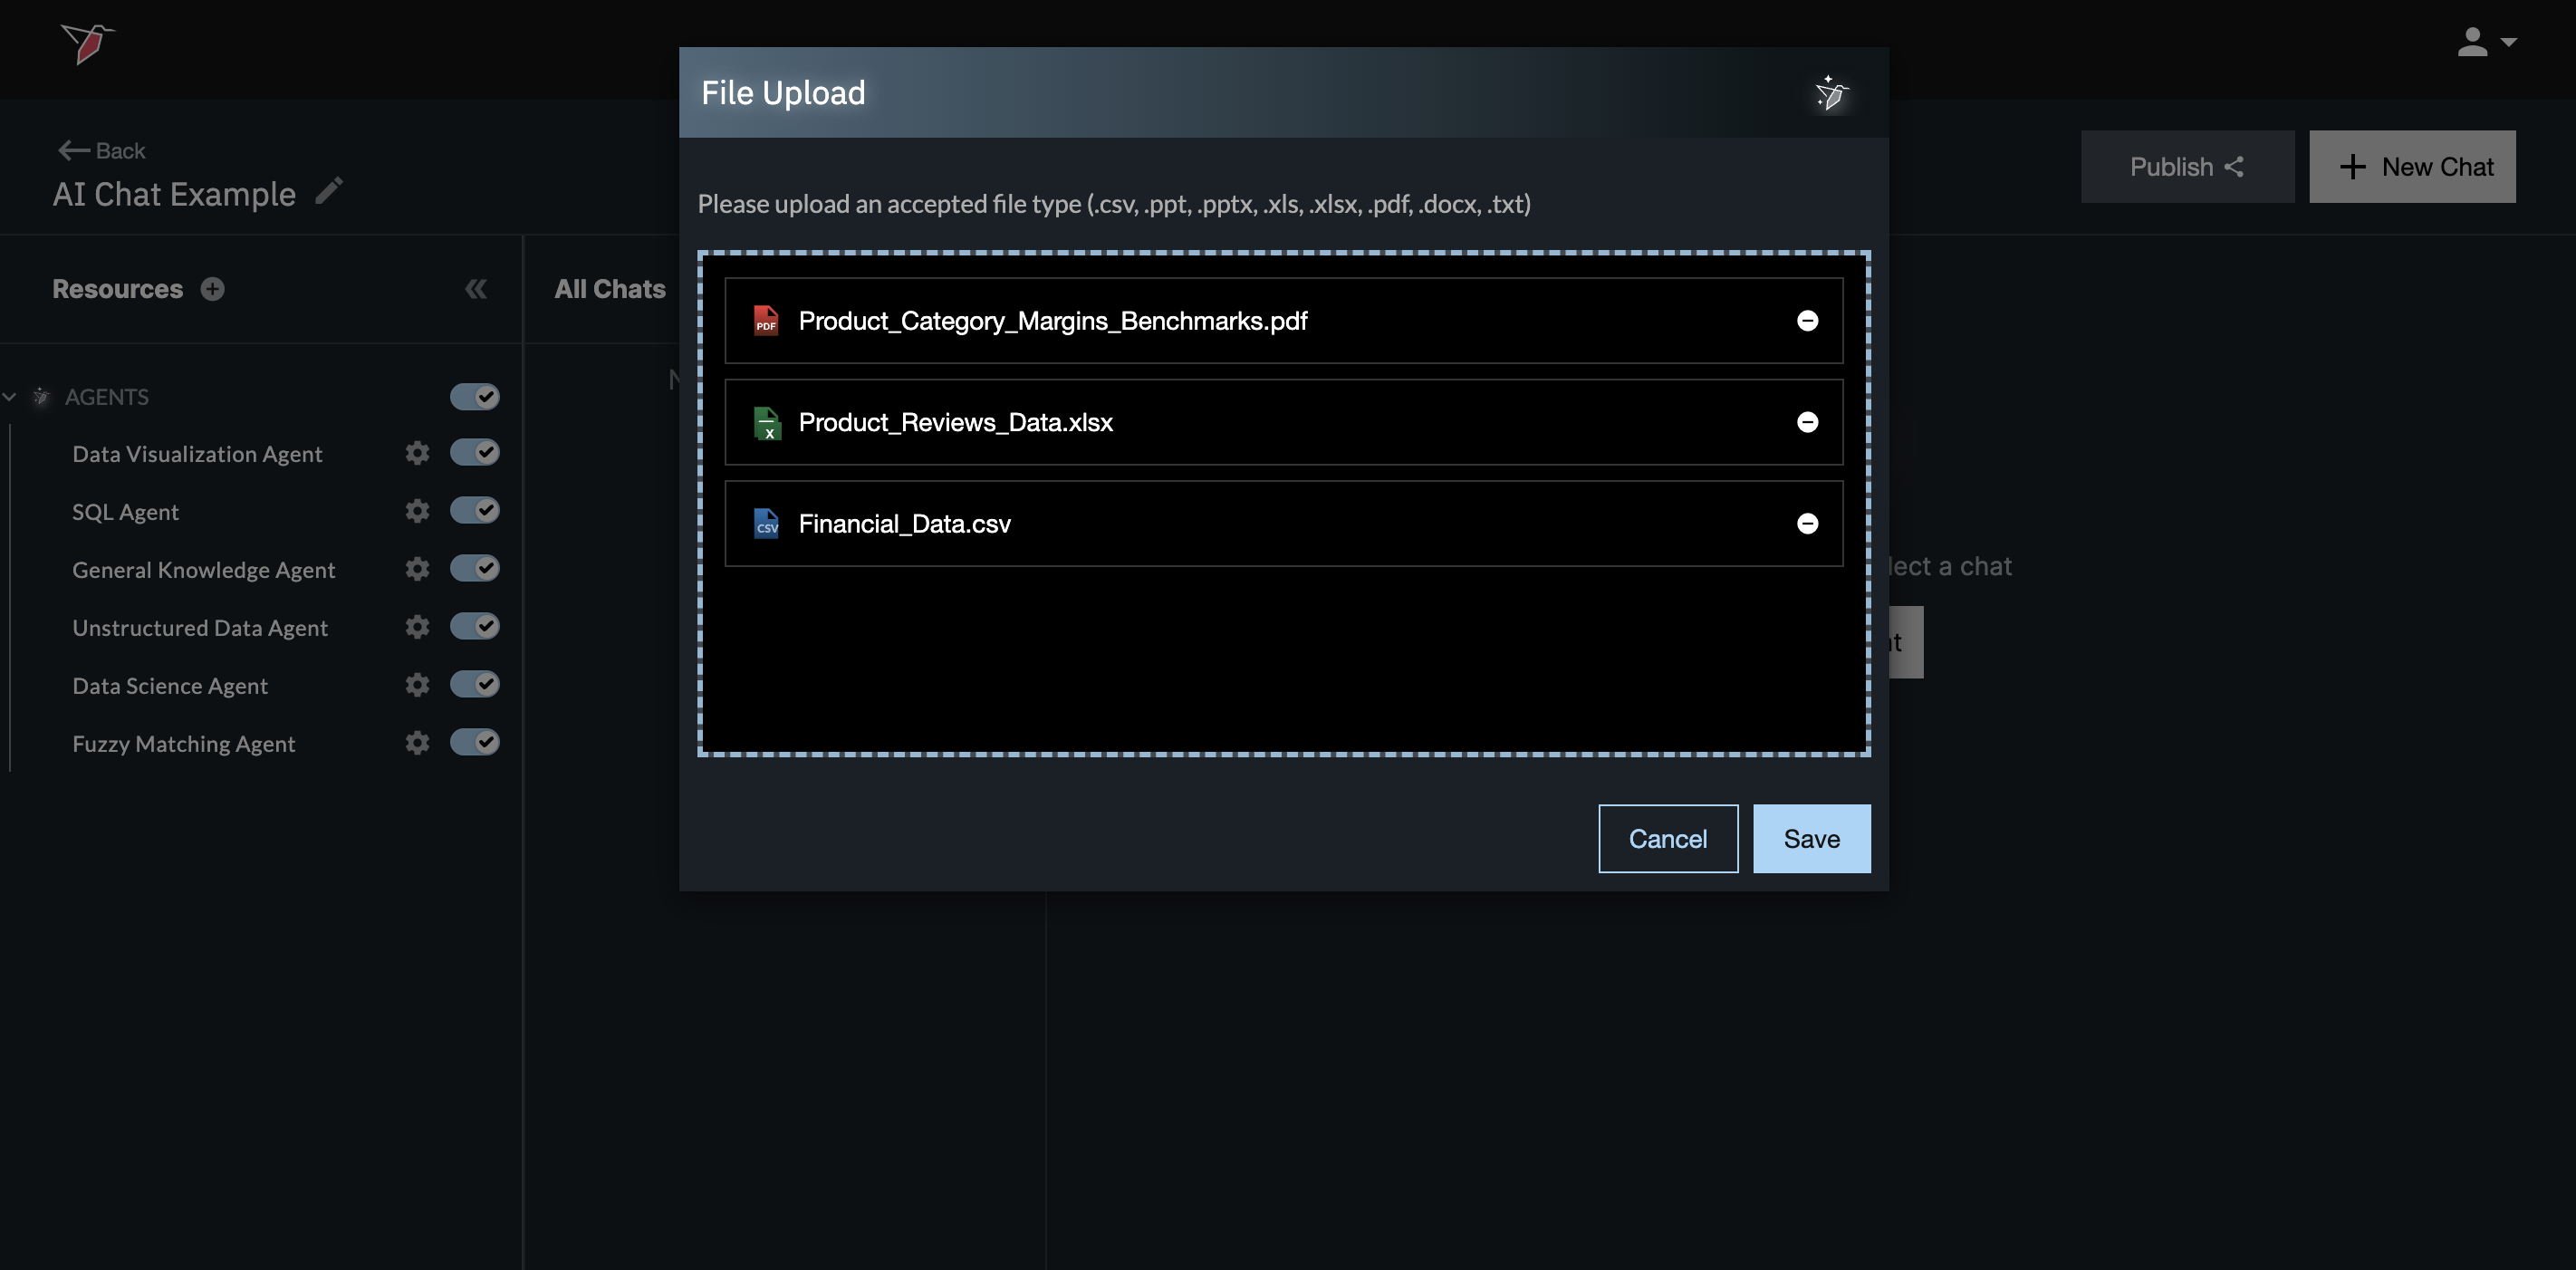
Uploading a Document
- To upload a document directly, click the plus (+) icon in the upload section, then drag and drop one or more documents into the upload area, or click Click to upload. When you’ve added all the documents you want, click Save.
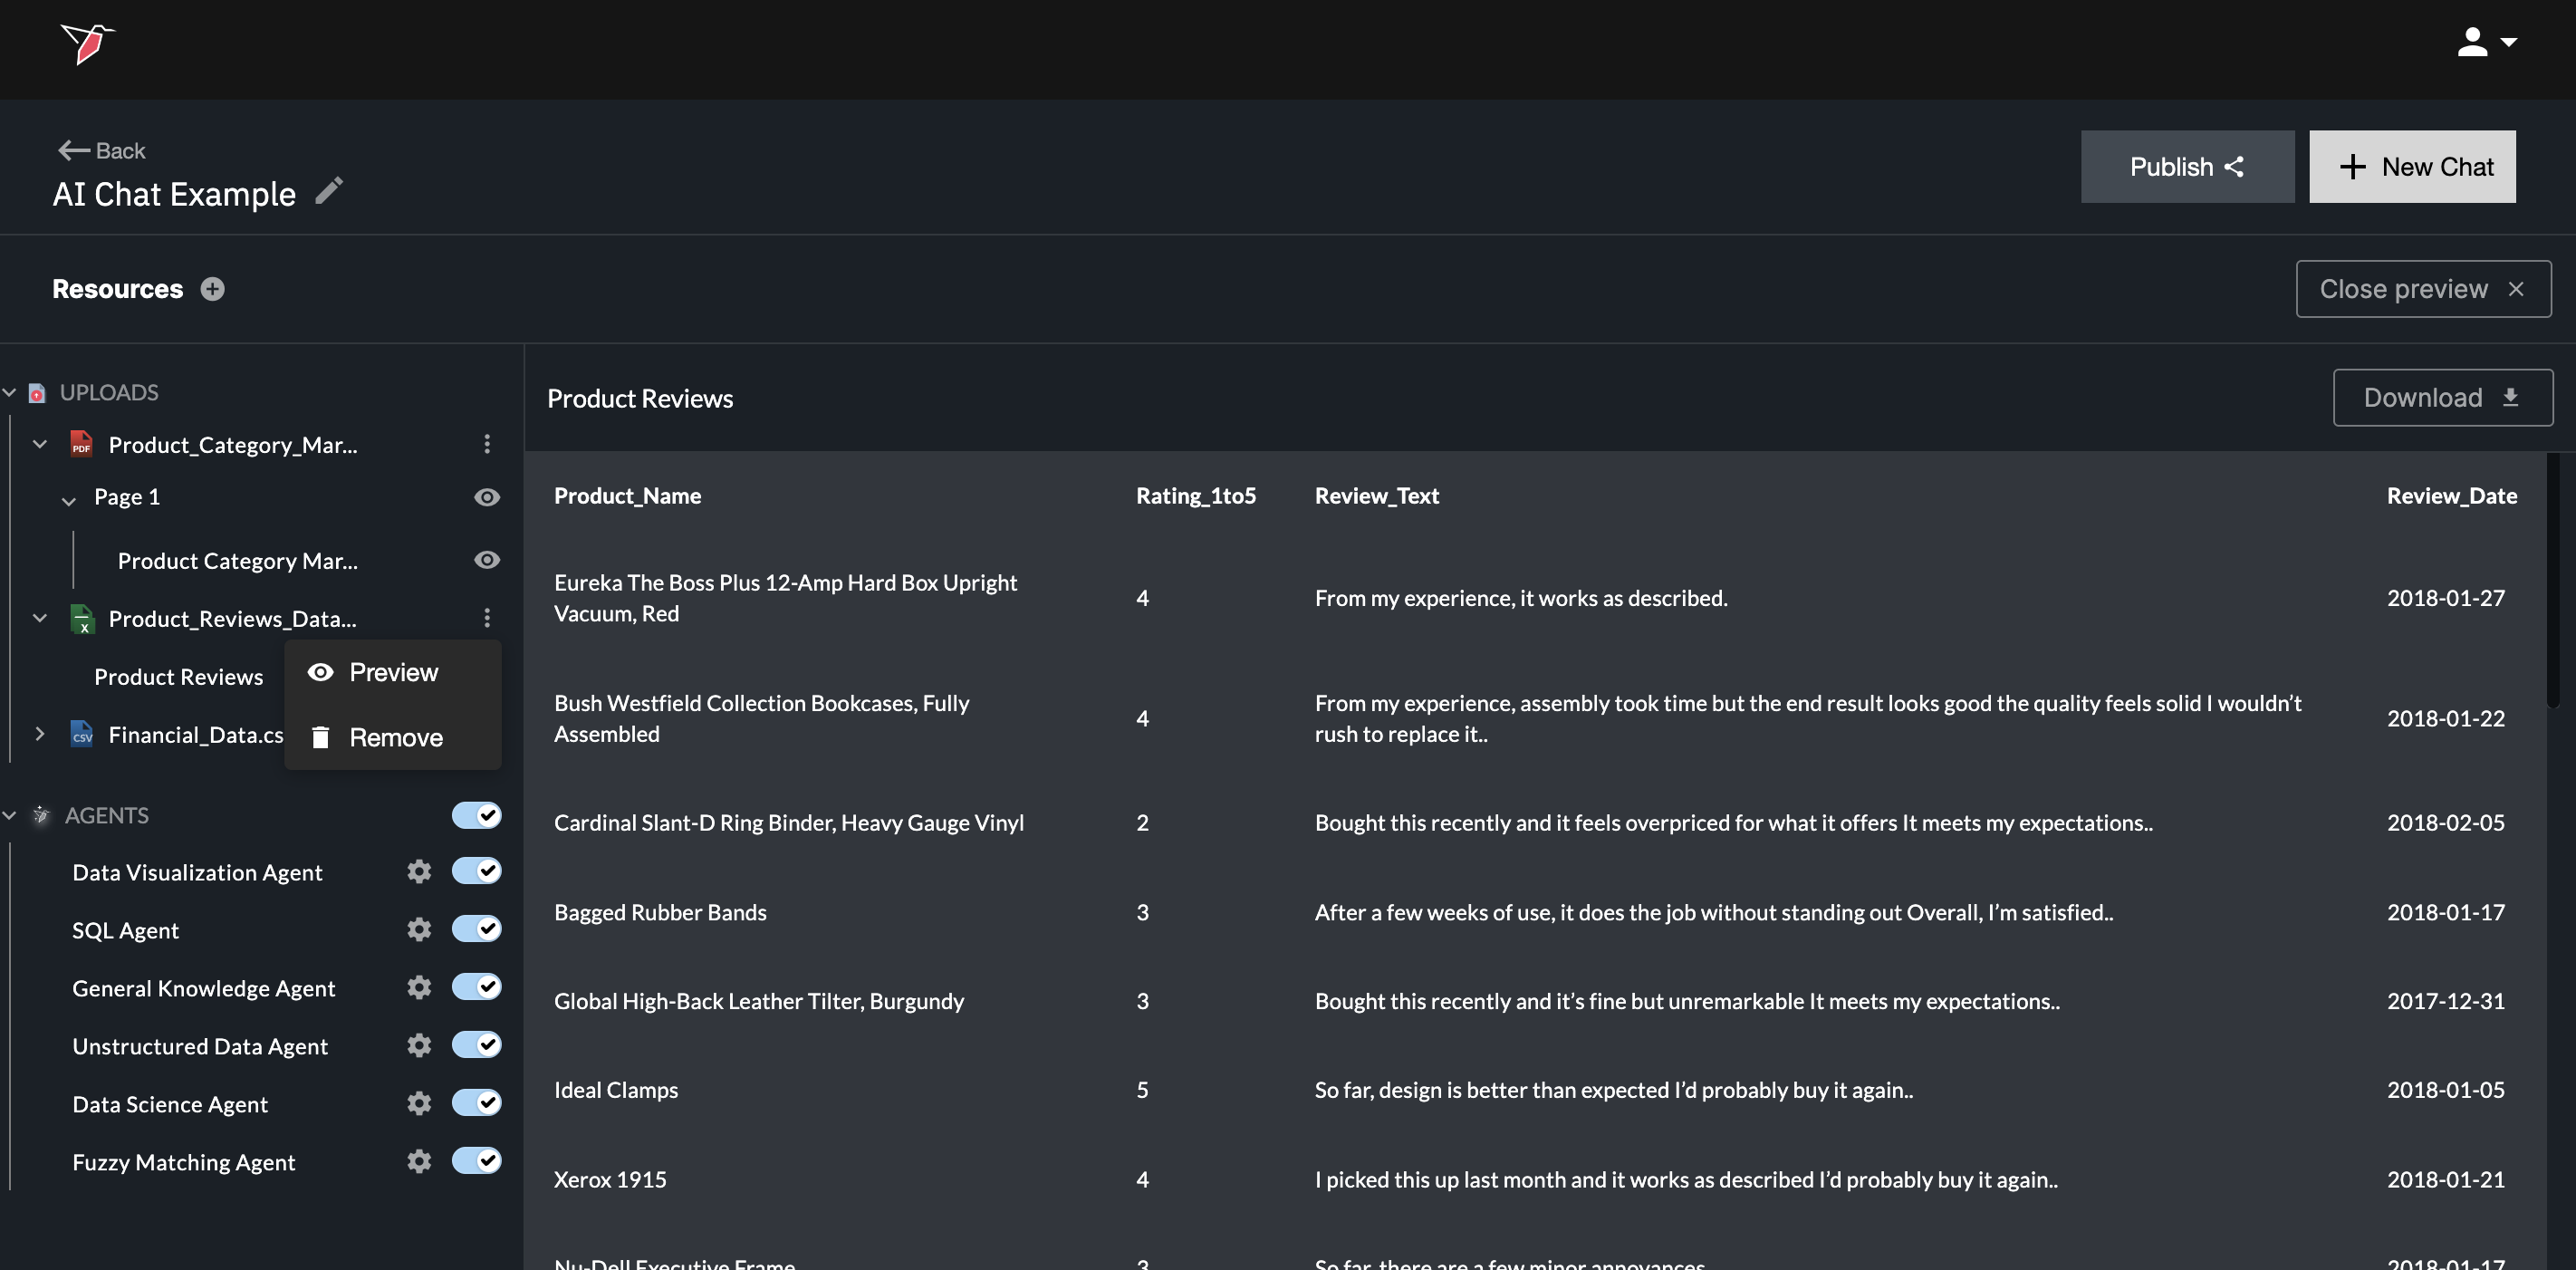
- Once uploaded, documents will appear in the upload section. Click the arrow next to a document to expand it and view individual pages or tabs, along with any extracted objects (for example, tables).
- At the document level, click the three-dot menu to preview or remove the document. At the page or object level, click the eye icon to preview specific content.
Connecting a Redbird Dataset Node
Connect a Redbird dataset node to the AI Chat node on the canvas. Any connected datasets will automatically appear in the Resources panel. For more information on data collection in Redbird, see here.
- Structured, tabular datasets will appear under Redbird Objects.
- File collections (typically used for unstructured data) will appear under sections based on how they were ingested, such as Google Drive, Email Collect, or File Uploader.
For any dataset added, you can click the eye icon to preview its contents.
For structured tabular Redbird datasets (listed under Redbird Objects), clicking the edit (pencil) icon opens a modal displaying dataset metadata in JSON format. This metadata is generated by Redbird AI by scanning the dataset. You can edit or enhance it to make it more accurate or descriptive, which helps Redbird’s AI agents better understand and work with the data.
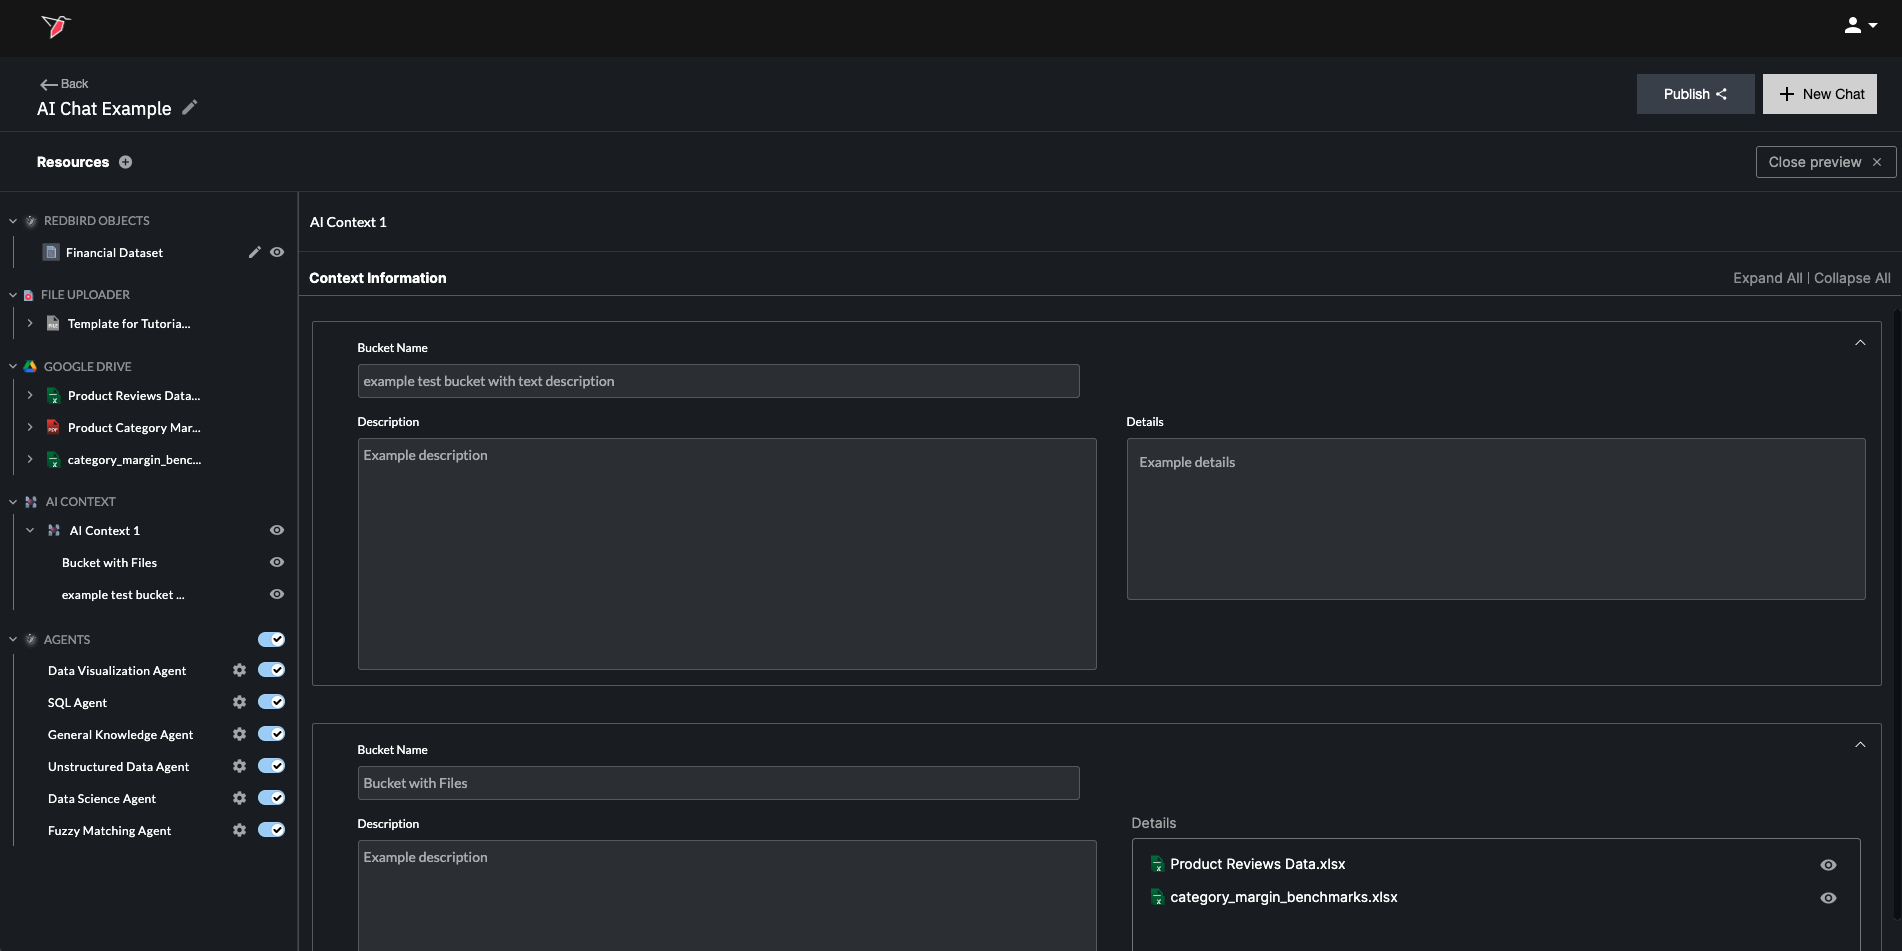
Context
The AI Context node lets you provide shared business context that helps Redbird’s AI better understand how to interpret your data and answer questions. This is useful when your data relies on company-specific terminology, acronyms, assumptions, or metric definitions that wouldn’t be obvious from the data alone.
Once an AI Context node is added to the canvas and connected to the AI Chat, it will appear in the Resources panel under the AI Context section. By default, this context is automatically taken into account every time a question is asked in the chat.
For any context node that’s been added, you can click the eye icon at the node level — or on individual context buckets — to preview its contents.
See here for more information on creating and using AI context.
Using the Chat
Now that the chat is configured you can start to interact with it in natural language to interrogate and explore your data. There are two main areas to do that in.
Chat Threads Panel
Click Add New Chat to create a new chat thread.
The Chat Threads panel displays all chat threads associated with this AI Chat node. Each thread can be renamed and used for a different topic, question set, or line of investigation.
Using multiple threads helps you organize your work and explore different questions without losing context. When responding, AI agents take into account only the history of the currently active thread.
You can create multiple chat threads within the same AI Chat node. All threads share access to the same input sources, while each thread maintains its own independent conversational context.

Chat Interface
The main chat interface is where you interact with the AI. This is where you enter questions and view responses. You can begin submitting prompts at the bottom of the chat view through the prompt bar (by clicking the arrow icon or hitting the Enter key after typing your prompt).
See the article here for a list of best practices around creating prompts.
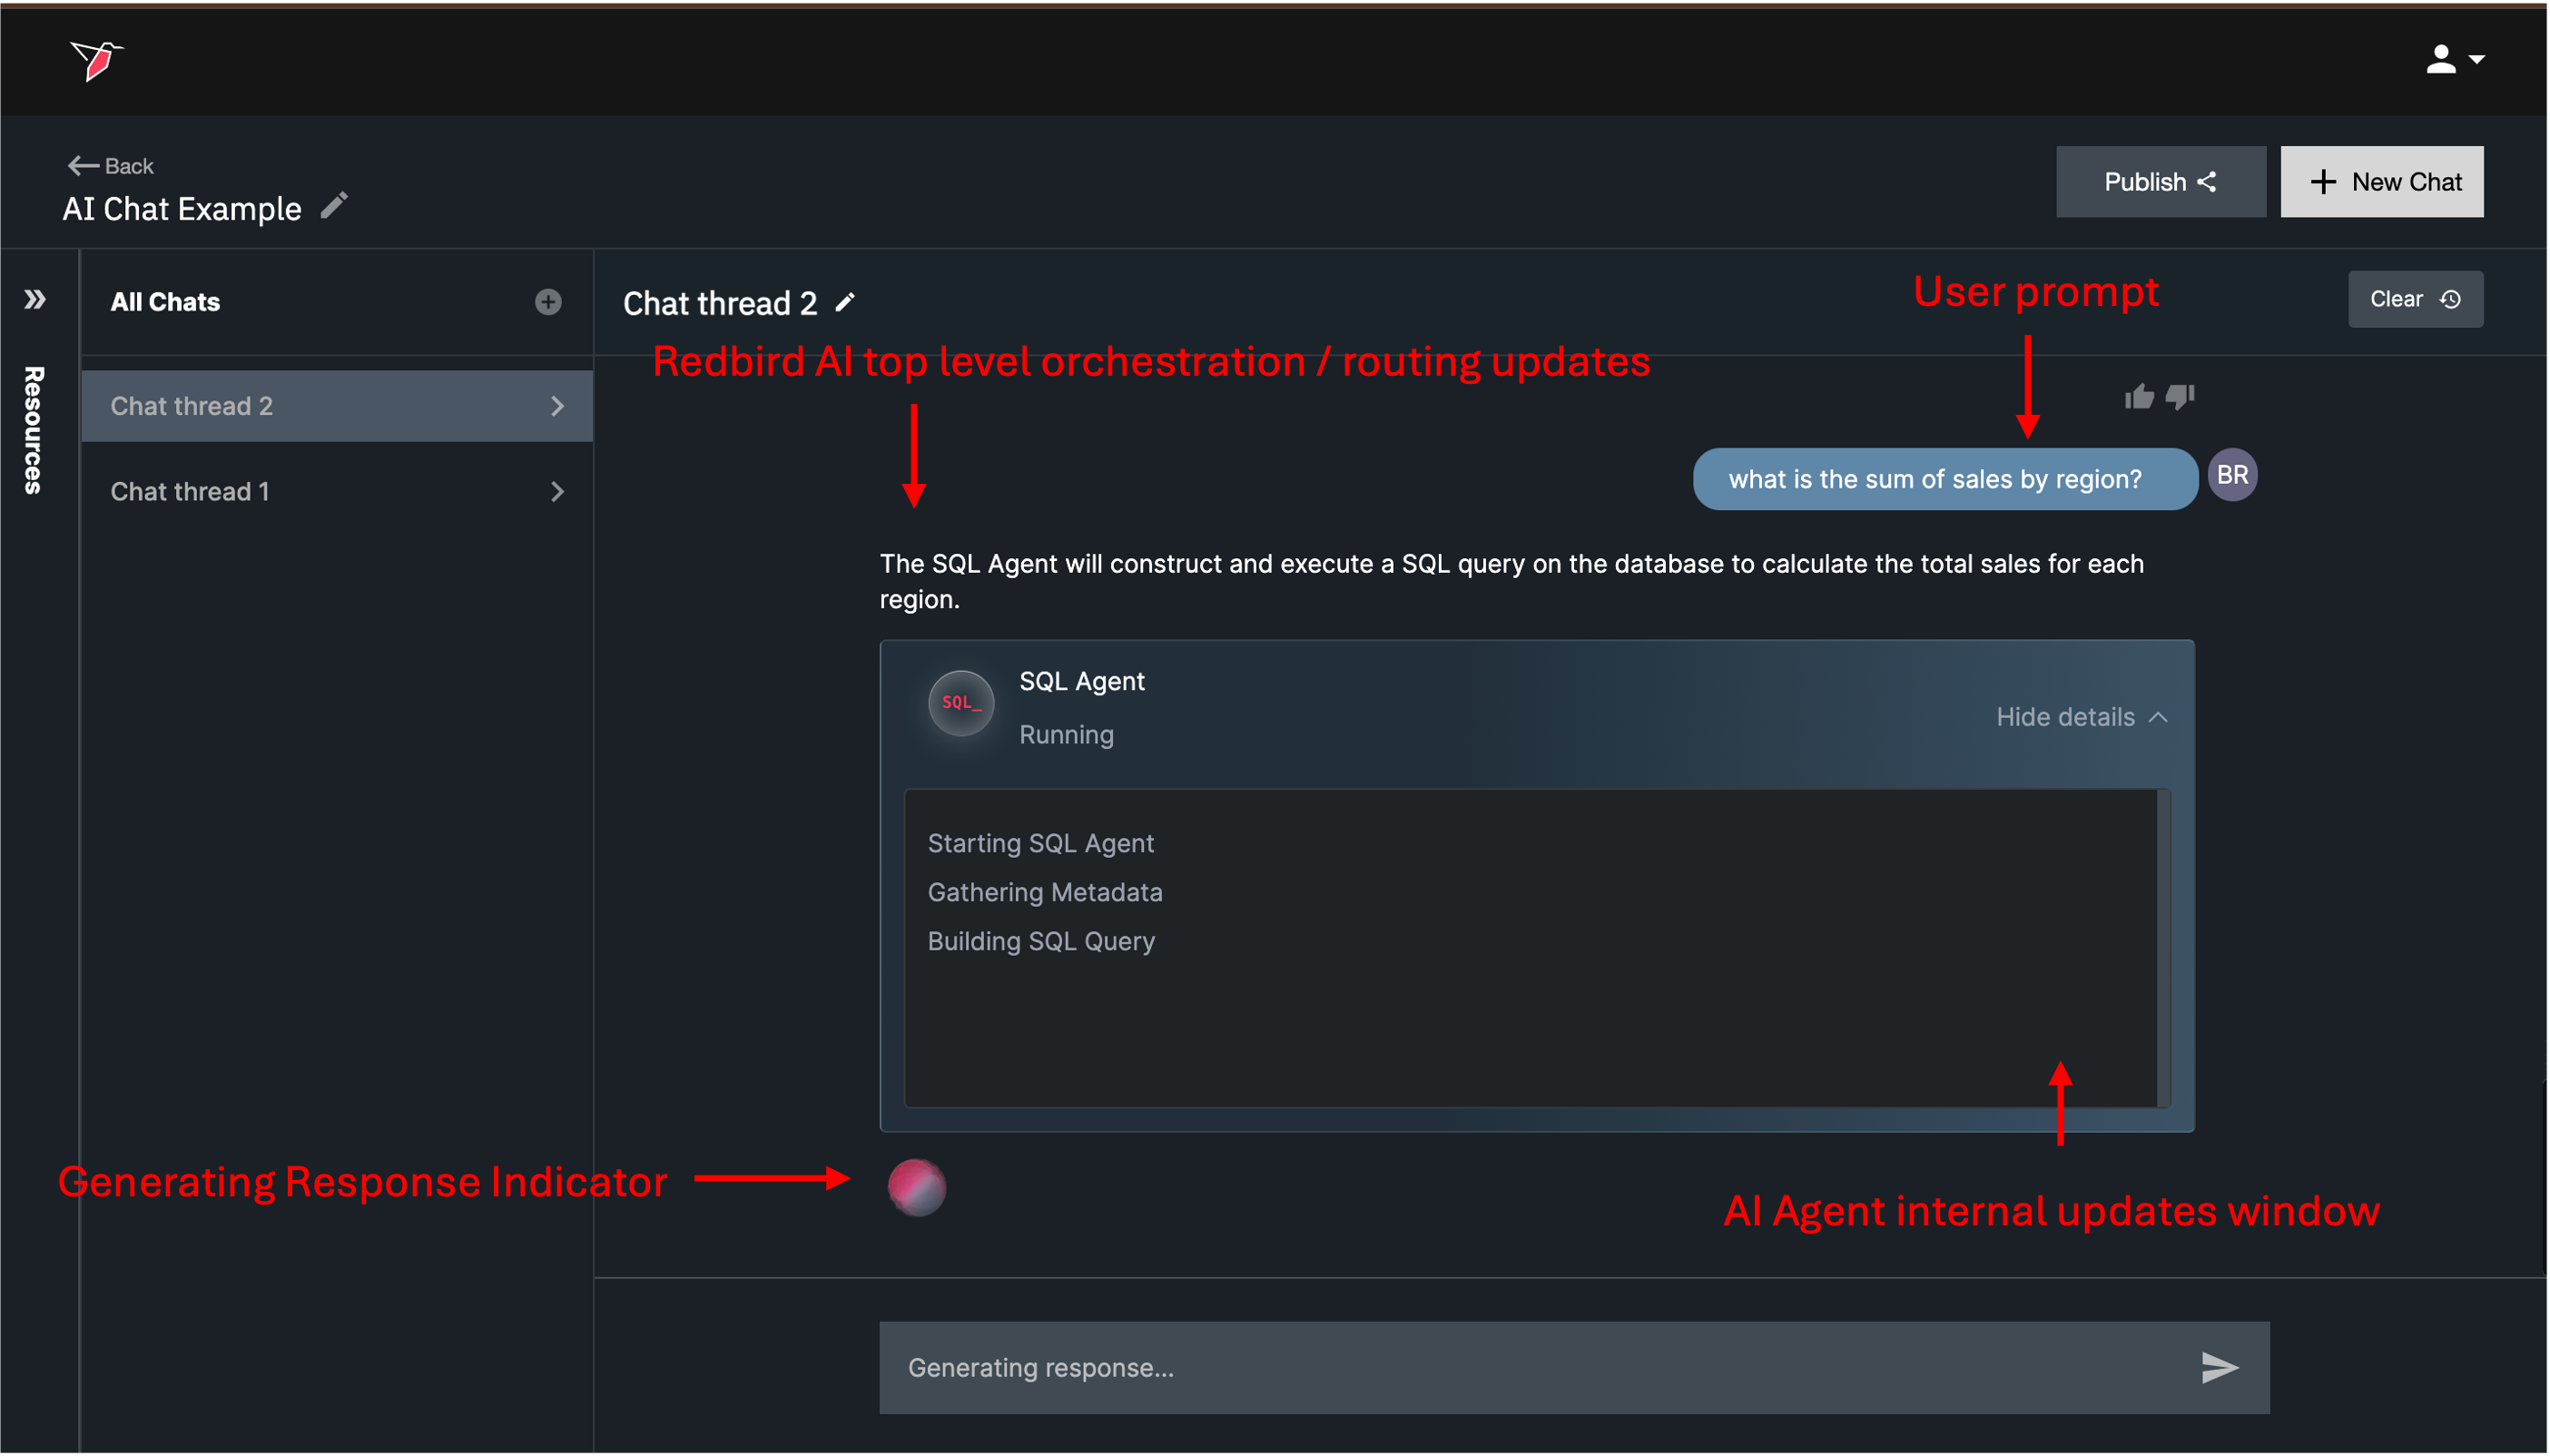
After submitting a prompt, Redbird AI will start working to generate a response and you will see the following elements below your prompt in the chat thread:
- A red pulsating ‘Generating a response’ indicator
- This indicator lets you know that Redbird AI's top level orchestration and routing is underway
- Redbird AI top level updates
- As top level updates or responses are available, Redbird AI will stream new information in the chat thread
- AI agent update windows
- Each AI agent recruited by Redbird AI's top level router will show up in the chat thread as a separate update window
- Within this AI agent update window, you can see updates on the inner workings of the AI agent as it executes different tasks to respond to your prompt
- The AI agent update window can be collapsed at any time to hide the detailed updates for that specific AI agent
- Multiple AI agents may be run in parallel to respond to your request
.
When Redbird AI has fully finished processing your request with the help of the recruited AI agents, the ‘Generating a response’ indicator will go away and the completed AI response will be added to the chat thread
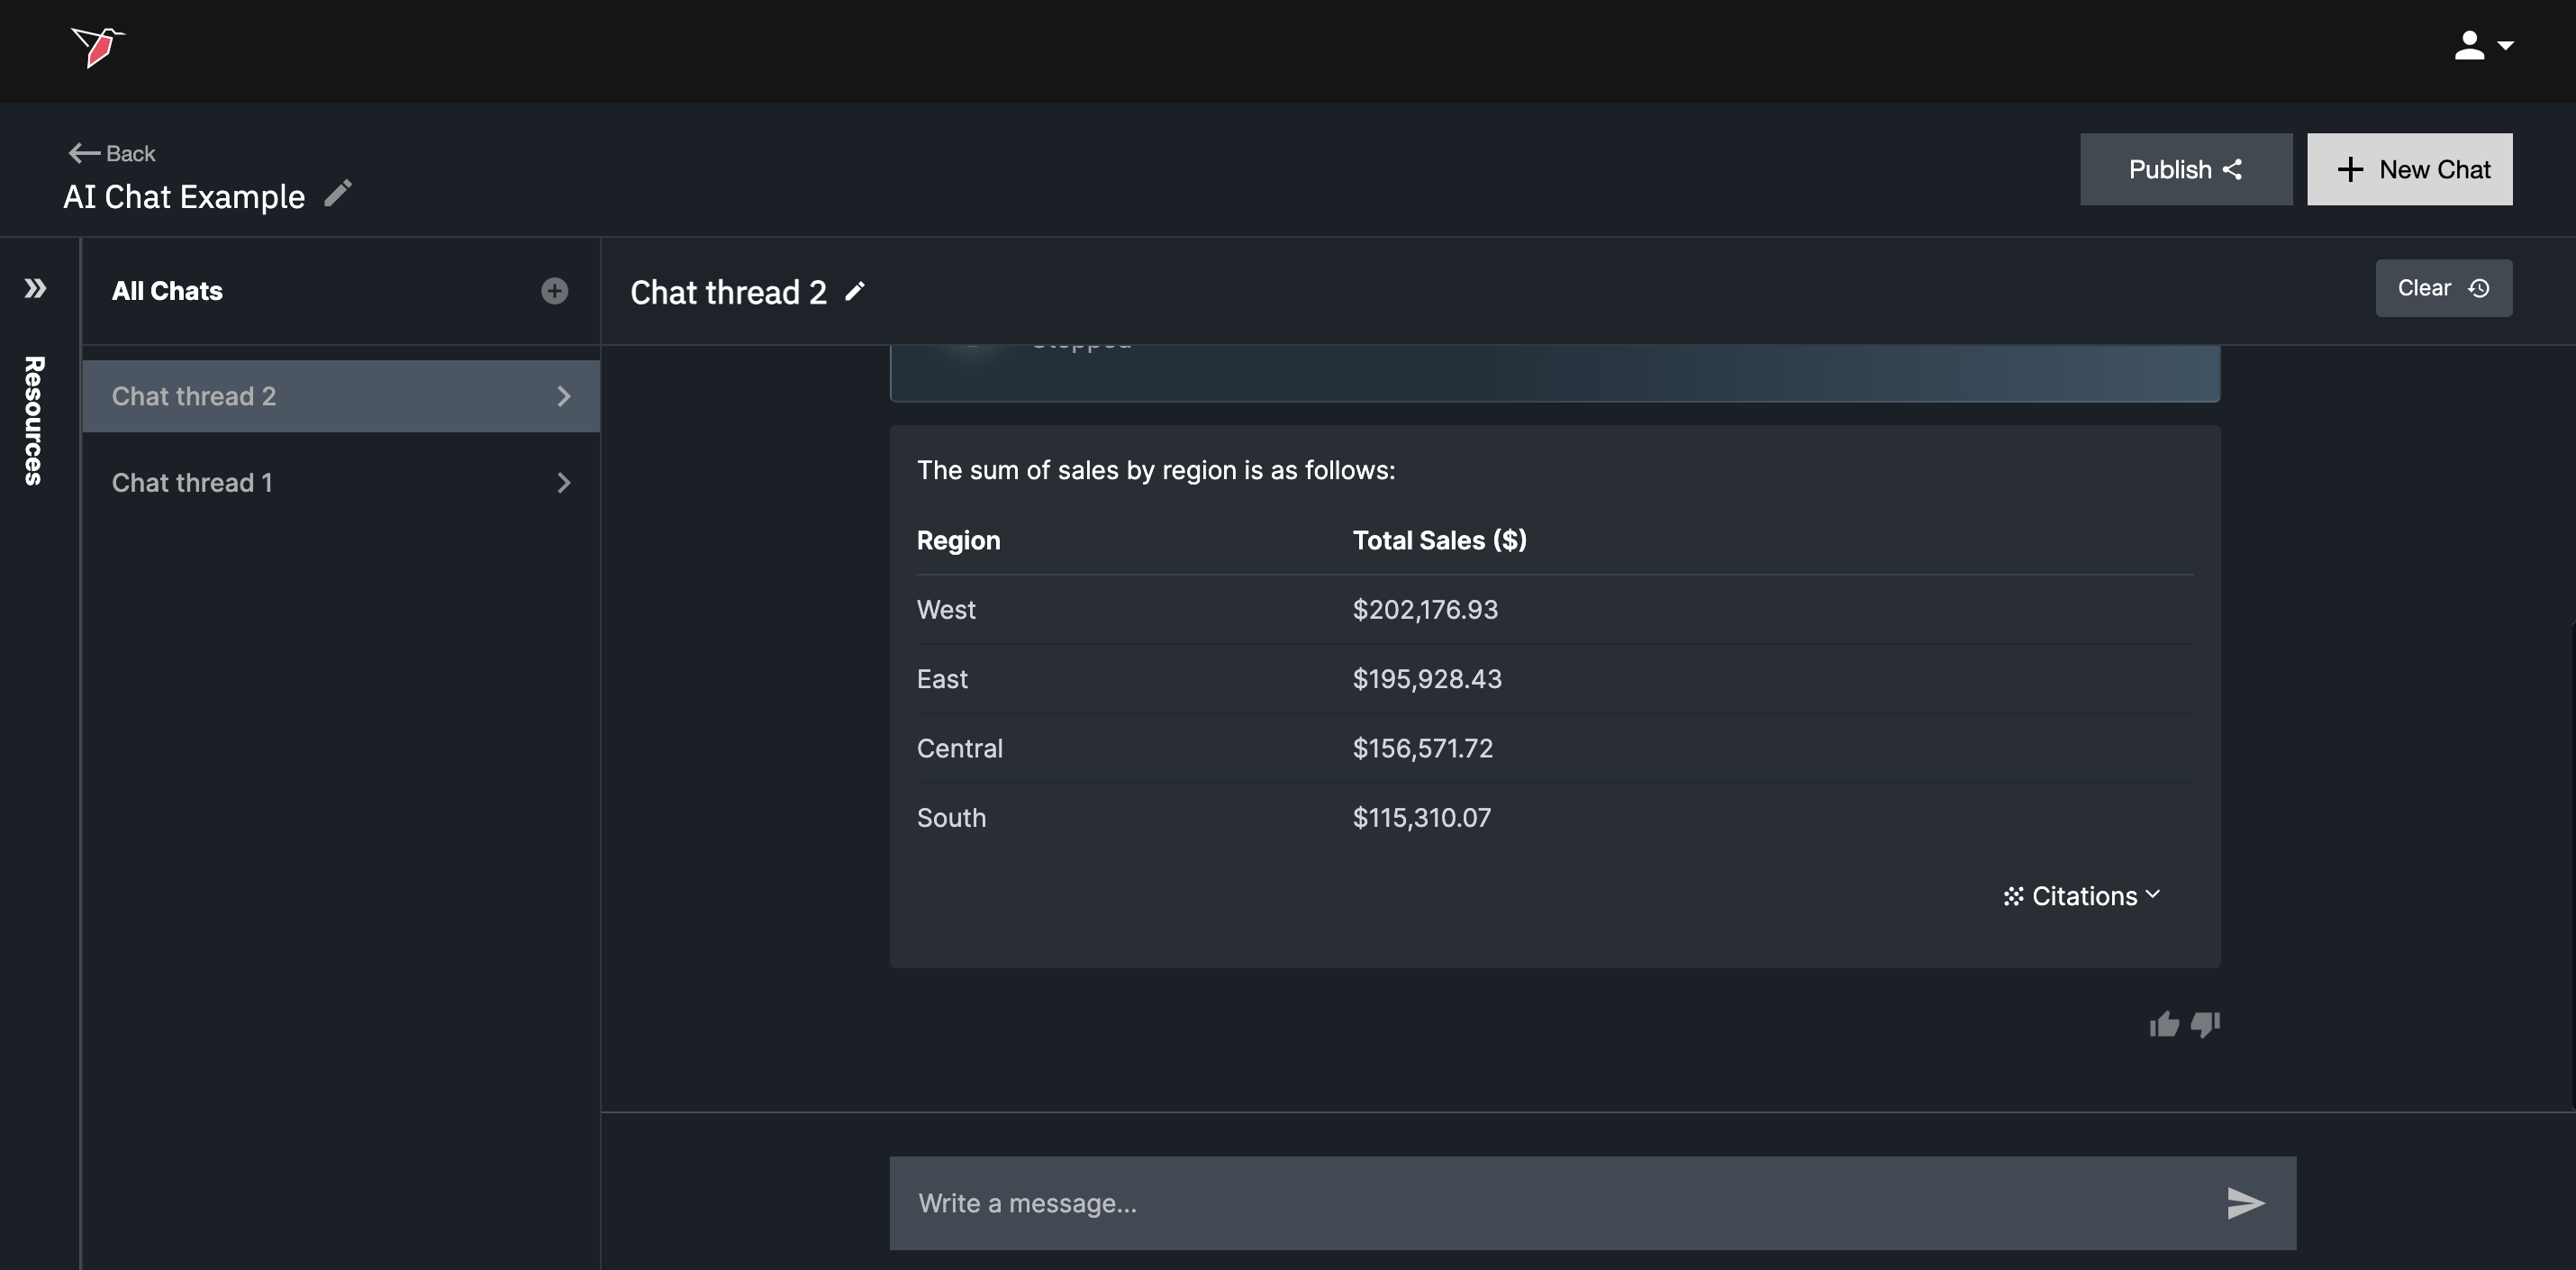
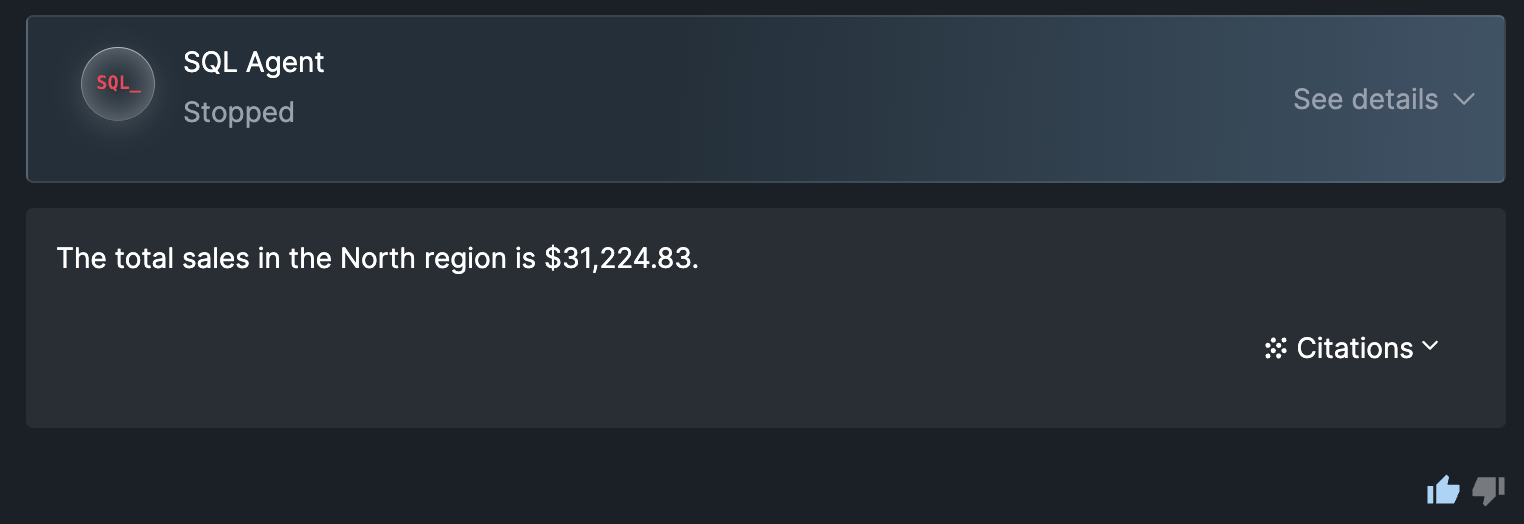
Redbird AI responses may include Citations or Configurations in the chat thread that provide more detail on how the AI executed its work.
- Citations are typically informational and give the user more details on the AI logic inline in the chat thread (e.g. queries / code snippets executed by the AI or reference to specific data sources / documents used to answer the question). You can expand and view citations by clicking on the 'Citations' action on the bottom right of the AI response. If an AI context node was connected to the chat and that context was used to respond to a question, that will also be included in citations.

- Configurations provide visibility into more involved operations within the AI's workflow. You can click through to see the configuration details in a new tab by clicking on the eye icon next to a configuration. Within the configuration details tab that opens up you can also modify the configuration through the point-and-click interface then save your changes. When you return to the chat your saved changes will now be used by the AI from that point forward when executing the operation.

Providing Feedback
You can improve the way an agent answers questions by providing feedback.
- Positive feedback lets the agent know that a response was correct or particularly good.
- Negative feedback allows you to guide the agent on what it did wrong, or how it could answer similar questions more accurately in the future.
Any feedback you provide is incorporated into the agent’s logic and may affect the responses seen by other users.
How to provide feedback
You can give feedback by clicking the thumbs icons at the bottom of each response.
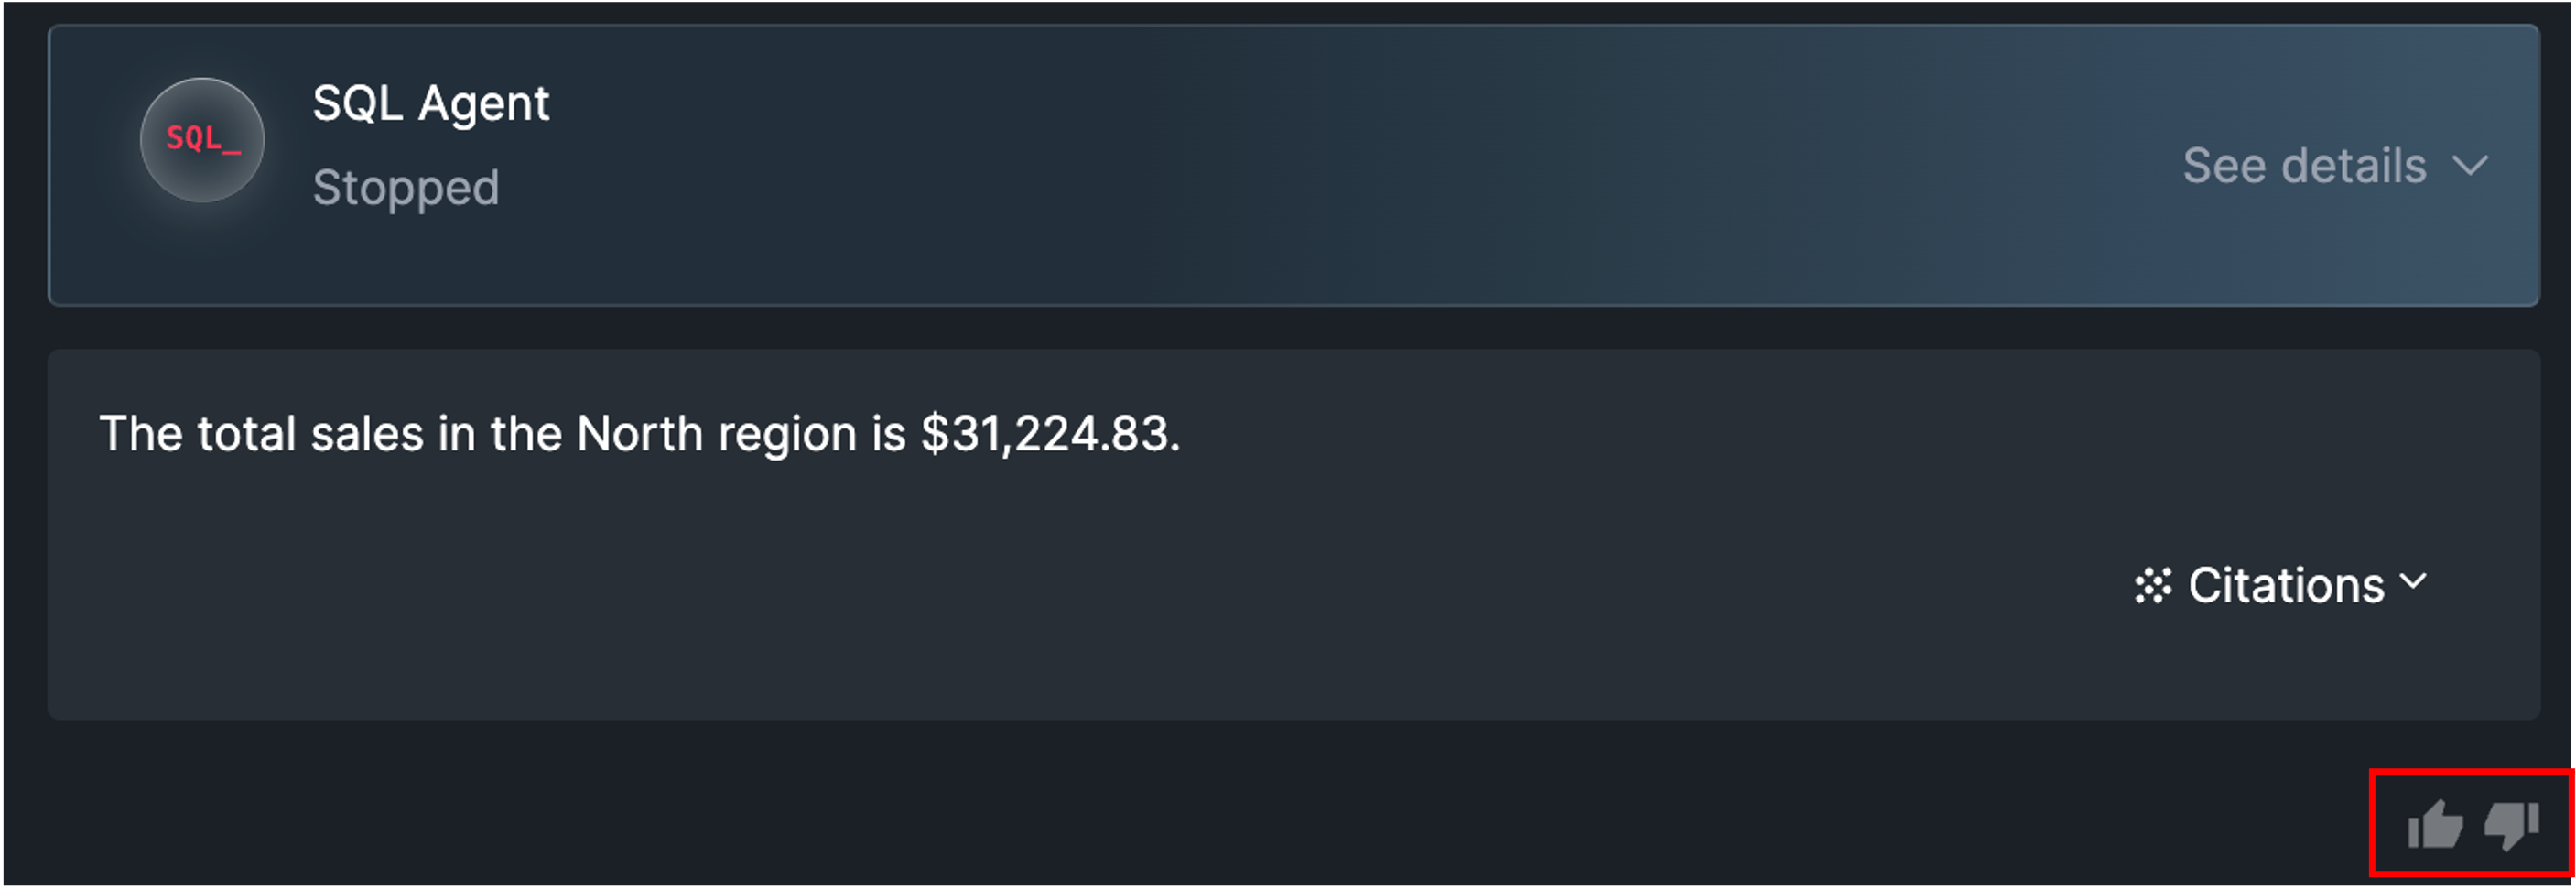
- Clicking the thumbs up simply registers positive feedback. The icon will appear selected/highlighted to indicate it has been recorded. You can undo this by clicking the thumbs up again.
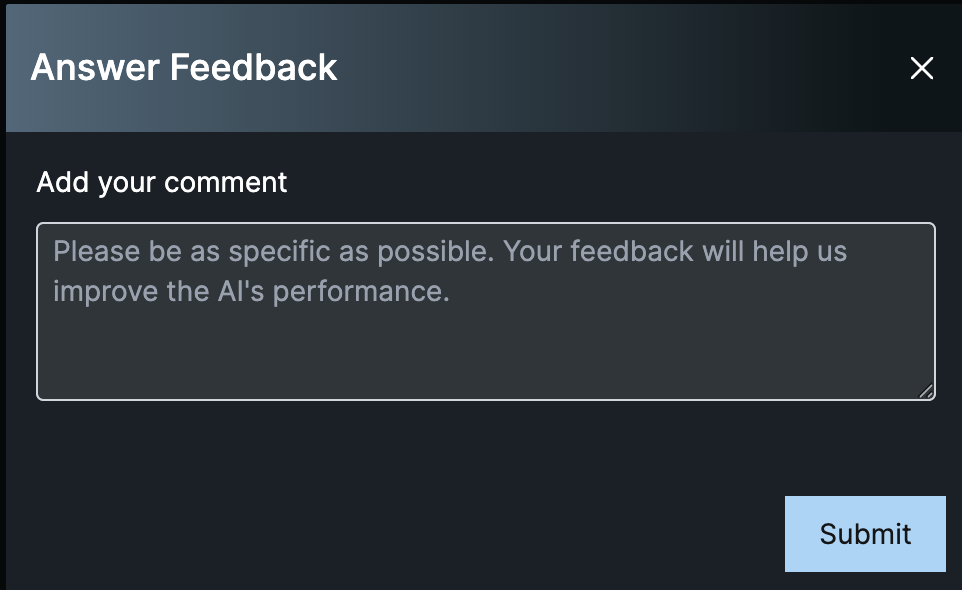
- Clicking the thumbs down opens a screen where you can enter written feedback. Click Submit to save your feedback. Click the X in the top-right corner to cancel and exit without saving.
- If you click the thumbs down again, you will have the option to review and edit your existing feedback. Click Update again to save changes or Delete to remove the feedback entirely. Click the X to cancel and exit without making any edits changes.

Publishing an AI Chat
Once you have configured and tested your AI Chat, you can then publish and share the AI Chat with other users. See more on publishing and sharing your AI Chat here.
How AI Chat stays in sync with your workflow
An AI Chat node maintains a live link to the rest of the workflow. Any time upstream nodes are run and data is refreshed, the updated data becomes instantly available without needing to manually rerun the chat node. This is also the case for a published AI Chat.
If you want to run staging or validation tests, we recommend setting up a parallel workflow (on the same or a different canvas). This allows you to refresh data and run any checks you need before updating the live workflow.